Instructions for confirming trust in applications on iPhone

When you install an iPhone application from the Apple Store, the application is always checked for safety. However, when you install an application on your iPhone from another source, you will need to manually confirm that the application is trusted. Then the application will be installed on your iPhone for use. The article below will guide you to confirm that the application is trusted on your iPhone.

How to trust apps on iPhone

Step 1:

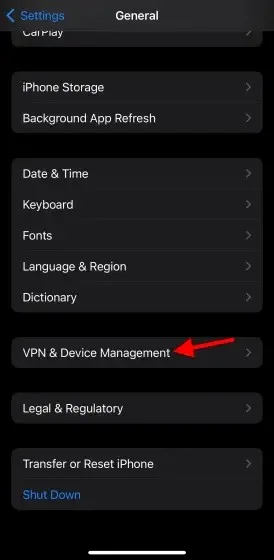
On the iPhone interface, click on Settings and then click on General . Switch to the new interface and click on VPN & Device Management .
Instructions for confirming trust in applications on iPhone

Step 2:

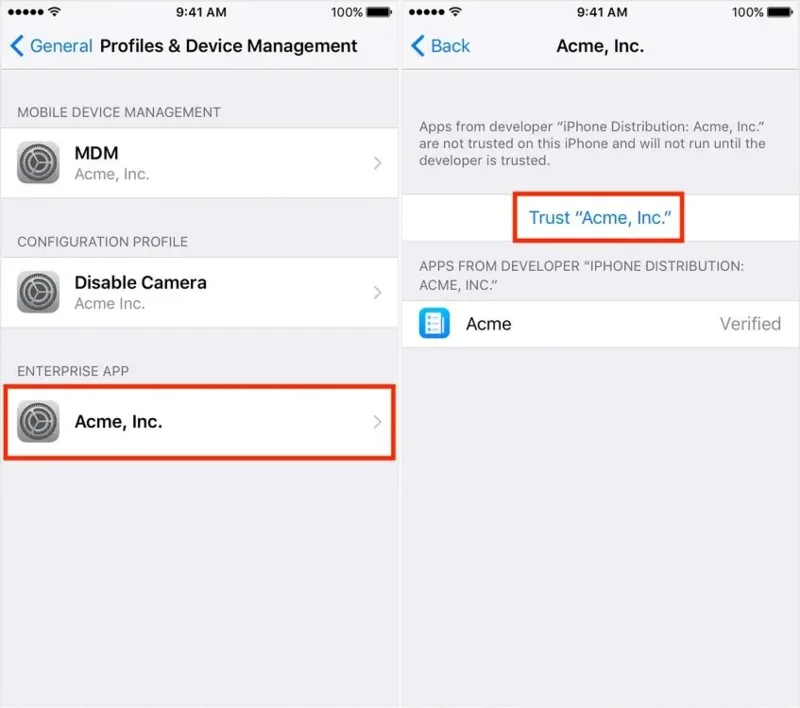
Now you will see the names of the Developer App developers, you click on the developer that needs to confirm the trust of the application . Next, you click on Trust to confirm the trust of the application from this developer.

Instructions for confirming trust in applications on iPhone

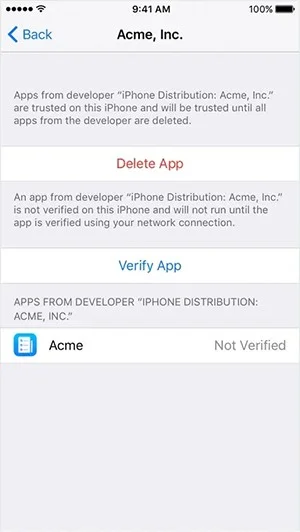
Note that to set up application trust verification, you need to connect to WiFi on your iPhone. When the phone is not connected to WiFi, the application installed by the developer will display Not Verified. To use the application, you just need to connect to WiFi and press Verify to use the application.

Instructions for confirming trust in applications on iPhone

Leave a Comment

Enable SLES Live Patching and Verify a Kernel Fix

Enable SLES Live Patching and Verify a Kernel Fix

Set up the right Live Patching path for SLES 16.0 or 15 SP7, apply eligible kernel fixes, and confirm what is active without confusing it with a reboot-required kernel update.

Install and Sign Custom Kernel Modules on SLES 15 Secure Boot

Install and Sign Custom Kernel Modules on SLES 15 Secure Boot

Load a custom SLES 15 kernel module without disabling Secure Boot. Match the running kernel, sign the .ko file, enroll a MOK key, and verify loading.

Keep Services Available During a SLES 15 SP5 to SP6 Upgrade

Keep Services Available During a SLES 15 SP5 to SP6 Upgrade

SLES 15 SP5 can migrate online to SP6, but each node must reboot. Use a tested rolling upgrade or blue-green cutover to keep workloads reachable.

Apply the SLES 15 STIG Safely with OpenSCAP

Apply the SLES 15 STIG Safely with OpenSCAP

Use SUSE’s supported STIG profile to scan SLES 15, test remediation, review remaining findings, and retain assessment evidence.

Restore Cockpit Access to SUSE Linux Enterprise Server

Restore Cockpit Access to SUSE Linux Enterprise Server

Trace a failed Cockpit connection through DNS, port 9090, the systemd socket, firewalld, TLS, and login settings using current SUSE guidance.

Configure Reliable Ethernet Failover with SLES 15 Bonding

Configure Reliable Ethernet Failover with SLES 15 Bonding

Create a redundant Ethernet connection on SLES 15 with YaST and Wicked, configure active-backup bonding, and verify both ports and failover.

Build a Reusable AutoYaST Profile for SLES 15 Installs

Build a Reusable AutoYaST Profile for SLES 15 Installs

Turn an existing SLES 15 system into a reviewed AutoYaST profile, validate it, and use it to deploy a test server with fewer manual steps.

SLES 15 KVM Setup: Make Selected VMs Start at Boot

SLES 15 KVM Setup: Make Selected VMs Start at Boot

Install the SLES 15 KVM and libvirt tools, enable the right host service, and configure selected virtual machines to start after a reboot.

Diagnose a SUSE Server That Hangs at the systemd Shutdown Screen

Diagnose a SUSE Server That Hangs at the systemd Shutdown Screen

Use systemd jobs and the previous boot journal to locate a slow service, mount, or storage dependency, then correct it without masking the cause.

Open Only the Web Traffic Your SLES 15 Server Needs

Open Only the Web Traffic Your SLES 15 Server Needs

Use firewall-cmd to inspect the active zone, allow HTTP safely, preserve SSH access, and verify that the rule survives a reload on SLES 15.