Since DAIKIN's air conditioning products are very popular in the market today, it is very important for users to understand the basic features of the DAIKIN air conditioner controller. To know the most appropriate way to use the DAIKIN air conditioner control, WebTech360 will introduce you the features, how to use it as well as how to connect the controller to your smartphone!
Structure of the DAIKIN air conditioner
DAIKIN's products, outside of the usual structures, are also designed according to the criteria of compactness and sophistication:
- Display screen: Helps users to know the current operating status of the machine. Under the screen there is also an LED illuminator so you can use it in dark areas.
- Function keys: Change, adjust the function of the air conditioner.
- PIN: provide energy for product activities.
>> Should buy the best air conditioner, save electricity
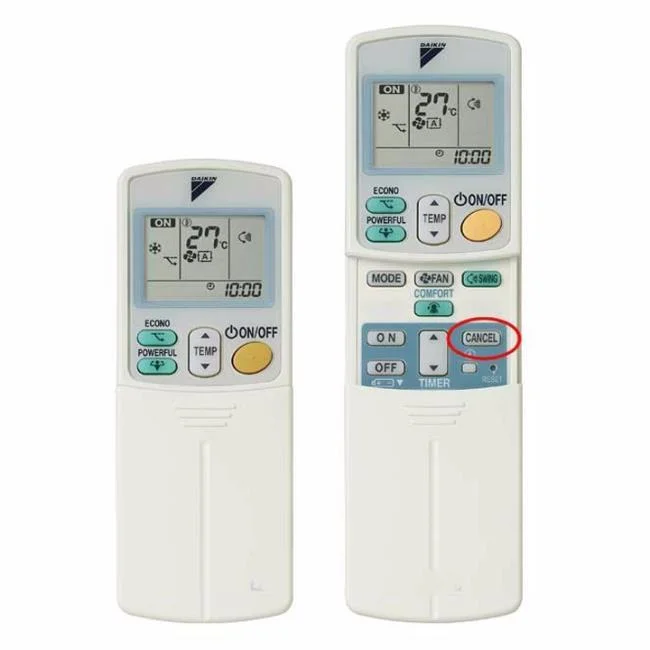
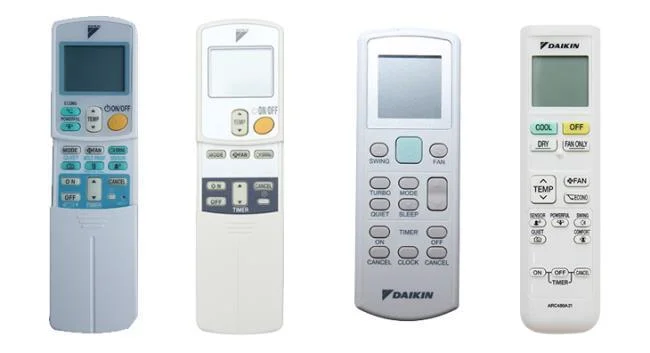
The controls are designed to be compact and sophisticated.
Function keys and how to use DAIKIN air conditioner controls
Function keys on the remote
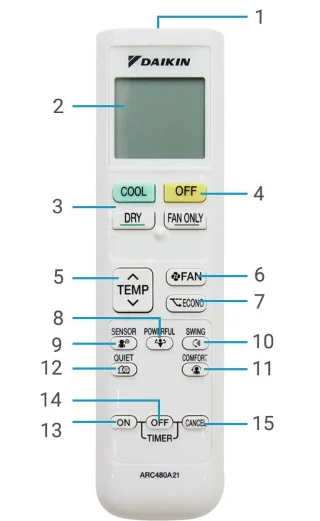
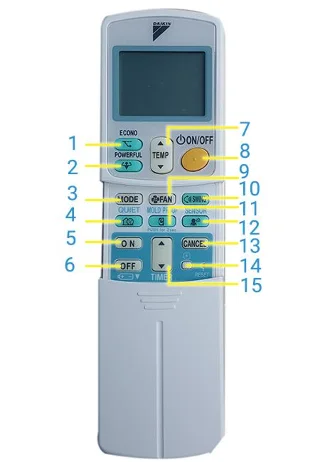
On the 1-way DAIKIN air conditioner controller will contain the main features such as:
- TEMP: Temperature adjustment button.
- POWERFUL: The button activates the quick cooling function.
- ECONO: Button that activates power saving mechanism.
- FAN: Set fan speed and adjust air flow.
- MODE: Selecting operation mode (cooling, drying or fan only) for air conditioner.
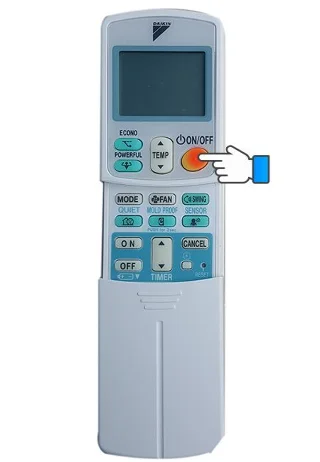
- ON / OFF: The button on / off the air conditioner (Power button).
- CANCEL: Cancel timer setting
- TIMER: Set timer mode.
- ON: Timer turn on the air conditioner.
- OFF: Timer turn off the air conditioner, activate the operation mode at night.
- SWING: Flexible adjustment of wind direction.
- COMFORT: Change the wind direction upwards, avoid cold wind blowing directly on the person.
QUIET: Reduce noise
- SENSOR: Intelligent eye sensor button: Within 20 minutes, if the infrared sensor does not detect movement in the room, the air conditioner will automatically increase or decrease the set temperature (2 degrees Celsius) ) to save energy.
Not only that, on the two-way DAIKIN controller, there is also a MOLD PROOF feature. This is the feature that activates the mold restriction mode. With this feature, the DAIKIN air conditioners ensure you have a cool space and clean air.

Although DAIKIN's controller types go through many models, they still have common features.
How to use the DAIKIN air conditioner controller
DAIKIN brand has constantly improved, providing consumers with the most convenient and easy-to-use products possible. Therefore, how to use DAIKIN air conditioner control is not complicated.
- With features such as MOLD PROOF, POWERFUL, ECONO, COMFORT, SENSOR and QUIET, users just need to click to activate and press one more time to turn off.
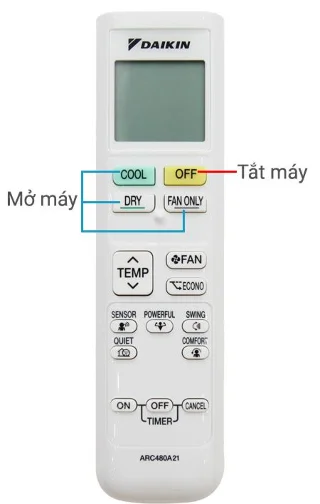
- Turning on / off the machine: For one-way DAIKIN, to activate the machine, users can press one of the 3 buttons: COOL, DRY or FAN ONLY and press the OFF button to turn it off.
- Automatic timer mode: You press one of the two ON and OFF buttons (on / off timer). Pressing 1 time increases by 1 hour. Users can schedule up to 12 hours. The orange light on the air conditioner will light to indicate that the timer is successful. To cancel this feature, simply click on the CANCEL button.
- Adjust the temperature: To increase the temperature, you press the arrow button on the upper half of the TEMP word and vice versa if you want to decrease the temperature.
- Change of wind speed: After pressing the FAN button, the air flow rate will be displayed by step.
Change the air flow direction: After pressing the SWING button on the remote, the flap will change the cooling position continuously and you just need to press SWING again when it reaches the position you want.
>> Consulting to choose air conditioning with a capacity suitable for the room area
Control Daikin air conditioner with smart phone
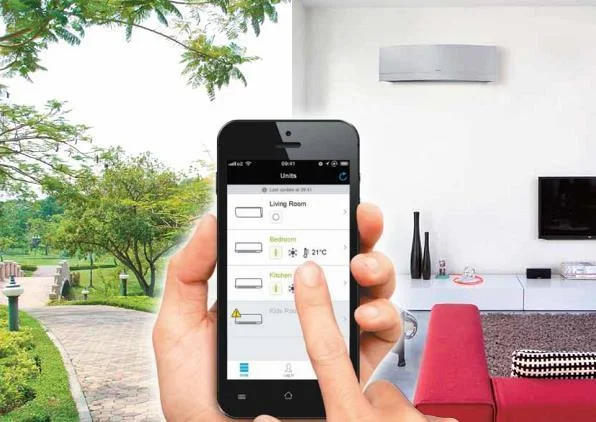
In mid-March 2016, DAIKIN officially launched product lines that can be controlled via a smartphone (Smartphone). With DAIKIN Mobile Controller application and extremely easy installation, you can monitor the air conditioner system and make sure the machine works as you want.

Users can easily monitor the operation of the air conditioner via the DAIKIN Mobile Controller app.
To be able to use this feature, users need to have a mobile controller DAIKIN BR072A42 provided by the company with a price of about 1.8 million VND, a smartphone that has downloaded the application and is connected to the Internet. This way, you can manage the inverter air conditioner from anywhere, helping to maintain homeowners' comfort while at the same time with optimal energy savings.
Following are the optimal features for DAIKIN air conditioner control
- The application still has the same control keys as a normal remote.
- Ability to adjust the temperature in the 2nd floor rooms from the living room.
- Even when you are outside, you can also monitor the status of the air conditioner: whether you have turned it off or not? What is the room temperature? ... and you can completely turn on the device before returning home to enjoy the cool air.
- Weekly schedule: With this feature, you can set up 4 types of air conditioner operations. The system will automatically turn on when you get home or turn off when you go out.
User manual for Daikin 1-way air conditioner controller Daikin Inverter gas R32
Names of buttons on Daikin 1-way air conditioner remote control
![]()
Buttons on Daikin 1-way air conditioner control
-
Signal generator.
-
Screen.
-
Mode selection button.
-
Off button.
-
Temperature adjustment button.
-
Button to set fan speed, airflow.
-
Power saving button.
-
Boost operation button.
-
Smart eye sensor button.
-
Rotary knob to adjust the wind direction.
-
The button turns on the pleasant blowing mode.
-
Quiet operation button.
-
Shutdown timer button.
-
Timer button to turn on the machine.
How to use Daikin 1-way air conditioner controller
![]()
How to turn on/off Daikin 1-way air conditioner
- Turn on/off the machine
- To turn on Daikin 1-way air conditioner , you can press one of the 3 buttons Cool/Dry/Fan only.
- Press the OFF button to turn off the air conditioner.
- Turn on the pleasant wind mode: press the COMFORT button once, if you want to cancel the mode, press this button again.
- Turn on the smart eye sensor: press the SENSOR button once and press it again to turn off the sensor.
- Timer to turn on and off
- To set a timer, you press one of the 2 buttons ON (timer on) and OFF (timer off). Pressing 1 time will increase by 1 hour and can be scheduled up to 12 hours. After the appointment is complete, the orange light on the air conditioner will light up.
- To cancel this mode, simply press the CANCEL button.
- Other functions
With the remaining function buttons such as POWERFUL (fast cooling), Econo (saving electricity) and QUIET (reducing outdoor unit noise), you also press once to activate and press again to turn off.
User manual for Daikin 2-way inverter air conditioner controller R410
Names of buttons on Daikin 2-way air conditioner remote control
![]()
Buttons on Daikin 2-way air conditioner control
-
The button activates the power saving function.
-
The button activates the quick cooling function.
-
The button selects the current operating mode (cooling/drying/fan only).
-
Quiet mode selection button.
-
The timer button turns on the air conditioner.
-
Timer button to turn off the air conditioner and night mode.
-
Temperature adjustment button.
-
Power on/off button.
-
fan speed control.
-
Airflow direction adjustment button.
-
The button to turn on the mold restriction mode.
-
Turn on the magic eye sensor.
-
Timer setting cancel button.
-
Clock setting selector button.
-
Adjust the timer time.
>> See more : Good tips for using 2-way air conditioners properly, saving electricity
How to use Daikin 2-way air conditioner control
![]()
How to turn on/off the Daikin 2-way radio
- On/off: Press the "ON/OFF" button on the remote to turn on or off the Daikin 2-way air conditioner .
- Adjust the temperature
- To increase the temperature, press the up arrow button located in the upper half of the “TEMP” button.
- To reduce the temperature, press the down arrow button located on the lower half of the “TEMP” button.
- Change the operation mode: press the “MODE” button. See also: How to turn on the hot mode of the air conditioner .
- Turn on the power saving feature: press the “ECONO” button on the remote control.
- Change the air flow setting: press the “FAN” button. When turned on, the air flow level will be displayed on the screen in steps to make it easier for you to monitor.
- Turn on the quick cooling feature: press the “POWERFUL” button.
- Adjust the direction of the wind: press the “SWING” button on the remote control. After pressing the button, the louver will change the cooling position continuously. When the flap has reached the desired position, please press the “SWING” button again to fix the position.
- Turn on anti-mold mode: press the “MOLD PROOF” button on the remote control.
- Set the time to turn on or off the air conditioner automatically:
- Press the “ON” button or press the “OFF” button to set the automatic shutdown timer.
- Click the up arrow side or the down arrow side to increase or decrease the setting time. Each time the button is pressed, the time will change 10 minutes and you can hold down the arrow button to change the time more quickly.
- Turn on the smart eye sensor: Press the SENSOR button once to turn it on and press it again to turn it off.
See more: How to check, error codes for Daikin air conditioners and air conditioners
Above is a guide on how to use the most standard Daikin air conditioner control with both 1-way and 2-way machines . Hopefully, through this article, you will have a better understanding of the functions of the buttons on the remote and use it most effectively.
Hopefully, the above article has helped users understand how to use DAIKIN air conditioner which is suitable for all models. WebTech360 Supermarket is currently displaying genuine DAIKIN air-conditioning products with good prices with unexpected promotions and warranties, free delivery to the place. Find out more about DAIKIN air conditioner products of the supermarket right HERE .