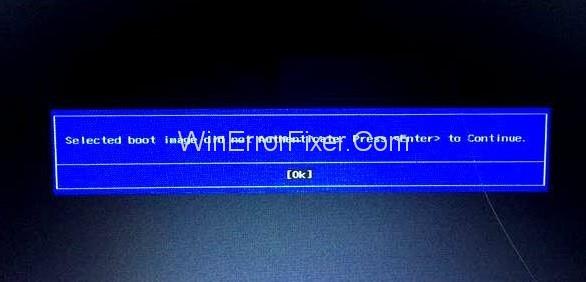
Often, users face a specific problem while starting or rebooting their computers. A blue box appears on a black screen, which says "Selected boot image did not authenticate, press Enter to continue". Clicking "OK" or "Enter" simply leads to the same screen, preventing the system from starting. This issue must be resolved as soon as it occurs. In this article, we explore the various solutions to fix the Selected Boot Image Did Not Authenticate problem.
Understanding the Issue
The Selected Boot Image Did Not Authenticate error indicates a problem with the boot image used to start the operating system. A boot image contains essential data related to the operating system, and the system needs to authenticate it against the firmware database to load properly.
Reasons Behind the Error
The system may fail to authenticate the boot loader due to various reasons:
| Reason |
Description |
| 1. Device Changes |
New hardware installation or system upgrades may alter boot loader information. |
| 2. Missing Boot Information |
Key data required for booting may be missing or corrupted. |
| 3. Malware Attacks |
Malicious software can corrupt the boot loader, leading to authentication failures. |
Contents
- How to Fix Selected Boot Image Did Not Authenticate Error
- Solution 1: Change from Secure Boot to Legacy Boot in BIOS Settings
- Solution 2: Hard Reset the Computer
- Solution 3: Repair the System
- Conclusion
How to Fix Selected Boot Image Did Not Authenticate Error
Many Windows users encounter this issue, especially with the latest version, Windows 10. This error often ties back to the boot image authentication failure, primarily stemming from system upgrades or new installations.
Solution 1: Change from Secure Boot to Legacy Boot in BIOS Settings
This method is effective when the error isn't caused by malware. It involves disabling the Secure Boot feature, which allows the system to boot. Here are the steps:
- Shut down your computer and power it on.
- Press Esc repeatedly to access the Startup menu.
- Press F10 to enter BIOS.
- Using the arrow keys, navigate to System Configuration.
- Select Boot Options.
- Disable Secure Boot and enable Legacy Support.
- Press F10 to save and exit.
This solution should enable Windows to reboot successfully. Keep in mind that Secure Boot is essential for device security and should be re-enabled after troubleshooting.
Solution 2: Hard Reset the Computer
This method helps reset the BIOS configurations, potentially resolving the issue. Here are the steps:
- Turn off the computer and disconnect the power cord.
- Remove the battery if it's a laptop.
- Press and hold the power button for 20 to 30 seconds.
- Reinsert the battery and connect the power cord.
- Restart the computer and press Esc repeatedly for the Startup menu.
- Press F2 to run hardware diagnostics.
- Select the Startup Test option.
- If there are no reported issues, reboot the system.
Solution 3: Repair the System
If the problem persists, especially if there's malware involved, a system repair is required. Follow these steps:
- Turn off your computer and turn it back on after a few seconds.
- Press Esc repeatedly as the computer starts.
- When the Startup menu appears, press F11 to access the recovery console.
- Select Troubleshoot followed by Advanced Options.
- Select Startup Repair and follow the on-screen instructions.
- Once complete, restart your computer.
Also Read:
Conclusion
This article outlines various methods to resolve the Selected Boot Image Did Not Authenticate error. Understanding the underlying cause of the error is crucial in selecting the appropriate resolution method. The initial two solutions should suffice for boot loader-related issues, while malware-related problems necessitate system repair. These techniques are user-friendly and can aid you effectively whenever you face this issue.



Mike W. -
I was skeptical at first, but your detailed instructions made it easy to follow. Thank you for breaking it down step by step
Vincent Green -
Your post saved me so much time! Thank you for being thorough in your explanation. I’ll remember this for future issues
Linda T. -
I'm so relieved I found this post. After trying multiple solutions without success, yours was the only one that worked. You’re a lifesaver
KateMunchkin -
Good to see a straightforward approach to this common problem. I’ll be recommending this article for sure
Jackie Br -
This is such an annoying error! I remotely solved it by following your method. Cheers
Haley J. -
LOL, I was about to throw my laptop out of the window! Good thing I found this guide. It solved the issue quickly
Lily T. -
I had this issue on my Lenovo laptop. Your fix worked right away! Thank you for being so clear and helpful
Lucy In The Sky -
Such a relief! I was worried about losing a project due to this error, but thanks to your guide, I'm back on track!
Kate R. -
I thought I lost my data forever! Found this solution just in time to rescue it. Thank you for sharing
Tom the Builder -
Great article! Would you mind writing a similar post about errors related to booting from USB? That would be super helpful
Sandy Galaxy -
This error had me stumped! Your tips were spot on and helped me avoid a factory reset. Appreciate your effort!
Connor W. -
With all the tech troubles I face, your blog is like a light in the dark! Will definitely follow your updates!
Ethan S. -
Could you provide more troubleshooting steps? Sometimes I feel like even after fixing one issue, another pops up
Goofy George -
Ugh, this is the most frustrating thing ever! Thanks for the tip. Finally, I can boot my laptop without issues.
Sammy D. -
I tried every fix in the book but nothing worked until I stumbled across this article! The solution was straightforward. Much appreciated
Cathy P. -
What a relief to find a solution to the "Selected Boot Image Did Not Authenticate" error! I never would have thought to use a different boot loader. You're genius
Marky Mark -
I had my doubts about the method, but it really did work! Can't believe I wasted so much time on it before. Thanks a bunch!
Carmen J. -
Wow, just wow! Can’t believe how easy that was. I wrote this down for future reference. Your step-by-step guide rocks
Bob's Adventure -
What a nightmare! I was seriously considering buying a new laptop. Glad I found your article instead
Anna B. -
Wow, this worked like a charm! I was stressing over running a major project on my laptop that wouldn't boot up. So glad I found your post!
Peter L. -
Thanks for the clear explanation and the steps you provided. It really made a difference in handling this problem!
Justine K. -
Can someone explain why this error happens in the first place? I'm still curious about the technical side of it
Amy K. -
I was ready to give up on my laptop! Your article gave me new hope. I followed all steps, and my device is working again
Emily Smith -
Thank you so much for this guide! I was stuck on the "Selected Boot Image Did Not Authenticate" error for days. Your solution worked perfectly! Really appreciate it
Jessica123 -
Has anyone else experienced this error when trying to boot? I followed the instructions but still got the same error. Any advice
Milo C. -
I think your method is helpful, but could you also suggest what to do in case the error persists after following all the steps
FluffyCat89 -
This is one of those moments when you're just thankful for the Internet! Thanks for sharing such a lifesaver solution
Pauline Q. -
Big thanks to the author. If it weren't for the clear instructions, I would have been totally lost trying to resolve this error!
Henry V. -
Thanks for writing this! I had the same issue, and after reading your article, I resolved it in just a few minutes
Bobby K -
This kind of stuff always happens at the worst times! So grateful for your help. Now I can finally work without interruption
Chloe M. -
Excited to have finally fixed this issue! Can’t believe how simple your solution was. Will share this post with all my friends!
Tommy Tech -
I was having a headache trying to solve this error. The step about renaming the boot file was a game changer! Thanks for sharing your knowledge.