Home
» PC Tips
»
What is virtual RAM? How to set virtual RAM on a Windows computer
What is virtual RAM? How to set virtual RAM on a Windows computer
In the articles about speeding up computers, Ben Computer has also repeatedly mentioned the plan to set virtual RAM for the computer. This is a way to increase RAM memory to help the device perform better, smoother when used for gaming, graphic design, ...
And in this article, let's learn about the concept of virtual RAM and how to set virtual RAM on a Windows computer.
What is virtual RAM?
Virtual RAM or Virtual Memory . When you set a piece of hard drive space to emulate physical RAM, it is called virtual RAM. This will help your computer run quite smoothly while the computer's physical RAM has been used up.
In addition, the logical setting of virtual RAM on the computer will help the machine operate with better performance, the graphics programs on the computer work more smoothly. Many of you have asked the question on the technology shows that setting virtual ram on a computer is harmful with a computer or not.
My answer is no, setting virtual RAM does not harm the computer, because it uses the space on the hard drive to make RAM, which is not the same as overclocking, ...
And after learning about the mechanism and benefits of setting virtual RAM, let's learn about how to set up virtual RAM for your computer in just a few steps.
6 Steps to Set Virtual RAM on Windows PC
Step 1: Go to My Computer ( My PC ). If you do not find it, you can use the key combination Windows + S and enter the keyword " Computer " and select.
How to Set virtual RAM on Windows computers - Photo 1
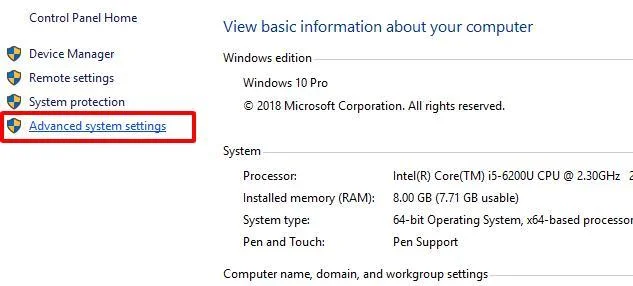
Step 2 : After selecting Properties , Windows will open the System window . In this window, select " Advanced system settings" on the left menu.
How to set virtual RAM on a Windows computer - Photo 2
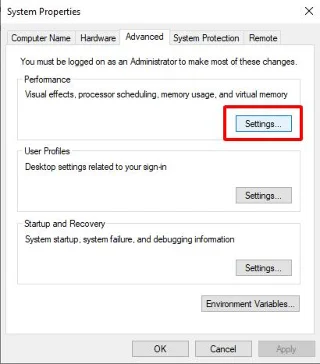
Step 3 : The System Properties window opens, go to the Advanced tab . In the Performance section select Settings ...
How to Set Virtual RAM on Windows Computers - Photo 3
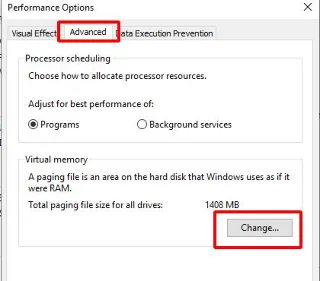
Step 4 : The Performance Options window appears, switch to the Advanced tab and then click the Change button .
How to set virtual RAM on a Windows computer - Image 4
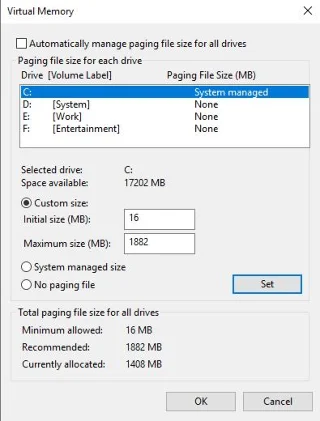
Step 5 : In Virtual Memory window , uncheck the box " Automatically manage paging file size for all drives ". Select the option " Custom size " at the bottom.
How to Set Virtual RAM on Windows Computers - Photo 5
Step 6 : Here, you pay attention to 2 items: Initial size and Maximum size
Initial size (MB) : This is the minimum size.
Maximum size (MB) : This is the maximum size.
For 32-bit win, if the current ram capacity is less than 3GB and less than 4.5 GB for 64 bit win, the initial size will be twice as much as the current ram size or 3 times if the disk space is available. Win more installed.
Example: If my windows is running 32 bit win, my ram is 4gb, then I will set the value of Initial size to 8Gb.
Conversely, for machines with 3 GB or more ram with 32 bit win and 4.5 GB for 64 bit win, users can install the initial size and maximum size equal to half of the actual ram capacity machine.
Once finished, click Set and OK to save the settings just now.
Step 7: After saving the settings, System Properties notices that in order to be able to increase the amount of virtual memory, you need to Restart the machine for the changes to take effect.
So in this article, I have shown you how to set virtual RAM and concepts related to setting virtual ram on a computer.
However, you should set virtual ram appropriately, not everything is good. In essence, setting virtual ram is the use of memory of the computer's hard drive to make RAM, so use it appropriately.
Thank you for reading and interested in my article.