The most commonly deficient nutrients in the diet

Diet is important to our health. Yet most of our meals are lacking in these six important nutrients.
Adding a spotlight behind your subject is a great way to separate them from the background. A spotlight can add depth to your portrait, and you can adjust the intensity of the spotlight for drama or change the color of the light to suit different moods or emotions.
Using Camera Raw and its powerful masking features, we can add spotlight effects non-destructively to the original image. And Camera Raw's intuitive image editing controls allow for quick and easy adjustments to the size, position, intensity, and color of the spotlight effect.
Note : You can also use these steps to add spotlight effects in Adobe Lightroom and Lightroom Classic as they have the same editing and masking features as Camera Raw.
Step 1: Open the photo in Camera Raw
First, open the photo in Camera Raw. And the best way to do this is from Adobe Bridge .
Bridge is a file browser designed specifically for organizing photos and other content used across multiple Creative Cloud applications. It is included with a Creative Cloud subscription and can be installed using the Creative Cloud Desktop application.
The benefit of using Adobe Bridge is that it allows opening not only raw files into Camera Raw, but also JPEG and TIFF images . This tutorial will use JPEG images.
Open Adobe Bridge and navigate to the photo location on your computer.
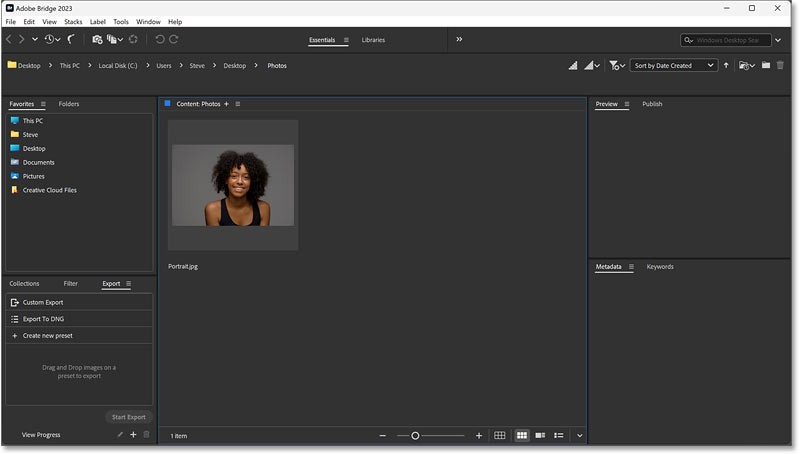
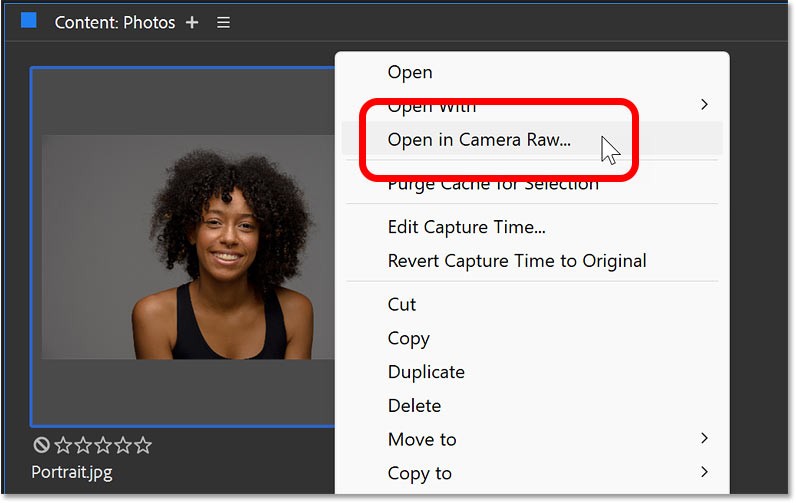
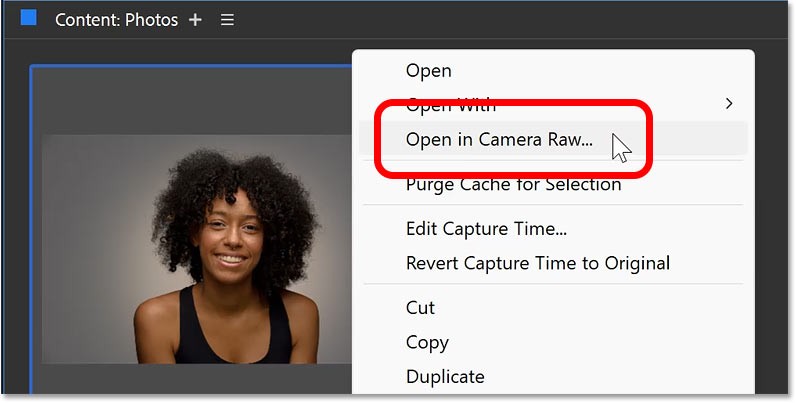
Then right-click on the photo thumbnail and select Open in Camera Raw from the menu.
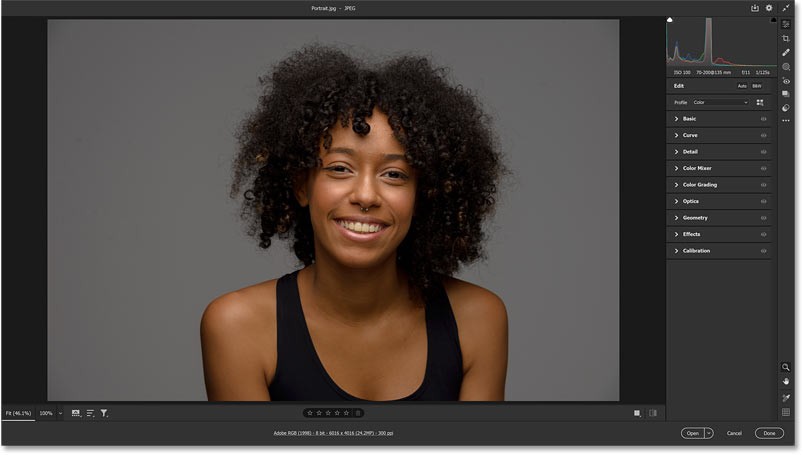
Camera Raw opens with the photo in the main preview window. The example photo used is from Adobe Stock.
If Camera Raw doesn't open in Full Screen mode, press the letter F (Full Screen) on your keyboard.
Step 2: Open Camera Raw's Masking options
You can add a spotlight effect behind your subject entirely using Camera Raw's Masking features. And there are two main steps.
First, we will use a mask to add a spotlight effect to the image, this will place the spotlight effect in front of the subject. Then, we will exclude the subject from the mask so that the spotlight effect only appears on the background.
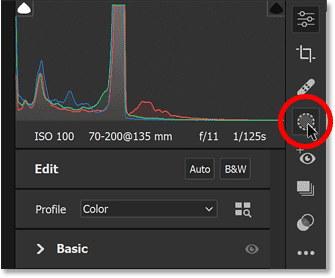
In the toolbar on the right side of the Camera Raw interface, click the Masking icon .
Step 3: Select Radial Gradient
Then, in the Create New Mask option , select Radial Gradient .
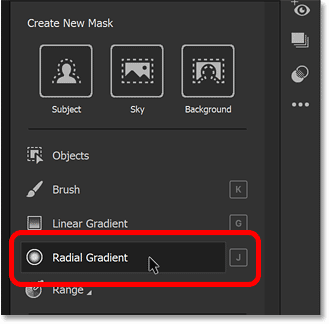
A separate Masking panel opens to the left of the main panel, while the main panel now shows all the adjustments that can be made to the selected area with a mask.

Step 4: Draw a Radial Gradient on the object
Click in the center of the object and start dragging out to create a Radial Gradient selection. The area inside the selection, covered with the red overlay, is where we'll add the spotlight effect.
You can turn a Radial Gradient into a perfect circle by holding the Shift key on your keyboard as you drag.
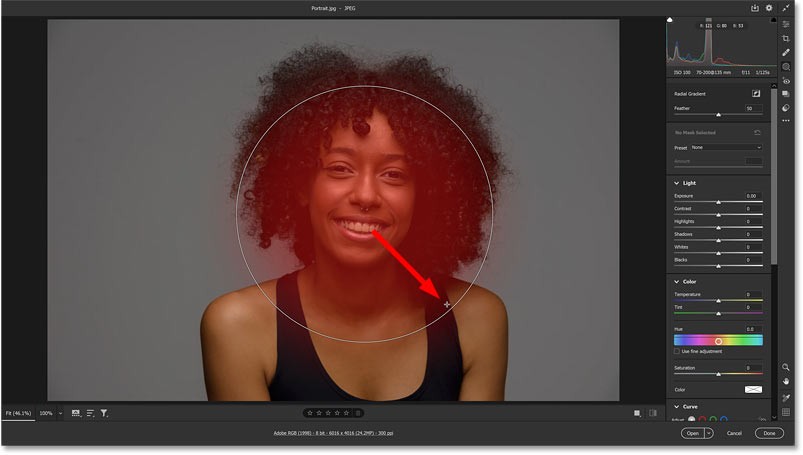
Continue expanding the selection outward until it encompasses not only the subject but also some of the background behind it, as the last background is where the spotlight effect will appear. Release the mouse button to complete the selection.
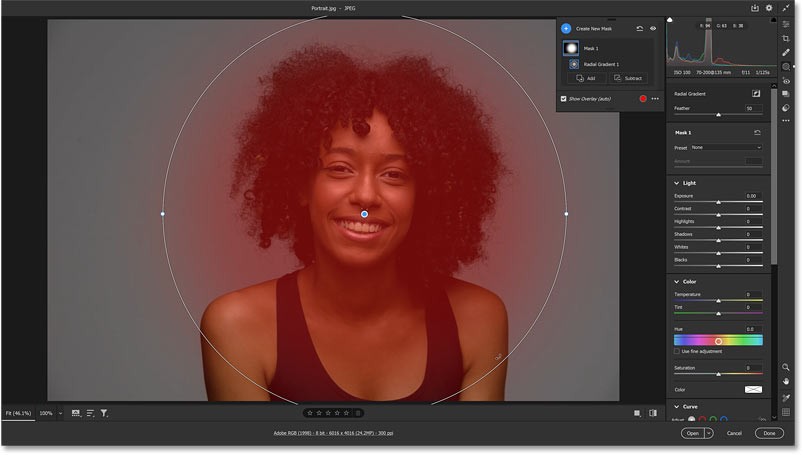
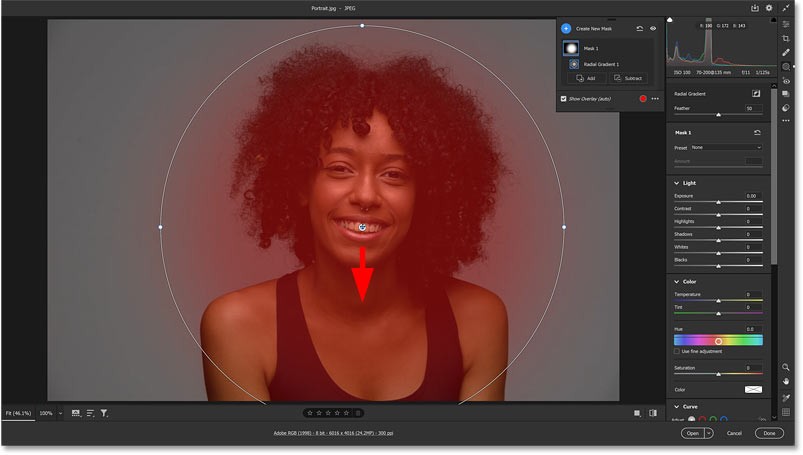
How to reposition a selection after drawing
If you need to reposition the Radial Gradient, simply click on the center pin and drag it into place.
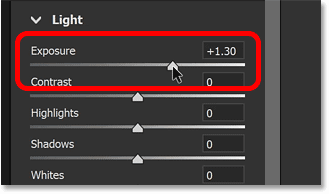
Step 5: Drag the Exposure slider to brighten the spotlight effect
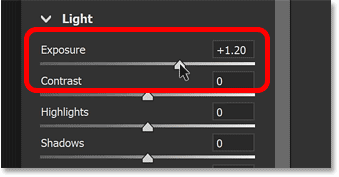
To create a spotlight effect, drag the Exposure slider (found in the Light section on the main Camera Raw control panel) to the right to increase the brightness of the selected area.
The red overlay will disappear as soon as you start dragging.
Notice that along with the background, we are also increasing the brightness of the subject. But don't worry about that for now. Just increase the Exposure value until the background behind the subject is bright enough.
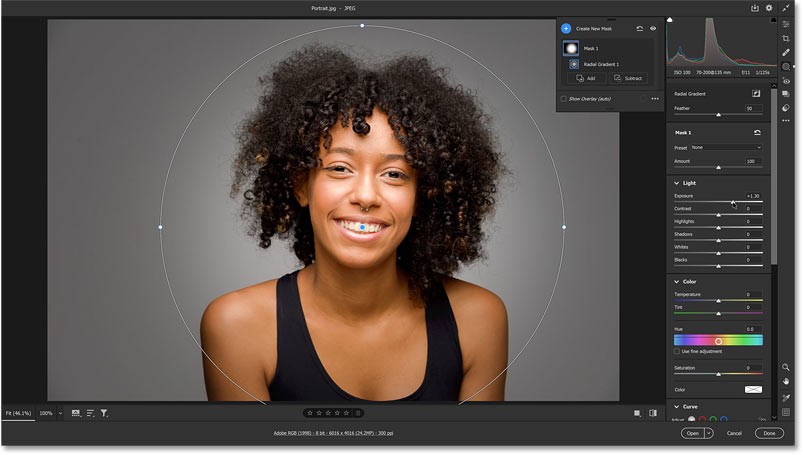
How to show and hide pins
To temporarily hide the pin in the center of the selection as well as the border around the pin, press V on your keyboard. This allows you to see the results without distraction.
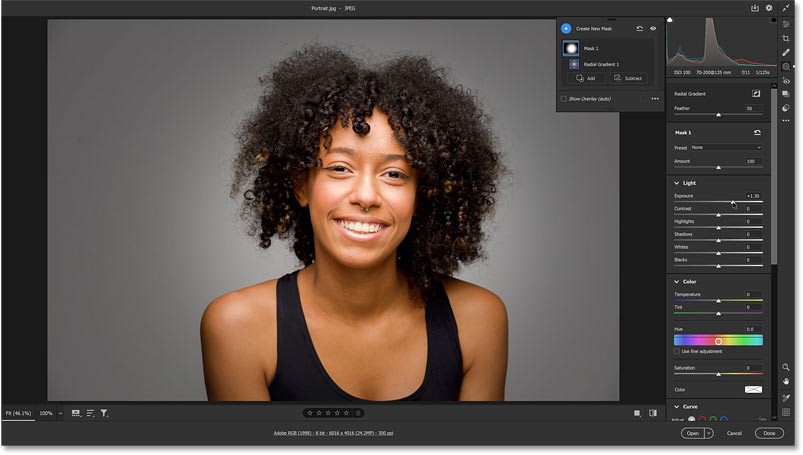
Step 6: Click the Subtract button in the Masking panel
We have the spotlight effect in the background. Now, we need to remove the spotlight effect from the subject by excluding the subject from the mask. In fact, we will let Adobe's AI do the job.
In the Masking panel, we see the mask (named mask 1) we created. Currently, the mask only contains a Radial Gradient.
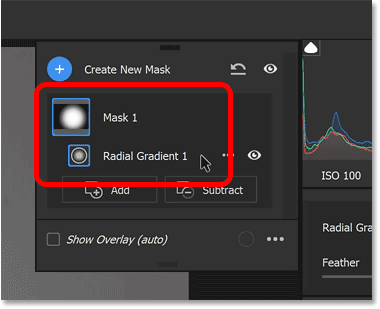
To subtract an area from the mask, click the Subtract button .
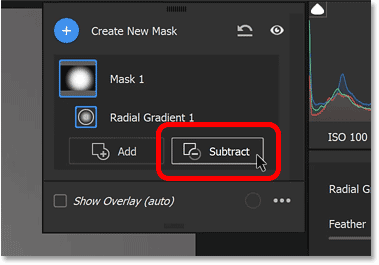
Step 7: Select Select Subject
Then, select the masking tool you want to use to remove that area. Since we need to remove the subject, select Select Subject .
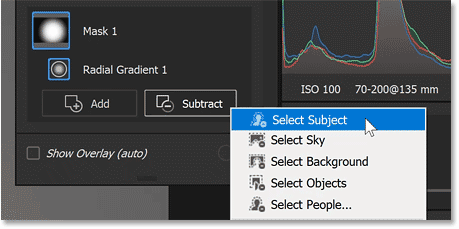
Select Subject works the same way in Camera Raw as it does in Photoshop. It uses AI to automatically detect and select subjects in your photo.
And since we're using it to subtract an area from the mask, the subject will be immediately removed from the effect, leaving them at their original brightness while the spotlight effect is only visible on the background.
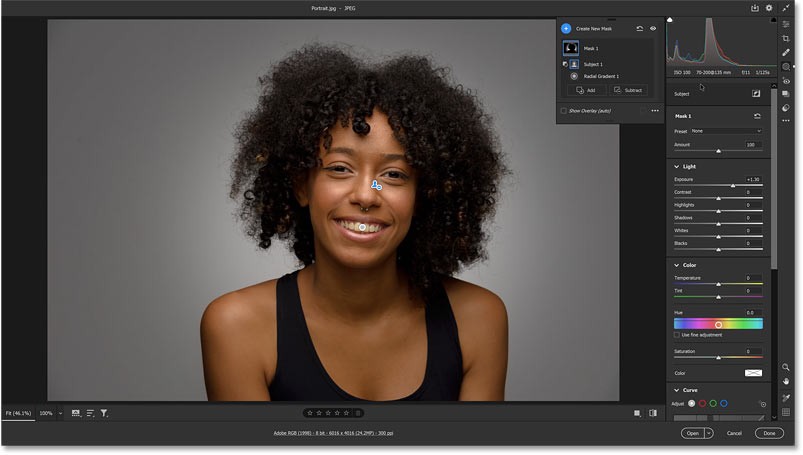
Now. we have two pins in front of the image, one for Radial Gradient and one for Select Subject. You can hide and show the pins by pressing V on your keyboard.
Back in the Masking panel, we see that the mask (Mask 1) is now a combination of two masking tools. The Radial Gradient created the original mask, and the Select Subject command removed the subject from the mask.
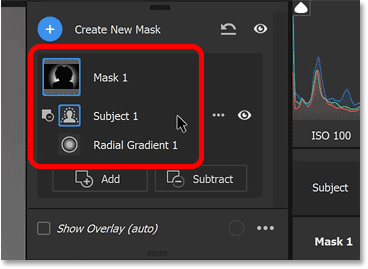
Step 8: Change the color of the spotlight effect
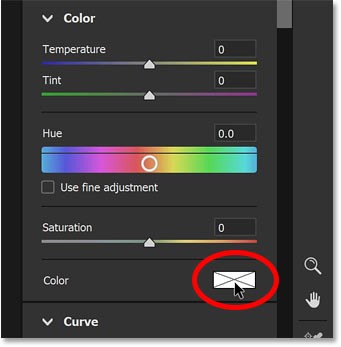
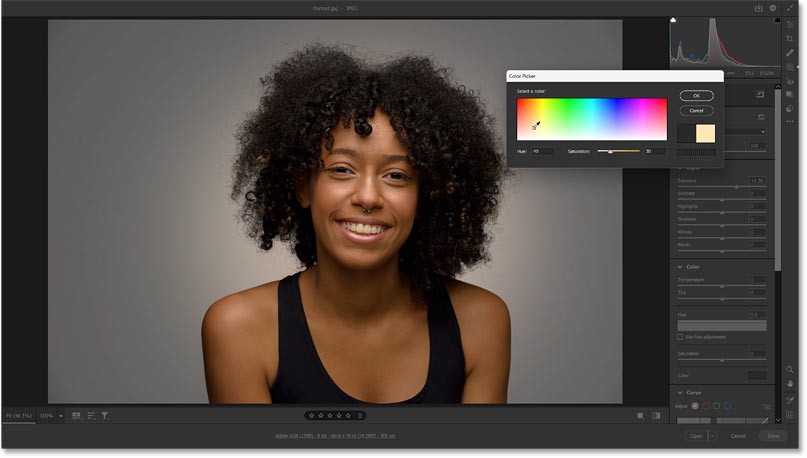
To change the color of the spotlight effect, go to the Color section in the main Camera Raw control panel and click on the color swatch.
Then, in the Color Picker , click and drag left or right to select the hue, drag up and down to adjust the saturation.
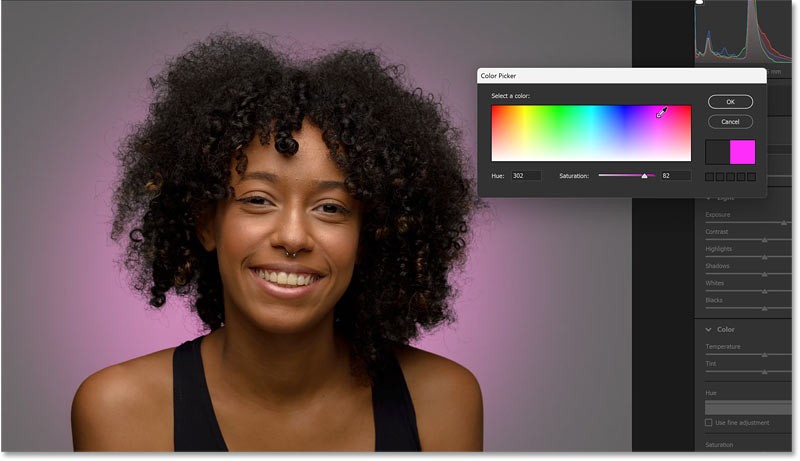
For example, we will choose a Hue value of 40 to warm the light and a Saturation value of 30 .
Click OK to accept the new color or Cancel to return to the original background color.
Step 9: Make any adjustments to the spotlight effect
To make any necessary adjustments to the spotlight effect, select Radial Gradient in the Masking panel.
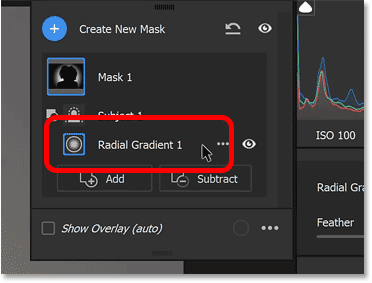
Then drag any handle to resize it. Hold Shift as you drag to lock its original shape. Drag the pin to the center to reposition it (press V on your keyboard if you don't see the pin).
You can also drag the Exposure slider to adjust the brightness of the spotlight effect. For example, lower it a bit.
Step 10: Turn Preview On and Off
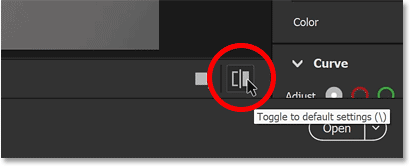
To compare the spotlight effect with the original photo, click the Preview button below the lower right corner of the photo to see the photo in its original state. Then, click the Preview button again to see the spotlight effect.
You can also turn Preview on and off by pressing the backslash key ( \ ) on your keyboard.
Step 11: Click Done or Open
Now, after adding the spotlight effect behind the subject, we have two options: Close Camera Raw to accept the changes or we can move the photo to Photoshop for further editing.
Option 1: Save the spotlight effect and close Camera Raw
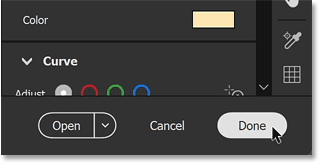
To save the spotlight effect and close Camera Raw, click the Done button in the lower right corner.
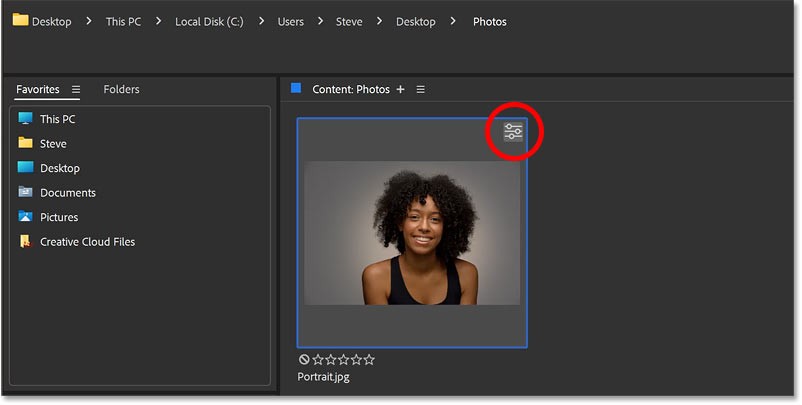
Back in Adobe Bridge, the photo will appear with an icon in the upper right corner of the thumbnail. This icon means we have applied edits to the image in Camera Raw.
If you right-click on the image and select Open in Camera Raw again:
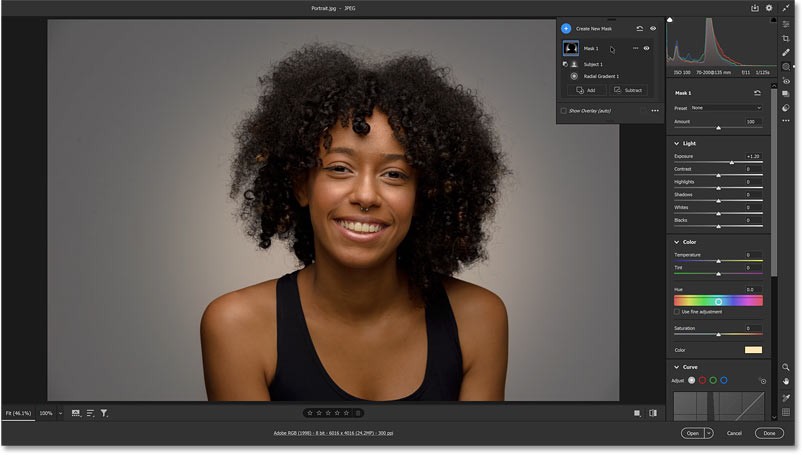
Camera Raw will reopen with the spotlight effect applied to the image.
You can click the mask icon on the toolbar to open the mask panel, then click the mask to expand it, and see the Radial Gradient and Select Subject commands inside.
Option 2: Send the image to Photoshop
Or if you want to save the spotlight effect and then send the image from Camera Raw to Photoshop for further editing, click the Open button .
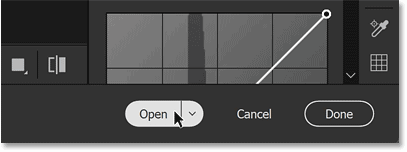
Camera Raw will close and your image, along with the spotlight effect, will open in Photoshop.
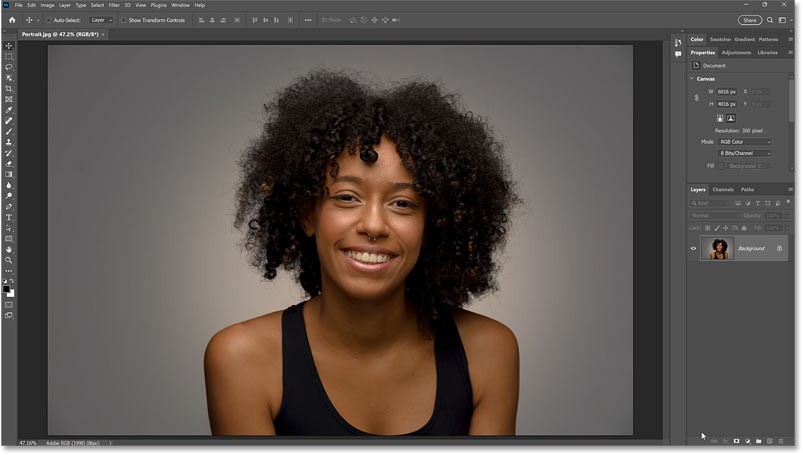
And that's it! That's how to add a spotlight effect behind your subject using the Masking features in Adobe Camera Raw.
Diet is important to our health. Yet most of our meals are lacking in these six important nutrients.
At first glance, AirPods look just like any other true wireless earbuds. But that all changed when a few little-known features were discovered.
In this article, we will guide you how to regain access to your hard drive when it fails. Let's follow along!
Dental floss is a common tool for cleaning teeth, however, not everyone knows how to use it properly. Below are instructions on how to use dental floss to clean teeth effectively.
Building muscle takes time and the right training, but its something anyone can do. Heres how to build muscle, according to experts.
In addition to regular exercise and not smoking, diet is one of the best ways to protect your heart. Here are the best diets for heart health.
The third trimester is often the most difficult time to sleep during pregnancy. Here are some ways to treat insomnia in the third trimester.
There are many ways to lose weight without changing anything in your diet. Here are some scientifically proven automatic weight loss or calorie-burning methods that anyone can use.
Apple has introduced iOS 26 – a major update with a brand new frosted glass design, smarter experiences, and improvements to familiar apps.
Yoga can provide many health benefits, including better sleep. Because yoga can be relaxing and restorative, its a great way to beat insomnia after a busy day.
The flower of the other shore is a unique flower, carrying many unique meanings. So what is the flower of the other shore, is the flower of the other shore real, what is the meaning and legend of the flower of the other shore?
Craving for snacks but afraid of gaining weight? Dont worry, lets explore together many types of weight loss snacks that are high in fiber, low in calories without making you try to starve yourself.
Prioritizing a consistent sleep schedule and evening routine can help improve the quality of your sleep. Heres what you need to know to stop tossing and turning at night.
Adding a printer to Windows 10 is simple, although the process for wired devices will be different than for wireless devices.
You want to have a beautiful, shiny, healthy nail quickly. The simple tips for beautiful nails below will be useful for you.


