Home
» PC Tips
»
How to check document print history on Windows
How to check document print history on Windows
Whether you want to check your print history for reference or see what other people are printing from your system, you can easily find a list of previously printed files in Windows. Here are a few ways to do it.
While Event Viewer is commonly used to troubleshoot various system issues, you can also use it to monitor your printed documents on Windows.
However, by default, Event Viewer does not keep a record of printed documents. To enable this feature, you will need to configure it to manually record your printing activities.
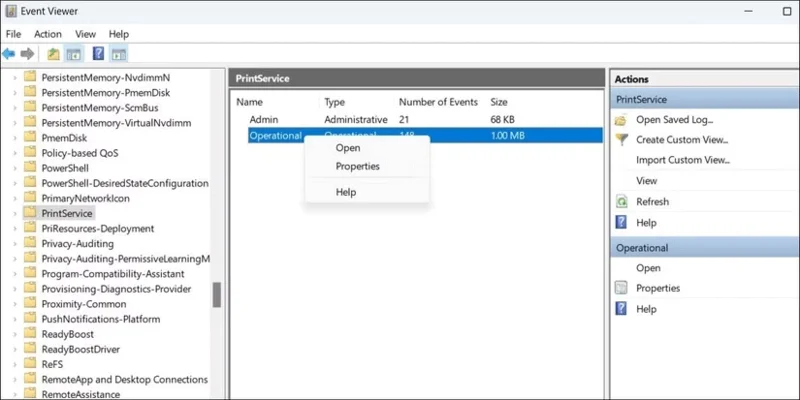
Using the left pane, navigate to Applications and Services Logs > Microsoft > Windows and locate the PrintService folder in the Windows folder. Now, right-click on the Operational log from the middle pane and select Properties .
Log PrintService in Event Viewer
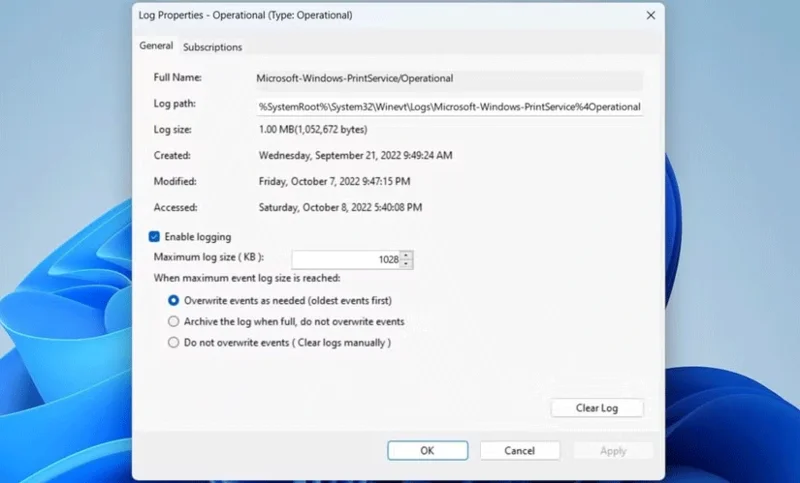
In the Log Properties window , navigate to the General tab and check the Enable logging check box . You should also specify what Windows should do when the maximum event log size is reached.
Click Apply > OK to save the changes.
Enable logging in Windows 11
Windows will now keep a log file of any documents printed from your system. You can access that log file from Event Viewer at any time.
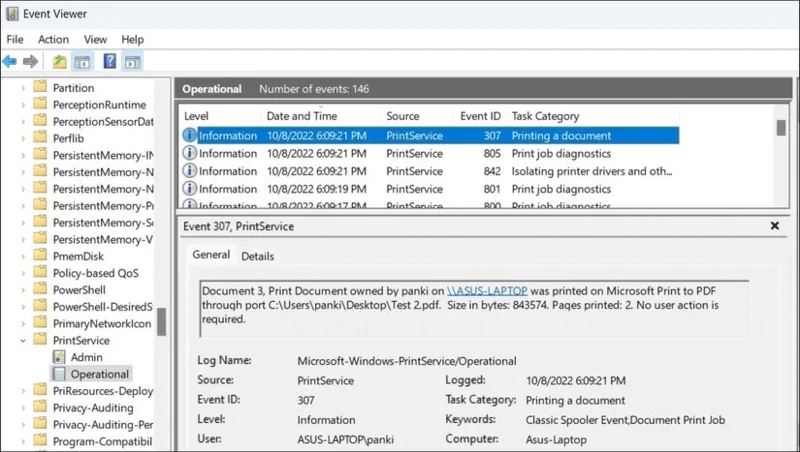
To view the print log, open Event Viewer using the search menu. Use the left pane to navigate to Applications and Services Logs > Microsoft > Windows > PrintService and double-click Operational log to view your print history.
In the middle pane, you'll see entries for various printer events. You can sort these entries by Date and Time or Task Category . Select an entry to see the exact date and time of the print job, along with the printer used. You'll also find the file path of the printed document in the General tab.
View Print History Log in Windows 11
If you need to clear the print history from Windows, simply right-click on the Operational log file in the PrintService folder and select the Clear log option from the context menu.
View document print history with PaperCut Print Logger
While it is possible to check the print history of a document through Event Viewer, this is not the most user-friendly method.
Luckily, you can also use a third-party application like PaperCut Print Logger to check your printer history on Windows. First, download and install the PaperCut Print Logger tool on your PC.
Once installed, PaperCut Print Logger will automatically monitor and log all print jobs on your system. It will record essential details like print time, user name who initiated the print job, total number of pages and other attributes like paper size, color mode, etc.
To view the print history saved by PaperCut Print Logger:
Open File Explorer to C: > Program Files (x86) > PaperCut Print Logger .
Double-click the ViewLogs shortcut.
In the report, you will see your print history by date.
Click the View button in the HTML column to see a list of documents printed on a particular day, along with their details.
Click on CSV/Excel option to save the report as Excel file for further analysis or record keeping.
PaperCut Print Logger page in browser
Knowing how to access your printed document history in Windows can be useful in certain situations. You can use it to track down a specific document or even check to see if someone else is using your printer without permission. Luckily, it's pretty simple no matter which method you choose.