There’s a lot of confusion surrounding the refresh rate and modern TVs. But what does the term refer to, exactly? The refresh rate represents how many frames a TV can show in one second. A higher refresh rate means a smoother, less flickery image.
So, how do you check which refresh rate your Samsung TV has? And is there a way to change it? In this article, we’ll reveal everything you need to know.
1. Checking Your Samsung TV's Refresh Rate
| Refresh Rate |
Description |
| 60Hz |
Reproduces 60 frames per second, suitable for everyday viewing like movies and TV shows. |
| 120Hz |
Reproduces 120 frames per second, ideal for live sports and gaming, providing a clearer image with less lag. |
Your Samsung TV will typically have a refresh rate of either 60Hz or 120Hz. If you own an older Samsung TV model, it likely supports only the 60Hz refresh rate. However, with newer models, you can enjoy the benefits of a 120Hz refresh rate, enhancing your viewing experience during fast-paced action.

2. Utilizing the Auto Motion Plus Feature
Most Samsung TVs come equipped with the Auto Motion Plus feature, allowing you to automatically adjust the refresh rate based on your content. To access this feature, follow these steps:
- Press the Home button on your Samsung TV remote.
- Use the left arrow key to find Settings.
- Navigate to Picture > Expert Settings > Auto Motion Plus Settings.
- You’ll see three options: Auto, Custom, and Off.
For optimal movie or sports viewing, you can rely on the Auto settings, although sometimes your TV might fail to pick the right settings, resulting in the "soap opera effect." If this happens, turning off Auto Motion Plus may provide a more natural viewing experience.
Custom Settings
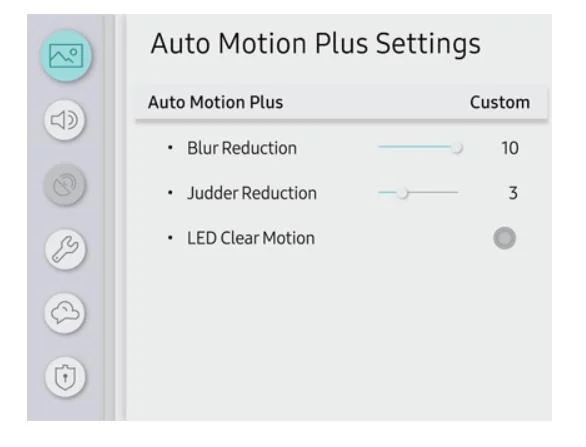
If you want to avoid blurriness during live sports or fast-action gaming, consider using the Custom option, where you can adjust:
- Blur Reduction – Adjusts blurriness using the arrow keys on your remote.
- Judder Reduction – Adjusts judder settings using the remote.
- LED Clear Motion – Turns the LED backlight on or off for sharper images during fast motion.

3. Understanding Higher Refresh Rates
The refresh rate, also known as motion rate, generally comes in 60Hz or 120Hz in the US. While some manufacturers advertise higher rates like 240Hz or 480Hz, these numbers often do not relate to real performance improvements.
4. Knowing the Correct Motion Rate
High refresh rates are not the only determinant of image quality. Knowing how to adjust the Auto Motion Plus feature on your Samsung TV is essential, especially if you plan to switch between types of content.
Have you noticed the difference when switching from one refresh rate to another? Share your experience in the comments section below!










Maximillian -
Checking the refresh rate helped me reduce motion blur when watching action movies. Thanks for the insightful tips
Jessica Brown -
Thank you for this! I always thought my TV was laggy due to my internet connection, but turns out it was the refresh rate!
Chloe M. -
Just to share my experience, after setting my TV’s refresh rate to 120Hz, the picture quality during sports was incredible!
David24 -
Quick question: Does the refresh rate affect streaming quality on platforms like Netflix or Hulu too
Anna K. -
Is 60Hz the best refresh rate for gaming, or should I aim for higher? Anyone have insights
Daniël K. -
Love how you broke it down step-by-step! I appreciate the effort you put into this guide; it really helps
Grant VideoGamer -
I always believed refresh rate was just a marketing gimmick until I checked and saw the actual improvement!
Penny P. -
I’m new to all this tech stuff. Any recommendations for setting the “ideal” refresh rate for a Samsung TV
Eric the Explorer -
Curious if other brands can also be checked this way? I may need it for my LG as well!
Brian Tech -
Appreciate your hard work on this. It’s those little things that make our daily entertainment experience so much better
Charlie the Cat -
Why didn’t I find this article sooner? I’ve been struggling with my TV settings for ages! Thank you
Mike The Techie -
Just discovered the refresh rate setting on my Samsung! Super easy; thanks for the clear instructions!
Lucy C. -
Can we look at options for adjusting refresh rate while watching live sports? Something like that would be even more helpful
Patrick IT -
The guide was easy to follow, but I would have loved to see visuals. Maybe consider adding screenshots next time
Lily B. -
Can someone explain what the difference is between 60Hz and 120Hz? My TV supports both, but I’m confused on what to choose
:D Funny Guy -
So I checked the refresh rate, and my TV almost winked at me! Just kidding, but it does look sharper now
Hannah Lee -
This post should be mandatory reading for all Samsung TV owners! I shared it with my friends
Ella C. -
Big thanks! I love it when guides are easy to understand. I’m definitely checking other settings now
Simón G. -
Just did the refresh rate check, and OMG the difference in visual clarity is fantastic! I’m in love with my TV all over again
Tommy T. -
Wow, I never knew this was so easy! Just followed the steps and my TV is running smoother now. You’re a lifesaver!
Rita Sky -
What a fantastic guide! I wasn't sure where to find the settings. I really hope to see more articles like this one!
Sandy G. -
Wow, refreshing my refresh rate felt like a mini upgrade! TV nights just got better
Angela P. -
Thanks for this! I was about to give up on my TV because it felt so laggy, but adjusting the refresh rate solved the issue!
Emily Davis -
Has anyone tried adjusting their refresh rate after checking? I noticed a huge improvement in my gaming experience!
John Smith -
Great article! I finally learned how to check the refresh rate on my Samsung TV. This was a much-needed guide, thanks!
Sarah Joy -
I used these steps and noticed a significant change while playing video games. My reactions are much faster now
Victoria Z. -
Finally, someone who explains it clearly! Most guides are so technical. This was refreshing and straightforward
James Wilson -
LOL, I thought refresh rate had something to do with my internet speed! Glad to learn it’s not!
Ben C. -
Nice job! But I couldn’t find the refresh rate option on my TV. Can someone help me out
Olivia N. -
This made my day! My TV looks way better now. Can’t believe I was missing out on this