How to see yourself like any celebrity with B612

Discover how to find out which celebrities you resemble using the new Familiar Faces feature in B612.
It can be said that "taking a selfie" is a popular job today, so there are many professional photography support applications were born with many different features, helping you to have A selfie that looks beautiful.
Currently, young people often use B612 as a tool to make their selfies more beautiful. Here we will introduce the article on how to install and take photos with B612 on the phone , please refer.
The following article we will guide you to install the B612 application on Android , in addition you can follow the steps for iOS , or press the download button at the bottom of this.
Download B612 on Android Download B612 on iOS
Step 1: To be able to download this photography app to your device, the first thing you need to do is open the Google Play app ( App Store for iOS) on your phone.
Step 2: Next, type B612 and press search .


Step 3: Click the Install button , the download of the application to your phone will begin.
Step 4: After successfully downloading the application, click the Open button to start using B612.


After successfully installing and opening the B612 application, we perform the following steps to be able to take photos.
Step 1: First, everyone click on Agree and start shooting.
Step 2: Press the Allow all button to give the application access to phone features.
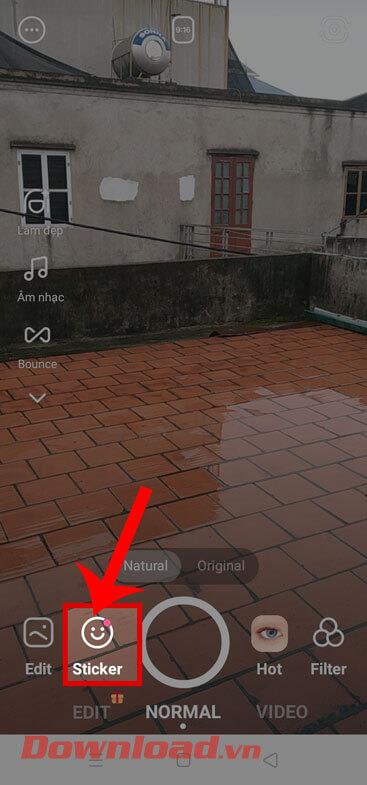
Step 3: To make your photos more unique, click on the Sticker and choose any sticker. This is a feature that many people like when using this application.


Step 4: Touch the Beauty section to edit your face to become more beautiful.
Step 5: Next, click on Filter to select an appropriate effect for the image.
Step 6: To get a really good picture, we need to give it a suitable size by clicking the 3: 4 icon . In addition, you can choose the shape of the photo in this section.


Step 7: After you have set all the features of the application, click on the circle at the bottom of the screen to take a picture.
Step 8: Click the down arrow icon to save the image to your phone.


Step 9: Touch the square in the lower left corner of the screen to review the image just taken.
Step 10: Click on the image to review the image.


Above is the guide to set up and take pictures with B612, we hope that after completing the steps in this article, you will be able to take a very nice selfie image to share on the Social Network.
In addition, you can refer to some of the following articles:
I wish you successful implementation!
Discover how to find out which celebrities you resemble using the new Familiar Faces feature in B612.
Instructions for blurring photos on B612. Recently, the B612 application has updated the image blur effect. Next, WebTech360 will introduce the article Instructions for blurring photos
In addition to taking photos, the B612 also allows users to record music videos, the following article will show you how to create music videos with B612 on your phone with just a few simple steps.
Struggling with DLL missing errors in Windows 11 after an update? Discover proven, step-by-step fixes to restore your system smoothly. No tech expertise needed – get back to normal fast!
Struggling with PowerShell Execution Policy Error on Windows 11? Discover step-by-step solutions to resolve it safely and efficiently. Unlock script execution without hassle in the latest updates. Perfect for beginners and pros alike.
Struggling with the Windows 11 "Microphone Too Quiet" error? Discover proven, step-by-step fixes to boost your mic volume and restore crystal-clear audio. No tech expertise needed—get back to seamless calls and recordings today!
Struggling with the "Cannot Connect to Printer" error 0x00000709? Discover proven troubleshooting steps to resolve this Windows printer issue quickly and get back to seamless printing. Updated for the latest systems.
Discover how to enable and use Windows 11 Hyper-V for virtual machines. Step-by-step guide to setting up VMs, installing OS, and optimizing performance for developers, IT pros, and enthusiasts.
Struggling with the Windows 11 hibernate option greyed out? Discover step-by-step solutions to fix this common issue, restore power options, and get back to seamless hibernation. Updated with the latest Windows tweaks for optimal performance.
Struggling with Windows 11 "System Sounds" missing? Discover proven fixes to restore your notification chimes and error beeps effortlessly. Step-by-step guide for seamless audio recovery.
Struggling with Windows 11 Search Indexing Paused error? Discover proven steps to fix it fast, restore smooth searching, and boost your PC performance without tech headaches.
Dive into how to use Windows 11 DirectStorage for games to slash load times and skyrocket frame rates. Get step-by-step setup, compatible titles, and tips for optimal NVMe SSD gaming performance.
Struggling with Windows 11 Aura Sync and iCUE errors? This comprehensive guide offers step-by-step troubleshooting tips to resolve compatibility issues, crashes, and sync problems for your RGB lighting setup. Get back to vibrant control in no time!
Struggling with the frustrating 0x800ccc0e Outlook error on Windows 11? Discover proven, step-by-step solutions to resolve this issue quickly and get your emails flowing again in 2026. No tech expertise required!
Struggling with the frustrating "A Disk Read Error Occurred" on Windows 11? Discover proven, step-by-step fixes to restore your PC quickly and safely. Get back to smooth computing today!
Struggling with the Windows 11 "DirectX 12 Unsupported" error? Discover proven, step-by-step fixes to get your games and apps running smoothly again. No tech expertise needed!
Struggling with the Windows 11 "Windows Update" Catalog Error? Discover proven, step-by-step fixes to get your updates running smoothly again. Say goodbye to frustrations and hello to a seamless PC experience!
Struggling with high CPU usage from background processes on Windows 11? Discover proven fixes to optimize performance, boost gaming, and reclaim your PC
