How to fix Windows Quick Assist not working error

Windows Quick Assist helps you connect to a remote PC easily. Thanks to it, you don't need to install a third-party screen sharing tool. However, sometimes it also generates errors. However, you can easily fix Windows Quick Assist errors in the following ways.

How to fix Windows Quick Assist not working error

What is Windows Quick Assist and how does it work

Quick Assist is a Windows tool that allows you and others to share devices over a remote connection. When you access someone else's computer, you can troubleshoot and diagnose technical problems as if you were using their device.

Both parties need to log in to Quick Assist to start using it. Next, you send them a code that allows you to access their device and vice versa. However, if Quick Assist is not working, you need to find a solution to fix the problem.

Features and requirements for using Quick Assist

When you know how Quick Assist works, you'll know which parts of it need repair.

  • Both parties' computers need to run Windows
    • Quick Assist only runs on Windows devices. Therefore, if you try this tool on another operating system, you will get an error. Additionally, if you're the one providing support, you need a Microsoft account.
  • Using Quick Assist requires an Internet connection
    • You can only use Quick Assist when your PC is connected to the network. To avoid problems, you need to ensure a stable Internet connection.
  • You cannot drag & drop files using Quick Assist
  • You cannot copy & paste text using Quick Assist
  • You cannot use Quick Asset for remote printing

If you perform a task that Quick Assist supports but still get an error, here's how to fix the problem.

How to fix Windows Quick Assist errors

Create a Microsoft account if you don't have one

If you use Quick Assistant as a helper, you need a Microsoft account. People who need help just need to have a Windows device.

How to create a Windows account:

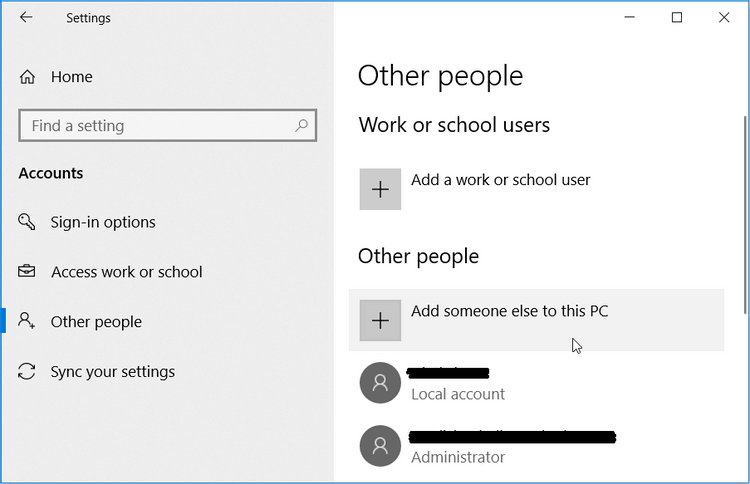
  1. Go to Windows Start Menu > PC Settings > Accounts .
  2. Select Other people on the left hand side of the window.
  3. Next, select Add someone else to this PC .
How to fix Windows Quick Assist not working error

In the next window, click I don't have this person's sign-in information . Here, you can create an account as follows:

  1. Click Get a new email address and enter detailed information in the relevant box.
  2. Next, create a password, select your country and fill in your date of birth. Click Next when completed.
  3. Follow the on-screen instructions to complete the process.
  4. When finished, sign in to your Microsoft account and start using Quick Assist .

Uninstall and reinstall Quick Assist

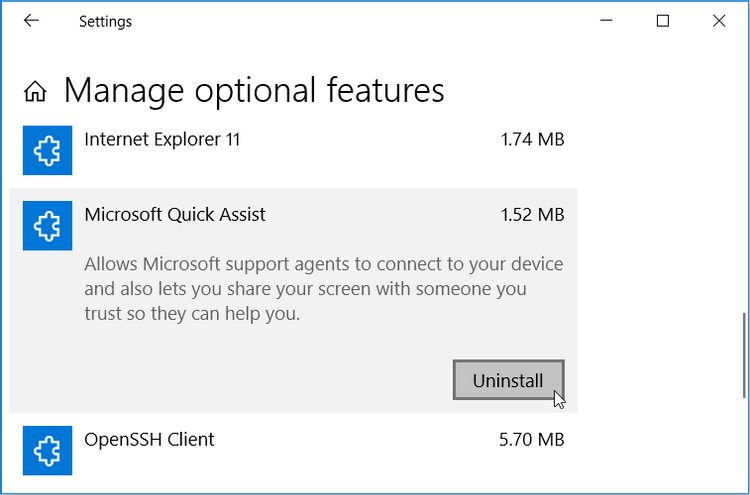
  1. Go to Windows Start menu > Settings > Apps .
  2. Click Manage optional features in the right-hand panel.
  3. Scroll down and select Microsoft Quick Assist . Click this feature and press the Uninstall button .
How to fix Windows Quick Assist not working error

When finished, click the Install button that appears in the Quick Assist feature. If this tool does not appear on Optional Features , you need to add it as follows:

  1. At the top of the Manage optional features screen , click Add a feature .
  2. Scroll down, select Quick Assist and press the Install button .

When finished, close the settings window and restart your PC to save these changes.

Run system restore

Quick Assist suddenly shows a strange error message that you've never seen before? If so, it's possible that a corrupt system file has interfered with its functionality. In this case, a system restore point can help you.

If you've created this point before, you can use it to restore Quick Assist to its normal state:

  1. Type Recovery in the Windows search bar and select Best match .
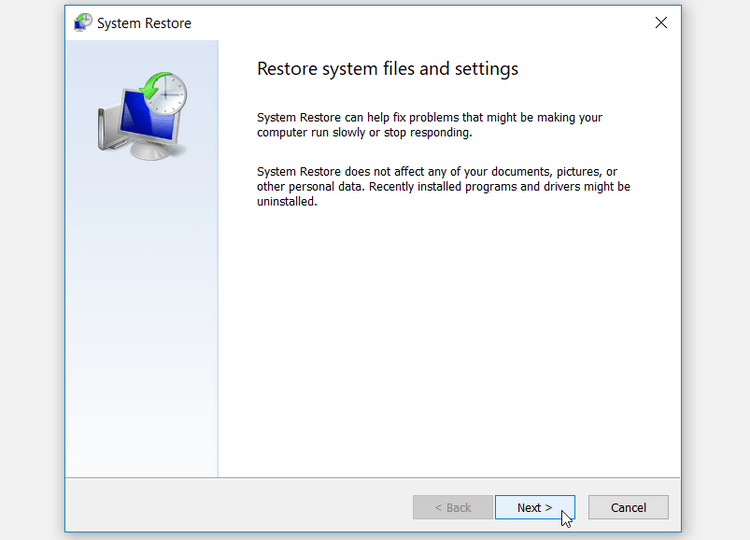
  2. In the Recovery window , click Open System Restore .
  3. In the window that appears, click Next to continue.
  4. Next, select the desired restore point from the list that appears in the pop-up window. There, click Next > Finish .
How to fix Windows Quick Assist not working error

The PC may restart several times to complete the recovery process. Wait for the process to complete, then try Quick Assist again.

If all of the above doesn't work, the final solution is to restore your PC to factory settings.

Above are ways to fix Windows Quick Assist errors . Hope the article is useful to you.

Sign up and earn $1000 a day ⋙

Leave a Comment

How to Create a Blue Screen of Death (BSOD) to Prank Your Friends

How to Create a Blue Screen of Death (BSOD) to Prank Your Friends

Blue screen of death (BSOD) is a common and not new error of Windows when the computer is experiencing some serious system error.

Summary of common Run CMD commands

Summary of common Run CMD commands

Instead of performing manual and direct access operations on Windows, we can replace them with available CMD commands for faster access.

Try these Wi-Fi tips while on vacation to reduce roaming costs!

Try these Wi-Fi tips while on vacation to reduce roaming costs!

Coming home to expensive data roaming charges probably isn't what you want. Luckily, there are some handy ways to cut those roaming costs.

How to fix network adapter not found error on Windows 10

How to fix network adapter not found error on Windows 10

Many people have encountered the problem of network adapter disappearing from Device Manager or receiving a missing network adapter message. This article will guide you on how to fix the missing network adapter driver problem on Windows 10.

How to delete individual system restore points in Windows

How to delete individual system restore points in Windows

Windows automatically creates system restore points up to a set limit, leaving you with dozens of restore points you never use.

Must-Have Windows Desktop Visual Enhancement Tools

Must-Have Windows Desktop Visual Enhancement Tools

If you're tired of staring at the same interface every day, these tools will enhance your desktop experience.

Windows 11 wont respect your privacy until you make these changes!

Windows 11 wont respect your privacy until you make these changes!

Windows 11 has a reputation for being a privacy-poor operating system, with many default settings that can cause privacy problems. But don't worry - there are ways to regain some control in this area.

How to View All Accounts on Windows 11

How to View All Accounts on Windows 11

On Windows 11, checking all the accounts on your computer can be useful in many cases. Here is a guide to view all accounts on Windows 11.

Learn about dark web tracking service F-Secure ID Protection

Learn about dark web tracking service F-Secure ID Protection

Many people never considered the dark web a real threat until one of their favorite services issued a warning about a data breach.

Fix error of not being able to open Windows Security on Windows 11

Fix error of not being able to open Windows Security on Windows 11

This article will help you fix the error Windows Security cannot run on Windows 11.

12 Most Useful PowerShell Commands for Windows

12 Most Useful PowerShell Commands for Windows

Most IT admins use PowerShell for scripting and automation, but it's not just for IT pros—anyone who deals with messy folders needs these commands.

12 Best Custom PC Building Websites

12 Best Custom PC Building Websites

Building a custom PC is no easy task, especially for beginners. Luckily, there is plenty of help available on the Internet.

How to delete old Windows restore points to free up space

How to delete old Windows restore points to free up space

By checking your storage usage, deleting old restore points, and setting reasonable storage limits, you can keep your storage under control without sacrificing its protection.

How to fix Microsoft Store not working error

How to fix Microsoft Store not working error

Microsoft Store (Windows Store) is not the most popular app store, as it is full of bugs, issues, and tends to be unstable.

What is Windows Superfetch (SysMain)? How to disable Superfetch?

What is Windows Superfetch (SysMain)? How to disable Superfetch?

SuperFetch is available on Windows versions but is known by very few users. In the article below, WebTech360 will guide you how to enable or disable SuperFetch on Windows 10/8/7.