Fix the error of not being able to type page numbers in Microsoft Word

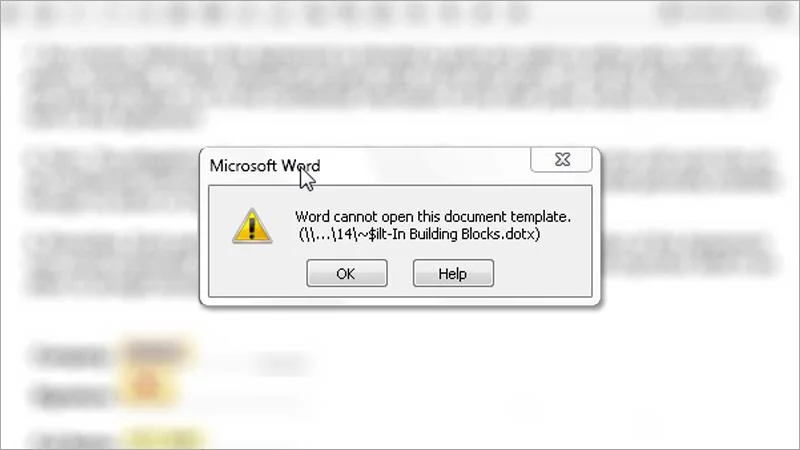
Microsoft Word  is a word processing program that probably no one does not know if you have ever used a computer. However, in the process of using, we often encounter some small errors. Page numbering error in Microsoft Word is a rare error, so there are very few references and instructions on how to fix this page numbering error. This error appears when you manipulate page numbering and receive the message " Word cannot open this document template ... " or the Page Number section is greyed out, you cannot number pages in Microsoft Word. This article The Teaching Manual will guide you on how to thoroughly fix the page numbering error in Microsoft Word 2007 to 2019 and Office 365, let's do it together.
Fix the error of not being able to type page numbers in Microsoft Word

There are 3 ways to fix this error, please follow. However, you need to turn off all the files you are editing before performing the steps to fix the page numbering error.

Way 1 Enable Building Blocks.dotx template

Maybe because some file Building Blocks.dotx is disabled, so follow the instructions below to Enable this file.

For Microsoft Word 2007 and 2010

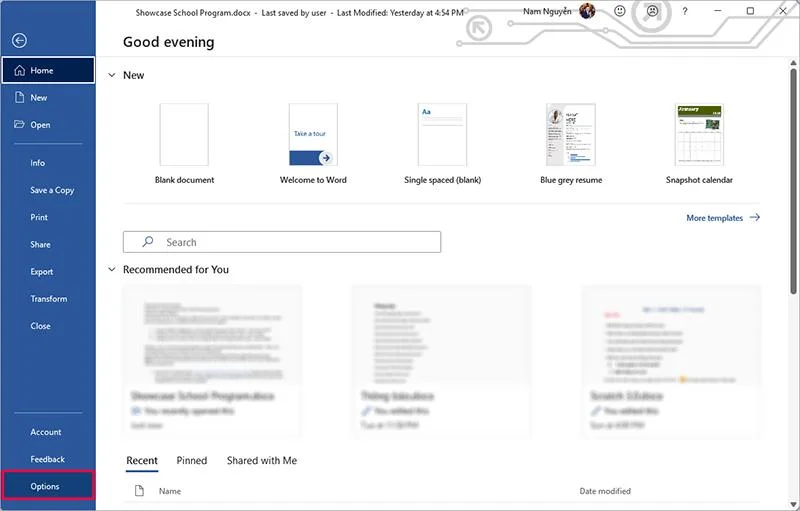
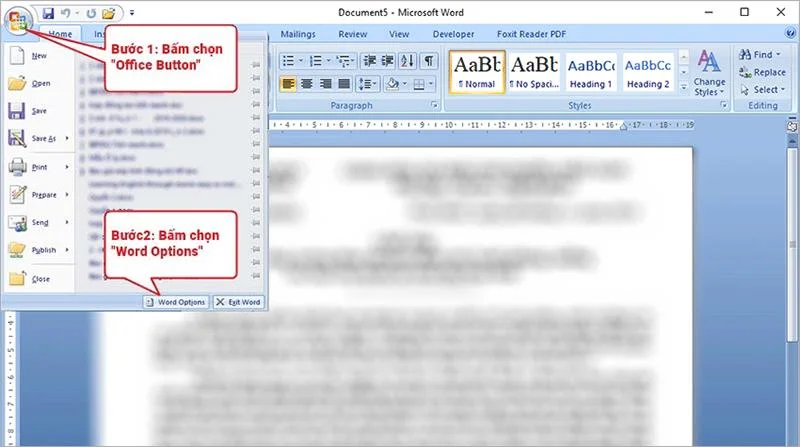
 Step 1: Click to select  Office Button  then select  Word Options

Fix the error of not being able to type page numbers in Microsoft Word

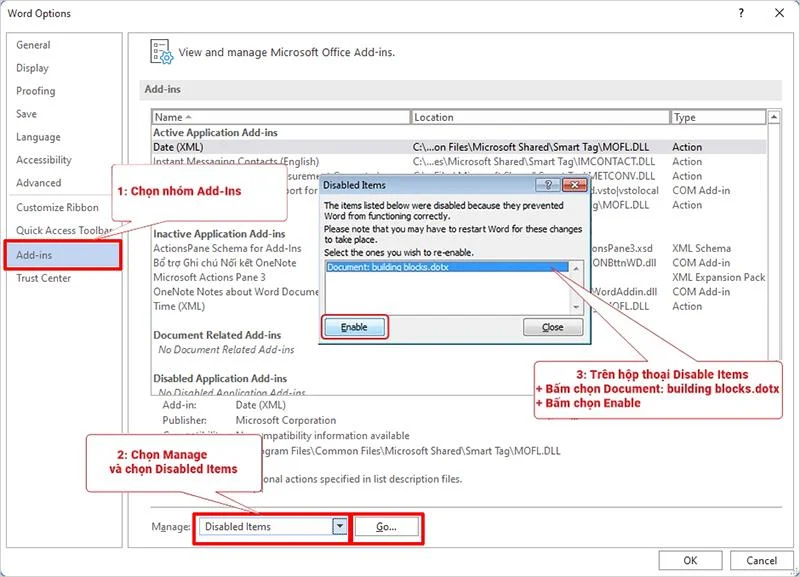
Step 2: Enable  building blocks.dotx

+ Click to select the  Add-Ins group

+ Click to select  Manager  >  Disable Item s > Go…

– Select Document:  building blocks.dotx  and click  Enable

Fix the error of not being able to type page numbers in Microsoft Word

For Office 2013 and later

Step 1. Click  File/Options

Fix the error of not being able to type page numbers in Microsoft Word

Step 2: Enable  building blocks.dotx

+ Click to select the  Add-Ins group

+ Click on  Manager  >  Disable Item s >  GO …

– Select Document:  building blocks.dotx  and click  Enable

Fix the error of not being able to type page numbers in Microsoft Word

Method 2 Restore files Normal.dot, Normal.dotm

Deleting the file Normal.dot, Normal.dotm means that the default settings such as paper size / font ... before will return to default.

Do not worry! Will not affect the system because MS Office will automatically generate a new Normal file ( Default )

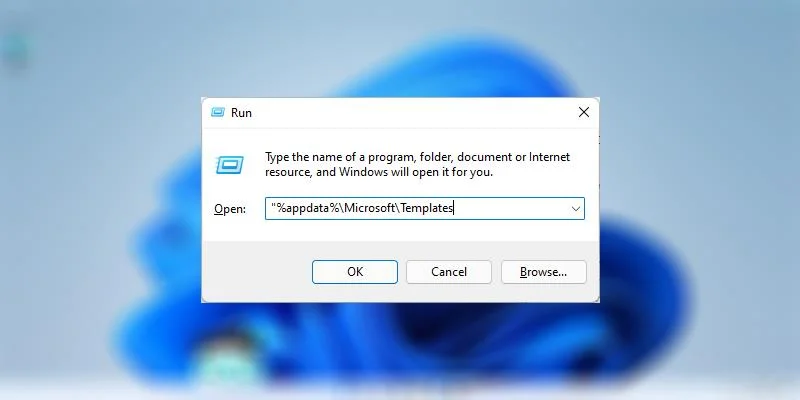
– Step 1: Press  Windows + R     to quickly open the RUN dialog box and  type “%appdata%\Microsoft\Templates”  and press OK or Enter

Fix the error of not being able to type page numbers in Microsoft Word

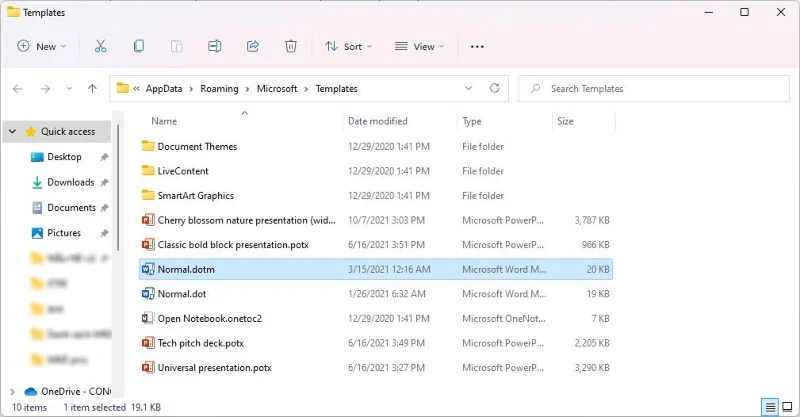
– Step 2: Delete all files  Normal.dot ,  Normal.dotm  in folder

Fix the error of not being able to type page numbers in Microsoft Word

Now start Microsoft Word and give it a try. If this method still can't fix the page numbering error, then let's move on to the 3rd method.

Method 3 Fix page numbering errors in Microsoft Word

Step 1. Find Folder Options: Click  Start > Control Panel > Appearance and Personalization > Folder Options  or click Search Folder Options to search quickly.

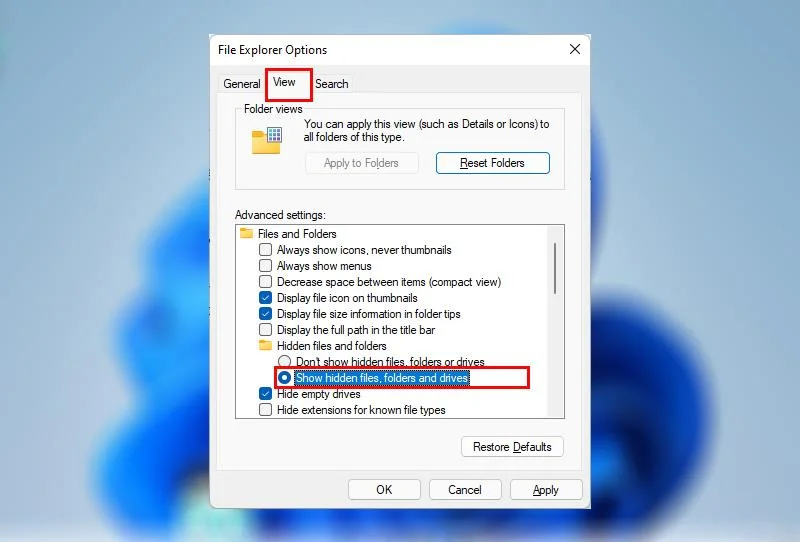
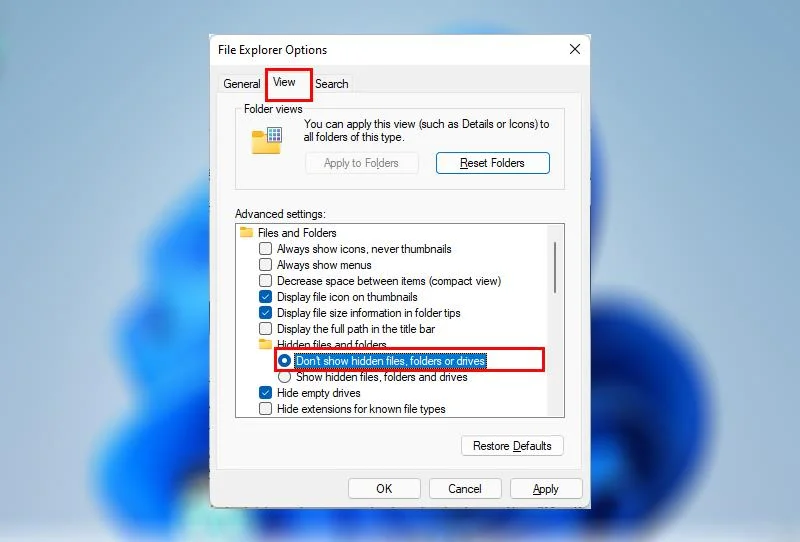
Go to the View tab   > Hidden files and folders  > turn on  Show hidden files, folders and drives

Fix the error of not being able to type page numbers in Microsoft Word

Step 2: Search for *.dotx . files

Open Windows Explorer (Windows + E) and type in the search box:  *.dotx

Many *.dotx files will be found, and two of them begin with a  ~ sign . You select and delete both files  (remember to turn off Microsoft Word before doing this)

That way you have solved the error of not being able to type pages, please return the  "Don't show hidden files and folders" status  for Folder Options to make your computer look cleaner.

Fix the error of not being able to type page numbers in Microsoft Word

So you have overcome the error that makes you feel uncomfortable when editing text in word, very simple, right? If you find it useful, please share it with your colleagues and friends. Good luck

Explore more:
Leave a Comment

Enable FIPS Mode on SLES 15 and Verify the Boot State

Enable FIPS Mode on SLES 15 and Verify the Boot State

Follow SUSE’s SP7 procedure to enable FIPS mode, reboot safely, verify the active policy, and check whether your compliance requirement calls for validated modules.

Set Up a LUKS-Encrypted Data Volume on SLES

Set Up a LUKS-Encrypted Data Volume on SLES

Compare YaST and cryptsetup for a new encrypted SLES data volume, choose LUKS1 or LUKS2, and verify unlock and mount behavior safely.

Build a Custom AppArmor Profile on SUSE Linux

Build a Custom AppArmor Profile on SUSE Linux

Create, refine, and verify a least-privilege AppArmor profile on SLES 15 SP7, with a clear note on SLES 16’s SELinux default.

Build a Local SUSE Update Server with RMT on SLES 15

Build a Local SUSE Update Server with RMT on SLES 15

Set up RMT on SLES 15, mirror entitled repositories, and verify HTTPS registration and package access from a test client.

Join SLES 15 to Active Directory with SSSD in YaST

Join SLES 15 to Active Directory with SSSD in YaST

Connect SLES 15 to AD with YaST’s SSSD-based logon management, then verify directory lookup, domain login, and Kerberos tickets.

Enable SLES Live Patching and Verify a Kernel Fix

Enable SLES Live Patching and Verify a Kernel Fix

Set up the right Live Patching path for SLES 16.0 or 15 SP7, apply eligible kernel fixes, and confirm what is active without confusing it with a reboot-required kernel update.

Install and Sign Custom Kernel Modules on SLES 15 Secure Boot

Install and Sign Custom Kernel Modules on SLES 15 Secure Boot

Load a custom SLES 15 kernel module without disabling Secure Boot. Match the running kernel, sign the .ko file, enroll a MOK key, and verify loading.

Keep Services Available During a SLES 15 SP5 to SP6 Upgrade

Keep Services Available During a SLES 15 SP5 to SP6 Upgrade

SLES 15 SP5 can migrate online to SP6, but each node must reboot. Use a tested rolling upgrade or blue-green cutover to keep workloads reachable.

Apply the SLES 15 STIG Safely with OpenSCAP

Apply the SLES 15 STIG Safely with OpenSCAP

Use SUSE’s supported STIG profile to scan SLES 15, test remediation, review remaining findings, and retain assessment evidence.

Restore Cockpit Access to SUSE Linux Enterprise Server

Restore Cockpit Access to SUSE Linux Enterprise Server

Trace a failed Cockpit connection through DNS, port 9090, the systemd socket, firewalld, TLS, and login settings using current SUSE guidance.