Instructions for changing Pagefile size and location on Windows

Occasionally, you will see a fix recommended by the Internet that asks you to change the location and/or size of the pagefile or pagefile.sys file on your Windows PC. The pagefile is a part of your system's virtual memory that Windows uses to extend the memory available for everyday tasks. If you know why you're being asked to do so, follow this guide to change the size and location of the pagefile in Windows.

Change Pagefile Size in Windows

When Windows is running low on physical memory (RAM), it accesses the pagefile.sys system file and moves all the least used bits of memory into that file. The system can then clear physical RAM for any additional tasks. Windows automatically manages the pagefile size by default, so only make changes if you really need to. Windows typically allocates about 1/8 of your total RAM or 4GB (whichever is greater) on your hard drive to the pagefile.

Follow the steps below to change the pagefile size:

Right-click the Windows button, select System , then select Advanced system settings .

Instructions for changing Pagefile size and location on Windows
Go to Windows system settings

In Performance under the Advanced tab , click Settings .

Instructions for changing Pagefile size and location on Windows
Advanced Windows System Settings

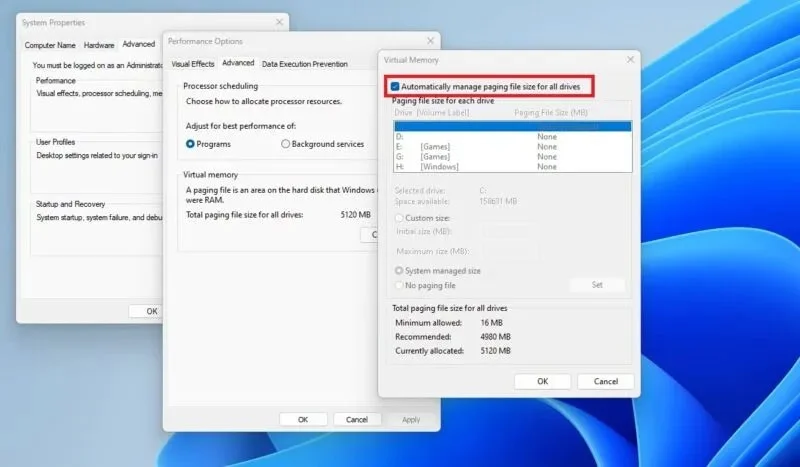
In the Virtual memory section of the Advanced tab , click Change . Uncheck Automatically manage paging file size for all drives in the Virtual Memory window , select the paging file drive, and click the button next to Custom size . Enter the Initial size and Maximum size values ​​for your pagefile, and click OK to save the changes.

Instructions for changing Pagefile size and location on Windows
Windows system virtual memory

It's best to restart your system for the changes to take effect. Also, if you're experiencing high memory usage in Windows, try increasing your virtual memory, although this may not completely fix the problem.
Change Pagefile Location in Windows

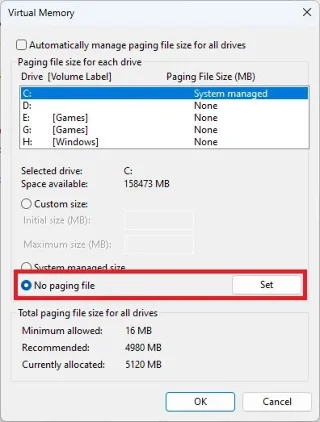
To change the pagefile location, follow the steps above until the Virtual Memory window opens, then uncheck the box next to Automatically manage paging file size for all drives . Select the default paging file drive, click the button next to No paging file , and click Set to effectively disable the paging file on the drive you selected.

Instructions for changing Pagefile size and location on Windows
Select No paging file

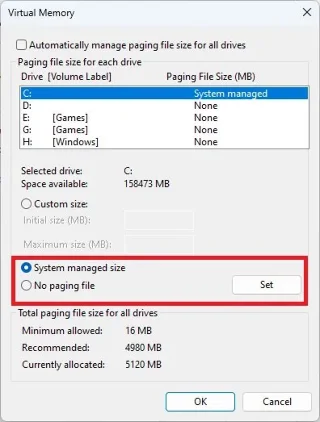
Select the drive where you want to store the paging file, then click the button next to System managed size and click Set to apply the changes. Click OK and close all windows.

Instructions for changing Pagefile size and location on Windows
Change pagefile location

Restart your system for the changes to take effect.
You can refer to some articles below:

Leave a Comment

Enable SLES Live Patching and Verify a Kernel Fix

Enable SLES Live Patching and Verify a Kernel Fix

Set up the right Live Patching path for SLES 16.0 or 15 SP7, apply eligible kernel fixes, and confirm what is active without confusing it with a reboot-required kernel update.

Install and Sign Custom Kernel Modules on SLES 15 Secure Boot

Install and Sign Custom Kernel Modules on SLES 15 Secure Boot

Load a custom SLES 15 kernel module without disabling Secure Boot. Match the running kernel, sign the .ko file, enroll a MOK key, and verify loading.

Keep Services Available During a SLES 15 SP5 to SP6 Upgrade

Keep Services Available During a SLES 15 SP5 to SP6 Upgrade

SLES 15 SP5 can migrate online to SP6, but each node must reboot. Use a tested rolling upgrade or blue-green cutover to keep workloads reachable.

Apply the SLES 15 STIG Safely with OpenSCAP

Apply the SLES 15 STIG Safely with OpenSCAP

Use SUSE’s supported STIG profile to scan SLES 15, test remediation, review remaining findings, and retain assessment evidence.

Restore Cockpit Access to SUSE Linux Enterprise Server

Restore Cockpit Access to SUSE Linux Enterprise Server

Trace a failed Cockpit connection through DNS, port 9090, the systemd socket, firewalld, TLS, and login settings using current SUSE guidance.

Configure Reliable Ethernet Failover with SLES 15 Bonding

Configure Reliable Ethernet Failover with SLES 15 Bonding

Create a redundant Ethernet connection on SLES 15 with YaST and Wicked, configure active-backup bonding, and verify both ports and failover.

Build a Reusable AutoYaST Profile for SLES 15 Installs

Build a Reusable AutoYaST Profile for SLES 15 Installs

Turn an existing SLES 15 system into a reviewed AutoYaST profile, validate it, and use it to deploy a test server with fewer manual steps.

SLES 15 KVM Setup: Make Selected VMs Start at Boot

SLES 15 KVM Setup: Make Selected VMs Start at Boot

Install the SLES 15 KVM and libvirt tools, enable the right host service, and configure selected virtual machines to start after a reboot.

Diagnose a SUSE Server That Hangs at the systemd Shutdown Screen

Diagnose a SUSE Server That Hangs at the systemd Shutdown Screen

Use systemd jobs and the previous boot journal to locate a slow service, mount, or storage dependency, then correct it without masking the cause.

Open Only the Web Traffic Your SLES 15 Server Needs

Open Only the Web Traffic Your SLES 15 Server Needs

Use firewall-cmd to inspect the active zone, allow HTTP safely, preserve SSH access, and verify that the rule survives a reload on SLES 15.