Home
» How to
»
Instructions on how to remove TeamViewer completely from the computer
Instructions on how to remove TeamViewer completely from the computer
Video Instructions on how to remove TeamViewer completely from the computer
TeamViewer is the world's leading remote desktop control and control software that is highly rated and used by many people. It can run on multiple platforms and supports more than 30 languages so that users from many different countries can still experience it.
However, many users want to uninstall TeamViewer from the computer because this program slows down the computer speed or now no longer uses it ... Besides these common reasons, there is another cause Another factor that makes users want to uninstall TeamViewer immediately is security. Recently, there have been many cases of computers being controlled by hackers, causing data and financial losses of some TeamViewer installers, although this information has not been officially verified.
So, for whatever reason you want to uninstall TeamViewer and tried to remove it by normal way but without success, please refer to the following article on how to uninstall TeamViewer completely:
Instructions for uninstalling TeamViewer by Control Panel
Here are the steps to uninstall TeamViewer with Control Panel on different operating system versions:
1. On Windows 7 and Windows Vista
In Start , type uninstall in the search box.
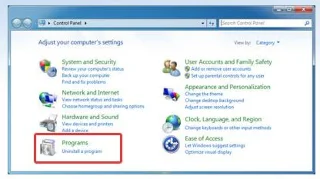
Select Uninstall a program from the search results.
Find TeamViewer in the list of installed applications and right-click on the program, then select Uninstall.
In the next window, put a checkmark in the Remove Settings to remove all files to save the custom settings of this program. Then click on Uninstall.
After the uninstall process is complete, click Close.
Delete TeamViewer in the Registry
Press the Windows + R key combination , in the Run dialog box , type Regedit and press Ok.
At the Registry Editor window , click on Edit and select Find ... Then, type TeamViewer in the Find what box , click the Find Next button .
You will see entries related to TeamViewer, delete all of them by right-clicking and selecting Uninstall , then restarting the computer.
2. On Windows 8, 8.1
Press Windows + E keys to open File Explorer . Then, click on the Computer tab and select Open Control Panel .
Click on Uninstall a program.
Select TeamViewer from the list of installed software on the computer and click Uninstall.
3. On Windows 10
Click Start> Control Panel and select Uninstall a program.
Select TeamViewer and click Uninstall.
After the uninstall process has finished, select Close and restart the computer.
ATTENTION:
You delete TeamViewer in the Registry on Windows 8, 8.1 and Windows 10 the same steps as on Windows 7 and Windows Vista
Uninstall TeamViewer with Perfect Uninstaller
Perfect Uninstaller is a professional removal tool to remove all unwanted programs as well as remove redundant files, invalid registry entries from your computer system easily, quickly and safely.
Uninstall programs faster than Windows Programs and Features.
Uninstall any programs that cannot be removed by using Windows Add or Remove Programs.
Display and remove hidden programs installed on your computer without your knowledge
Completely clean out useless registry files and errors.
Make backups of common registry files to restore Windows system easily
Displays details including installation date, manufacturer, and other information of each program installed on your computer.
After downloading and installing Perfect Uninstaller, follow these steps:
Step 1: Start Perfect Uninstaller and select TeamViewer from the list of programs, then click Uninstall.
Step 2: A message box pops up showing you the details of the program including its version, installation location, manufacturer and homepage. Click the Next button to continue the process.
Step 3: In the pop-up dialog box, click on Next to confirm uninstall.
Step 4: Click Close to complete the uninstall process.
Step 5: In the next window, select Yes to confirm deleting the remaining balances.
The uninstaller automatically scans the registry and all drives for junk files.
Step 6: After the scan is completed, Pefect Uninstaller will display a list of the remaining files of TeamViewer. Click on Next to delete them.
In addition, the registered version of Perfect Uninstaller provides a Force Uninstall option that allows users to completely uninstall software that cannot be uninstalled by the usual method. To use this feature, follow these steps:
Select TeamViewer and click on Force Uninstaller.
Click on the branch diagram icon next to the Scanning program path and select the TeamViewer folder , then click Next to delete them.
There are many ways to remove TeamViewer completely from your computer system, but the instructions as above article are considered the simplest and most effective method. In addition, you can still install and use TeamViewer as often as needed or the security issue has been fixed.
Completely Uninstall TeamViewer from Computer
Do you want to uninstall TeamViewer completely from the computer? Do you receive strange errors when uninstalling TeamViewer? Do you fail to install the updated version or other program after uninstalling TeamViewer? Many computer users can not completely uninstall the program for one reason or another. If some files and components of the program are still left in the system, that means the program is not completely removed and uninstalled. Those leftovers will slow down your computer and stuff your system with invalid files as well as result in many problems for your life, such as strange error popups and unable to install other programs. There are many methods to uninstall the program, please see below:
Manually Uninstall TeamViewer with Windows Add/ Remove Programs
Windows Add/ Remove Programs offers users a way to uninstall the program and every Operating System has Add/ Remove Programs feature.
* Click Start menu and run Control Panel.
* Locate TeamViewer and click Change/ Remove to uninstall the program.
* Follow the uninstall wizard and uninstall the program.
Manually Uninstall TeamViewer with Build-in Uninstaller
Most computer programs are installed with its build-in uninstaller that can also help uninstall the program.
* Click Start menu and move your mouse to All Programs.
* Find TeamViewer folder and click on its Uninstaller.
* Follow its uninstaller and uninstall the program.
To run its uninstaller, you can also
* Go to the folder where the program is installed.
* Locate its uninstaller usually named as unins000.exe or uninstall.exe
* Double click on its uninstaller and follow it to uninstall the program.
Please know that both of Windows Add/ Remove Programs and its build-in uninstaller can only uninstall the main executable files of the program, but not all program files and components. Some invalid files may be left in system registry and folders. To completely remove TeamViewer, you need to get rid of those remnants, otherwise, it will slow down your PC and block you installing other incompatible programs.
To thoroughly delete its files, please follow the steps:
* Run Registry Editor
* Find and delete all registry entries of the program in HKEY_CURRENT_USER\Software, HKEY_LOCAL_MACHINE\SOFTWARE and HKEY_LOCAL_MACHINE\Software\Microsoft\Windows\CurrentVersion\Run\eg ui
* Find and delete all files of the program in system folders C:\Program Files\, C:\Document and Settings\All Users\Application Data\ and C:\Documents and Settings\%USER%\Application Data\.
Note: We only recommend advanced computer users to manually edit registry and remove TeamViewer, because deleting any single registry entry by mistake will lead to severe problem or even system crash.
A Better Way to Uninstall TeamViewer with Added Benefits
There is a much easier and safer way to uninstall TeamViewer completely. A third party uninstaller can automatically help you uninstall any unwanted programs and completely remove all of its files and free up your hard disk space. Especially when users can not find the program in Add/ Remove Programs or its build-in uninstaller, a third party uninstaller can save your much time and frustration.