Text shading in Photoshop will help you create a more wonderful feeling for your text, avoiding the boring phenomenon compared to conventional typefaces. This article of WebTech360 will help you easily learn how to create text shadows in Photoshop with simple but extremely beautiful and outstanding manipulations!
Uses Of Creating Text Shadows In Photoshop
Creating text shadows in Photoshop is a beautiful effect that is popular with designers in the design process and produces impressive design products.
They appear not only in newspapers and magazines, but also on packaging , textual publications appearing in most media and social networks. Only with the shadow effect, there are many sub-effects contained in it, for example, 2D - 3D text shadow effects, reclining shadows, sinking shadows, floating shadows...
In the scope of this article, we will guide you through tips on how to shade text in Photoshop with 3 simple styles: create simple text shadows, create short shadows and create long shadows.
Tutorial How To Create Text Shadows With 3 Simple Styles In Photoshop
Create a simple text shadow
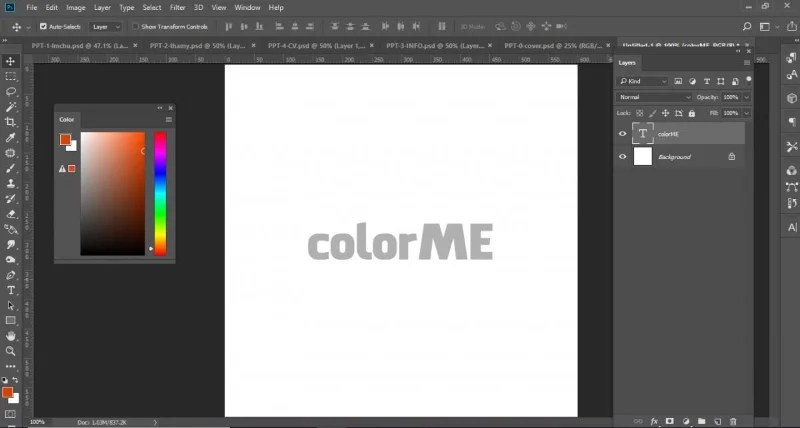
Step 1: To start creating text shadows in Photoshop, first open Adobe Photoshop, create a new working file with the parameters and sizes you set to suit and balance.
Step 2: Select the Text tool ( shortcut T ) to type a piece of text that you need to shade. Here I will use two contrasting colors to highlight the subject. Use red color with code #e50f38l for background and use color code #ffffff for text layer, font UTM Facebook.

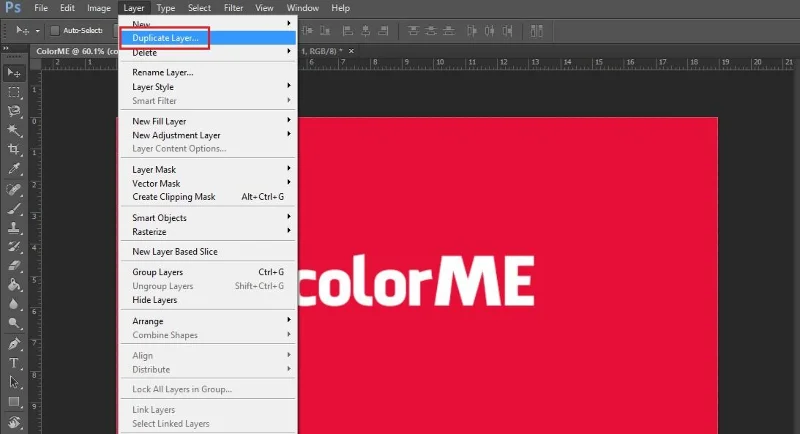
Step 3: Use the tool to duplicate the text layer by selecting Layer > Duplicate Layer ... on the selection bar or using the Ctrl + J key combination with the window operating system.

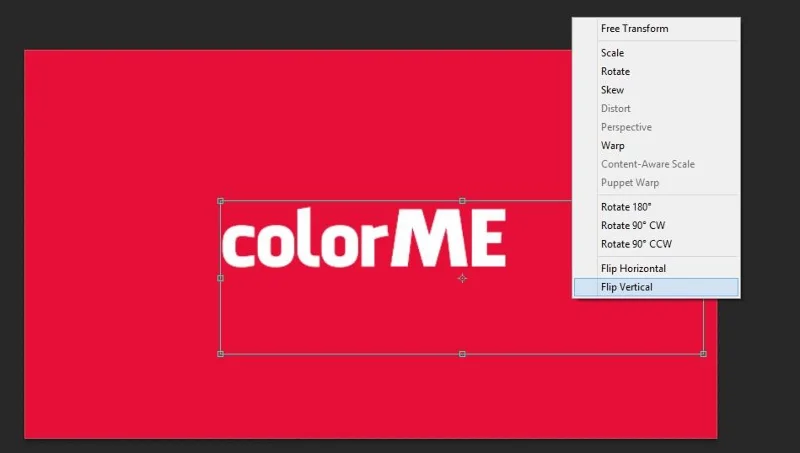
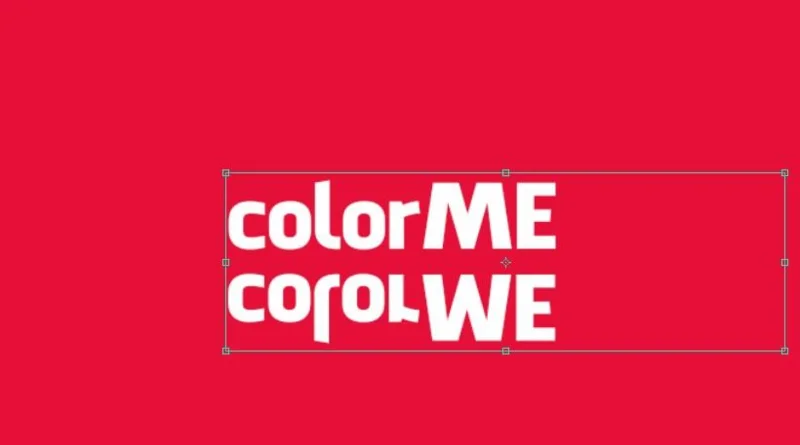
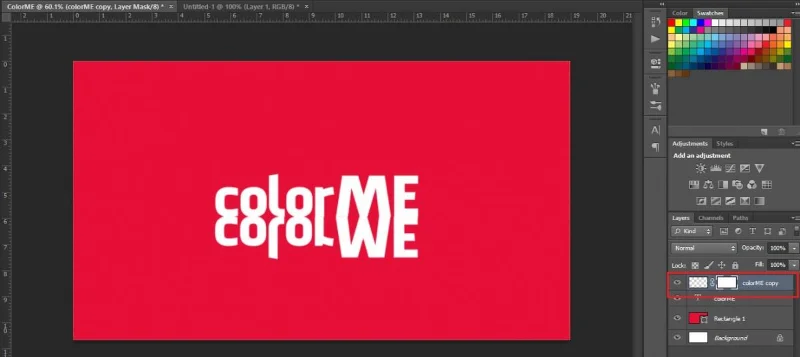
Step 4: Select the layer that has just been duplicated, use Ctrl + T to adjust the position of this layer, right-click then select the Flip Vertical tool to reverse the new layer compared to the original position to change the position of the layer. create shadow.


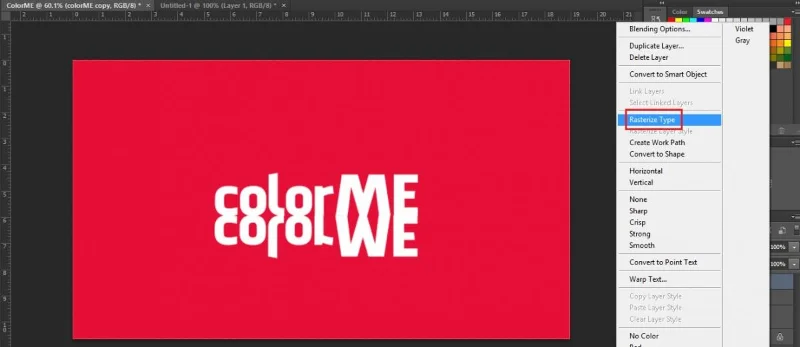
Step 5: To continue creating text shadows in photoshop, right click on the newly adjusted layer then select > Rasterize Type to change the layer 's format to Graphic .

Step 6: Click the Add Vector mask icon to create a mask above this layer.

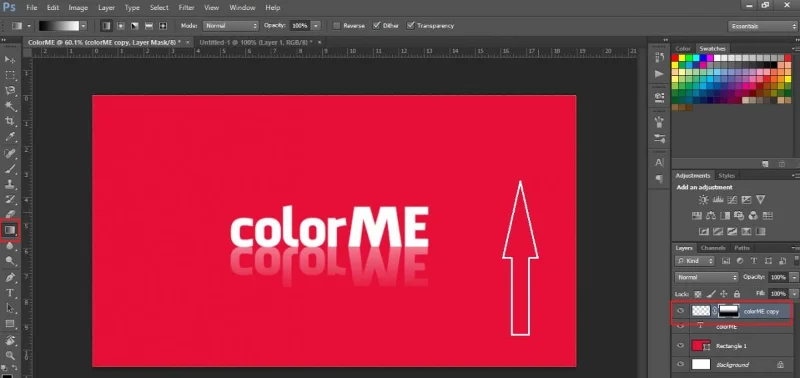
Step 7: Click on the Add Vector mask area of the layer copy , then select the Gradient Tool (shortcut is G) to fill the text color. Hold and drag the mouse on this layer from bottom to top. Note, to keep the gradient direction straight, remember to hold shift when manipulating!

Step 8: Adjust the Opacity opacity for the newly created layer, the Opacity is about 60% for a more natural image.
So after 8 steps, we have created a simple text shadow effect with tools in photoshop.

Create short shadows
Step 1: To create a text shadow in photoshop with a short shadow. First you need to create a new document. Use the Type Tool to type the text that you want to create the effect on. In this example we will create a new document with dimensions of 600px by 600px and we will use the font UTM Facebook .

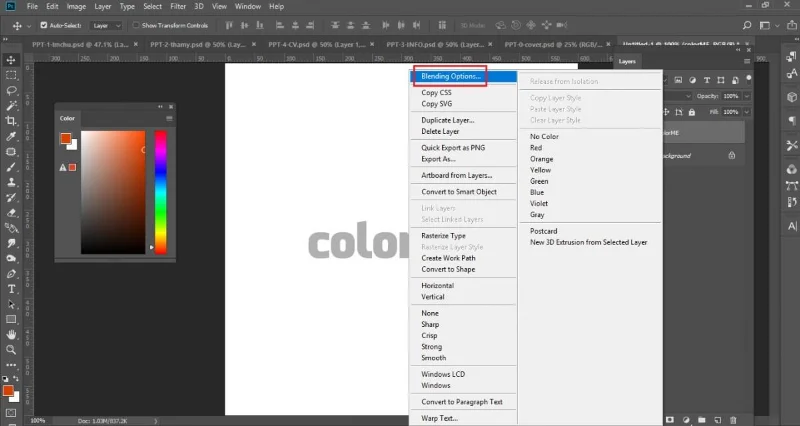
Step 2: Right click on the text layer > Then use Blending Option to create a shadow effect.

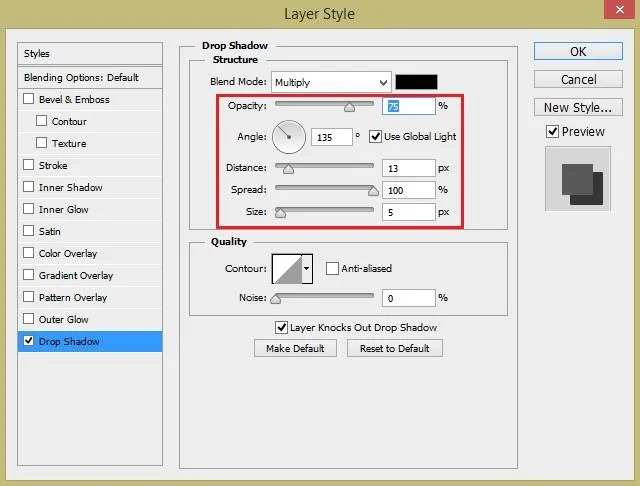
To get a short shadow choose Drop Shadow . After you have cast the shadow, go to the text layer and change the properties on the panel to the following parameters:
- Angle: let it be 135 degrees
- Distance: let it be 13px
- Spread: let it be 100%
- Size: let it be 5px

As a result we will have a small shadow after the text:

Long shadow
Step 1: To create a text shadow in photoshop with a long shadow. First you need to create a new document. Use the Type Tool to type the text that you want to create the effect on. In this example we will create a new document with dimensions of 600px by 600px and we will use the font UTM Facebook .
Step 2: Right click on the text layer > Then use Blending Option to create a shadow effect.
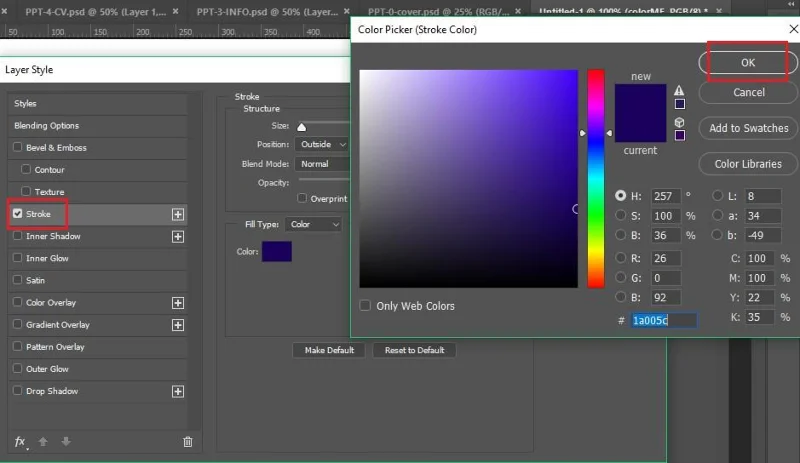
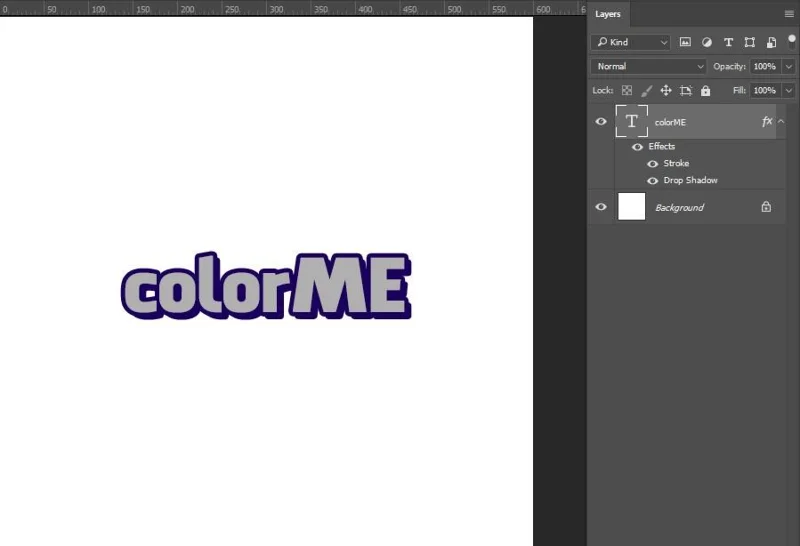
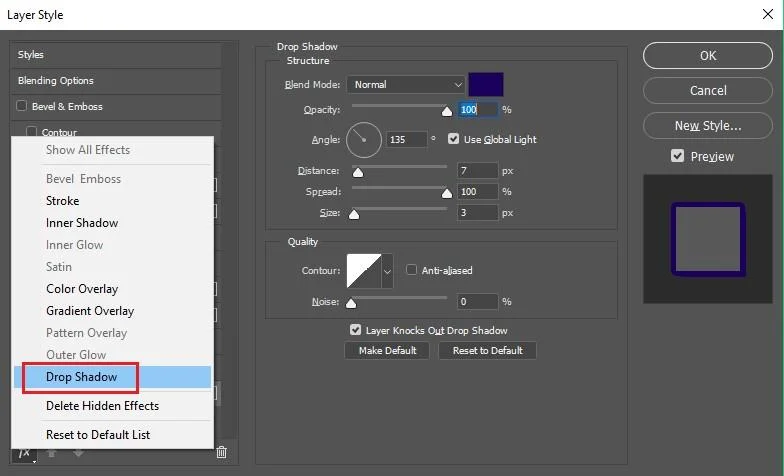
To get a long shadow, on the Layer Style panel , choose Stroke and Drop Shadow . In this case we will keep the stroke color the same color as the shadow color.

Now we will get the result:

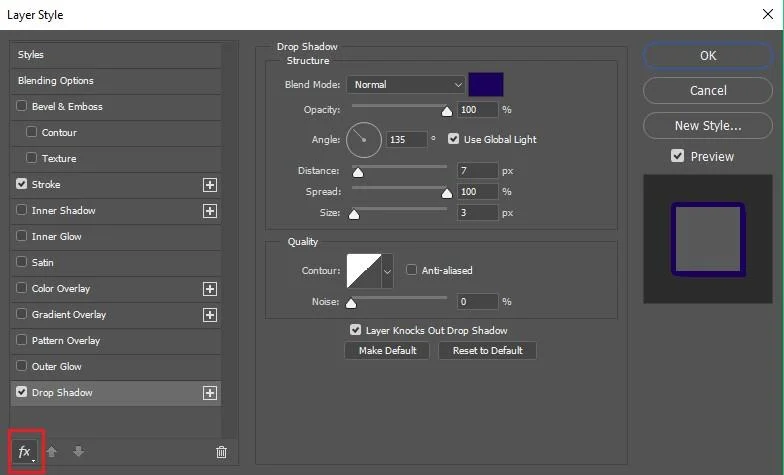
Step 3: Next, to add another Drop Shadow by clicking the fx icon at the bottom of the Layer Style panel .

Select on Drop Shadow, now you will create a new shadow effect for your text layer .

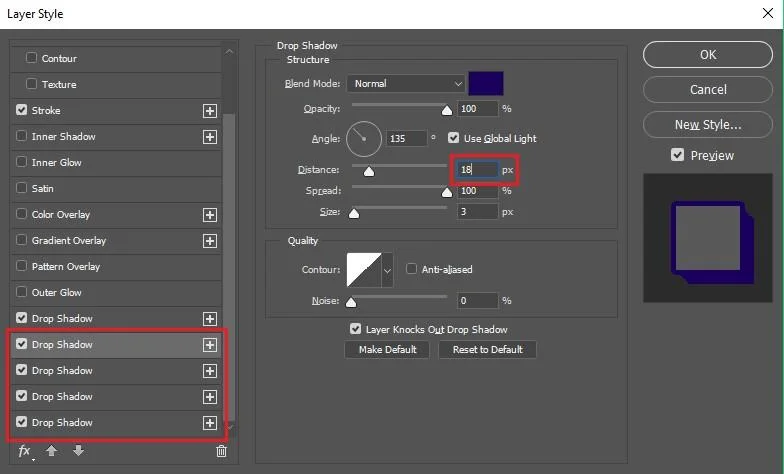
Choose a new style and adjust the Distance property . You should increase the Distance slightly from the first Drop Shadow . Here we will leave it at 7px.
Continuing like this, add a Drop Shadow and adjust the Distance as above.
Now we will create a text shadow in photoshop with an extra long shadow by combining all the shadows placed into a single layer. You can also use the Layer Group feature to add additional Drop Shadows . Place the text layer into the Layer Group.
When adding a Drop Shadow to a Layer Group, some settings will need to be adjusted to match the color and style of the previous shadow. Also, you must set the drop shadow so that it appears as a continuation of the previous layer styles.

The result will be as follows:

So with a few simple steps, you can create text shadows in Photoshop , apply to be creative with the method you just learned. If you're interested in Photoshop, stay tuned for more of our group's posts!
You can refer to the following minimum configuration for Photoshop design:
Configuration for Designer: HHPC GAMING - INTEL CORE i3 10100 | 16G RAM | GTX 1050Ti
- MAINBOARD: GIGABYTE H410M-H
- CPU: INTEL CORE i3 10100 up to 4.3G | 4 CORE | 8 THREAD
- DISPLAY: JONSBO CR-1000 RGB
- RAM: COLORFUL BATTLE AX 16GB BUS 3000 DDR4 (1x16GB)
- VGA: NVIDIA GTX 1050Ti 4GB GDDR5
- SSD: GIGABYTE SSD 240G SATA III
- HDD: CUSTOMER OPTIONS
- SOURCE: COOLERMASTER PC700 700W
- CASE: JETEK KAMADO ( NO FANS )
If you have any needs as well as answers to questions about photoshop, please contact WebTech360 for more advice.