How to merge all open windows on Windows 10 into one

You really like the tabbed browsing feature on Chrome , Firefox or Coc Coc . Help switch between multiple websites without having to open multiple windows. You can do so on Windows 10 with the help of TidyTabs.

So invite you to refer to the following article of Download.com.vn , to know how to install and use TidyTabs:

Use TidyTabs to collect all open applications on Windows 10

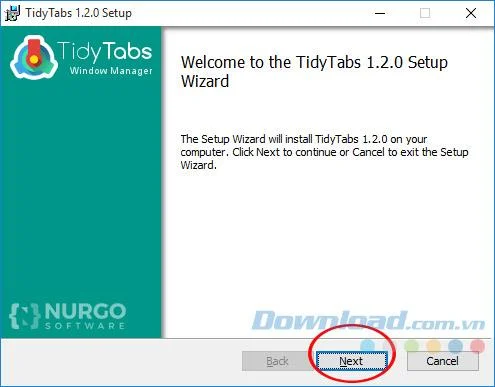
Step 1: Download TidyTabs following the download link above to your computer. Once downloaded, double-click the setup file to begin the installation process. When the TidyTabs 1.2.0 Setup window appears, click the Next button .
How to merge all open windows on Windows 10 into one

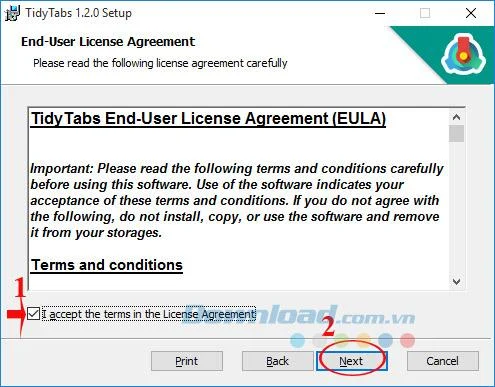
Step 2: If you agree with the terms set out by the manufacturer, check the box I accept the terms in the License Agreement and click Next.

How to merge all open windows on Windows 10 into one

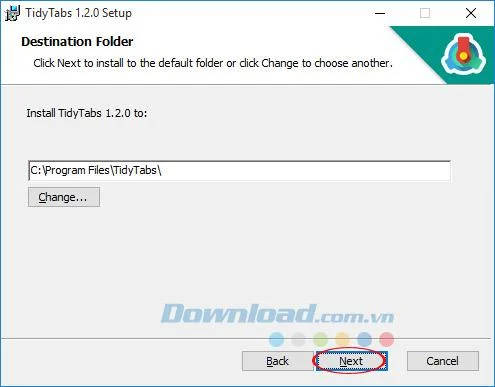
Step 3: If you want to change the installation path, click the Change button , otherwise click Next.

How to merge all open windows on Windows 10 into one

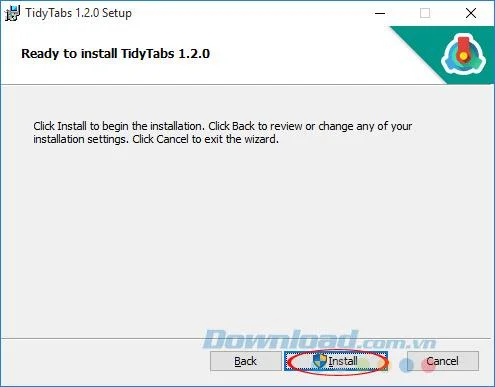
Step 4: Click the Install button to install on the computer. TidyTabs does not come with any strange ingredients, so you are assured.

How to merge all open windows on Windows 10 into one

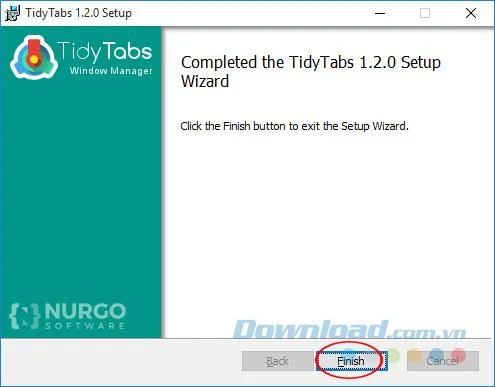
Step 5: Wait a while for the installation process to complete, the installation process fast or slow depends on your computer configuration. After installation is complete, click Finish to complete.

How to merge all open windows on Windows 10 into one

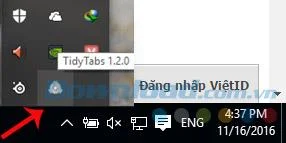
Step 6: Soon, TidyTabs will run in the background on the system, you can easily see it through the small icon in the Taskbar.

How to merge all open windows on Windows 10 into one

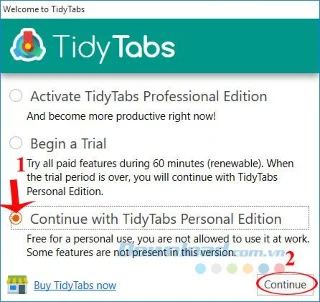
Step 7: The Welcome TidyTabs dialog box appears, select the Continue with TidyTabs Personal Edition box , then click Continue to continue the free experience.

How to merge all open windows on Windows 10 into one

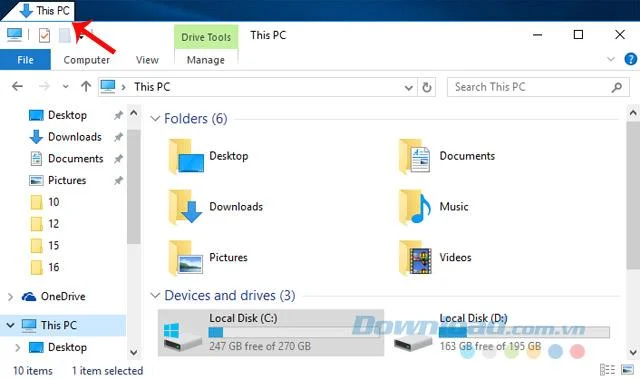
Step 8: Now, TidyTabs will help you quickly gather all open windows into one, for easier management and manipulation. Just drag the mouse to the top left corner of the application window, you will see the tab section appears.

How to merge all open windows on Windows 10 into one

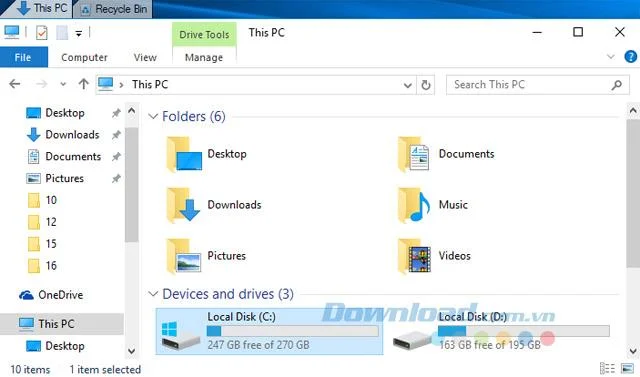
Step 9: To create a new tab, open another application window. Then drag the mouse on the tab, drag across the tab part of the other window. At this point, you will see 2 adjacent tabs (as shown below).

How to merge all open windows on Windows 10 into one

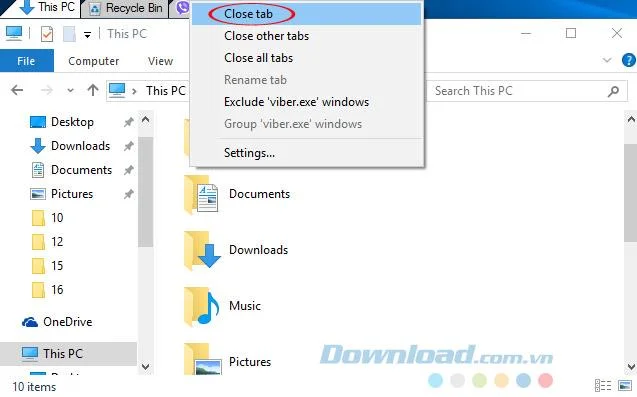
Step 10: When you need to close the tab, just right click on the tab, there will appear:

  • Close tab: Close the tab.
  • Close other tabs: Close other tabs.
  • Close all tabs: Close all tabs.

How to merge all open windows on Windows 10 into one

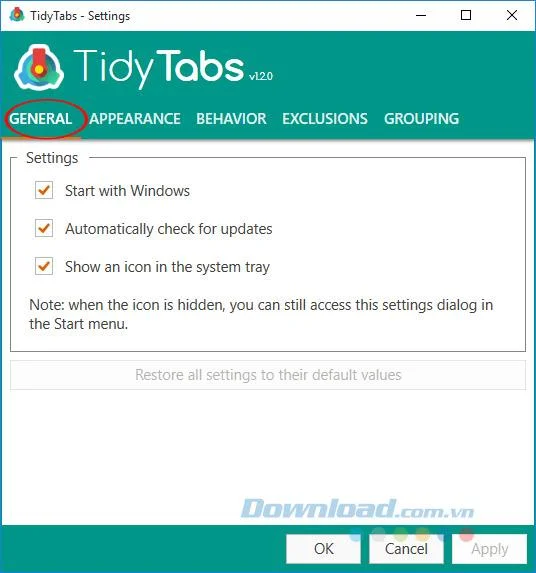
Step 11: TidyTabs also provides quite a lot of setup options in the Settings section . On the General tab will provide options to boot with the system, automatically check for new versions, display icons in the system tray.

How to merge all open windows on Windows 10 into one

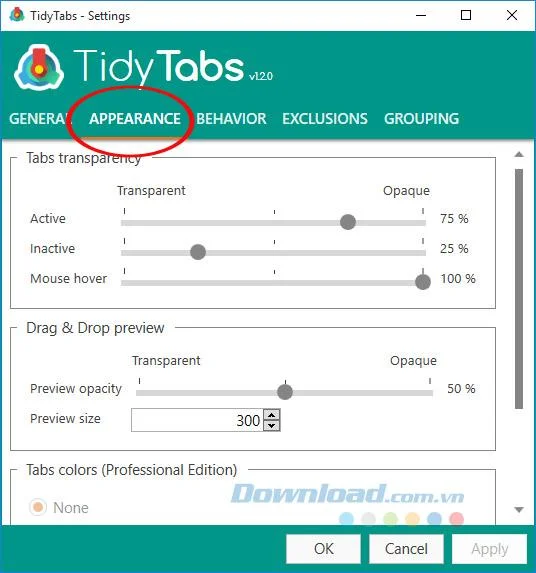
Step 12: The Appearance tab provides some interface settings such as tab opacity, tab color ...

How to merge all open windows on Windows 10 into one

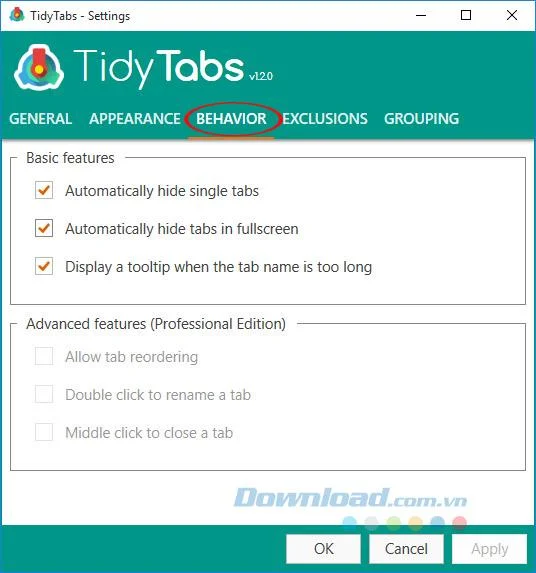
Step 13: Behavior tab will give you some settings about effects such as: Automatically hide when there is a tab, auto hide when in full screen mode ...

How to merge all open windows on Windows 10 into one

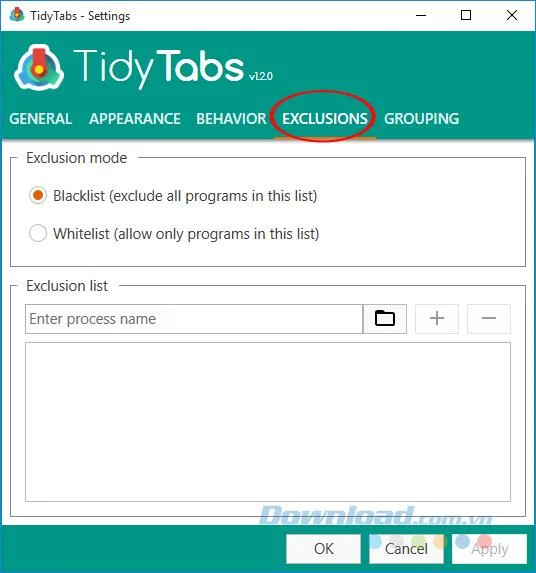
Step 14: The Exclusions and Grouping tab provides application exclusion list settings and set of application window groups for ease of use. After making your selection, click the Apply button > OK to save all changes.

How to merge all open windows on Windows 10 into one

TidyTabs helps you manage tabs more easily, saving a lot of time during use. In particular, the software does not affect the performance of the computer, so you feel secure.

I wish you successful implementation!
Leave a Comment

Diagnose High CPU from Collabora’s coolwsd or loolwsd

Diagnose High CPU from Collabora’s coolwsd or loolwsd

Find out whether CPU load comes from active documents, idle worker processes, or server capacity before changing Collabora settings or restarting the service.

Raise the CODE Container’s Memory Cap Without Guessing

Raise the CODE Container’s Memory Cap Without Guessing

Check whether Docker is capping Collabora CODE, raise the Compose memory limit safely, and confirm the running container received the new cap.

Customize Collabora CODE Toolbars Without Editing Source

Customize Collabora CODE Toolbars Without Editing Source

Simplify Collabora CODE with Compact or Tabbed mode and WOPI PostMessage controls to hide selected buttons, commands, and tabs safely.

Run Collabora CODE Behind Nginx with TLS Termination

Run Collabora CODE Behind Nginx with TLS Termination

Put Nginx in charge of HTTPS for a Collabora CODE container, forward editing WebSockets correctly, and verify the public endpoint without exposing port 9980.

Keep Text Visible When the Collabora Mobile Keyboard Opens

Keep Text Visible When the Collabora Mobile Keyboard Opens

Troubleshoot a mobile browser keyboard covering text in Collabora Online, with quick workarounds and separate checks for browsers, embedded WebViews, and host pages.

Stop Unwanted Printing and Downloads in ONLYOFFICE

Stop Unwanted Printing and Downloads in ONLYOFFICE

Set print and download limits for ONLYOFFICE links, room members, or Docs API sessions, then verify the restrictions from a recipient account.

Schedule Reliable Backups for ONLYOFFICE Workspace

Schedule Reliable Backups for ONLYOFFICE Workspace

Set a backup destination, schedule, Mail coverage, and retention limit in ONLYOFFICE Workspace, then verify the archive is ready to restore.

Deploy ONLYOFFICE Docs Enterprise with Its Official Compose File

Deploy ONLYOFFICE Docs Enterprise with Its Official Compose File

Start the Enterprise Docker Compose stack, persist its license and data, configure JWT safely, and confirm the editors are ready to integrate.

Clean Spreadsheet Text with a Reusable ONLYOFFICE Macro

Clean Spreadsheet Text with a Reusable ONLYOFFICE Macro

Use an ONLYOFFICE JavaScript macro to remove nonprinting characters and trim extra spaces from a defined spreadsheet range, with a safe review workflow.

Sync Active Directory Users with ONLYOFFICE DocSpace via LDAP

Sync Active Directory Users with ONLYOFFICE DocSpace via LDAP

Connect ONLYOFFICE DocSpace to Active Directory or OpenLDAP, import users and groups safely, map account fields, and schedule reliable synchronization.