Set Default Storage Quotas by User Role in ownCloud oCIS
Assign byte-based storage limits to new ownCloud Infinite Scale users by role, with a proxy.yaml example and a safe verification checklist.
To assign a storage quota automatically in ownCloud Infinite Scale (oCIS), add a role_quotas mapping to the Proxy service’s proxy.yaml configuration. Map each oCIS role ID to a quota in bytes, then restart the Proxy service. This setting assigns quotas to new users according to their role; it is not an environment variable and changing it should not be treated as an update to existing accounts. The current ownCloud 8.2 documentation describes this role-based method in the Proxy service configuration.
Use this method when users receive an oCIS role during first login and you want new users in different roles to start with different personal storage limits. For example, a standard account could receive 10 GiB and a higher-capacity role could receive 50 GiB. Your identity provider can map its claims to oCIS roles, or the Proxy’s default role assignment can assign the user role to users who do not already have one.
Do not confuse a user’s personal storage quota with a Space quota. A Space quota sets capacity for a Space, while OCIS_SPACES_MAX_QUOTA sets the global maximum allowed for Spaces. ownCloud documents that Space capacity is independent of storage quota and that a Space can have a quota larger than the underlying storage capacity. For details, see the official Spaces quota documentation and the Storage-Users configuration reference.
Before editing, identify the role IDs used by your own instance and decide the limit for each. Role names such as user and guest are useful for role assignment, but the quota map expects role IDs. There is no universal ID to copy from this example. Also check whether users already receive roles through OIDC or a provisioning workflow; quota rules only help when the user is assigned a matching role.
Locate the configuration directory used by your deployment and back up its existing proxy.yaml. In a package-based installation it may be under /etc/ocis; container deployments can mount a different directory. Use the path mounted into the Proxy container or specified by your deployment configuration rather than assuming every installation uses the same location.
Keep the existing file’s other settings. If it already contains role_quotas: {}, replace that empty mapping. Do not add a second top-level role_quotas key: duplicate YAML keys can be parsed inconsistently. If the file does not contain the key, add it at the top level, aligned with other top-level Proxy settings.
The Proxy expects integer quota values in bytes. For this example, 10 GiB equals 10,737,418,240 bytes and 50 GiB equals 53,687,091,200 bytes. The numbers 1001 and 1002 below are sample role IDs only; replace them with IDs from your own oCIS installation.
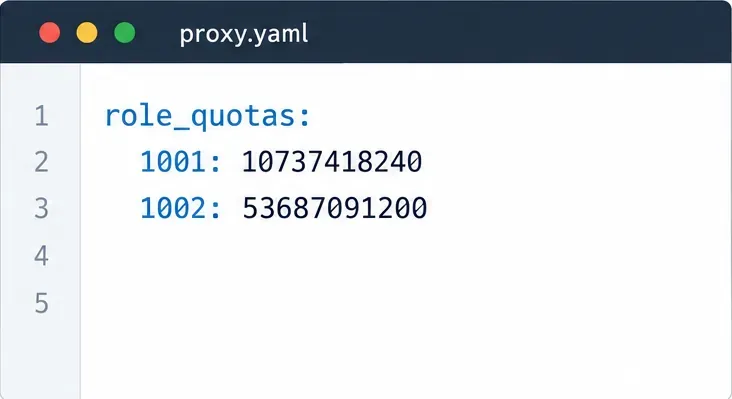
role_quotas:
  1001: 10737418240
  1002: 53687091200
Indent each role entry consistently beneath role_quotas. Keep the values as whole byte counts rather than writing strings such as 10GB. If you already use a role_assignment section, it can remain in the same file; the quota map is a separate top-level setting.
With the default role-assignment driver, a user without an existing role receives user at first login. If all new users should receive one limit, map the ID of that role to the desired quota. If quotas differ by user category, configure role assignment so each category maps to the correct oCIS role, then add the ID for every role to role_quotas.
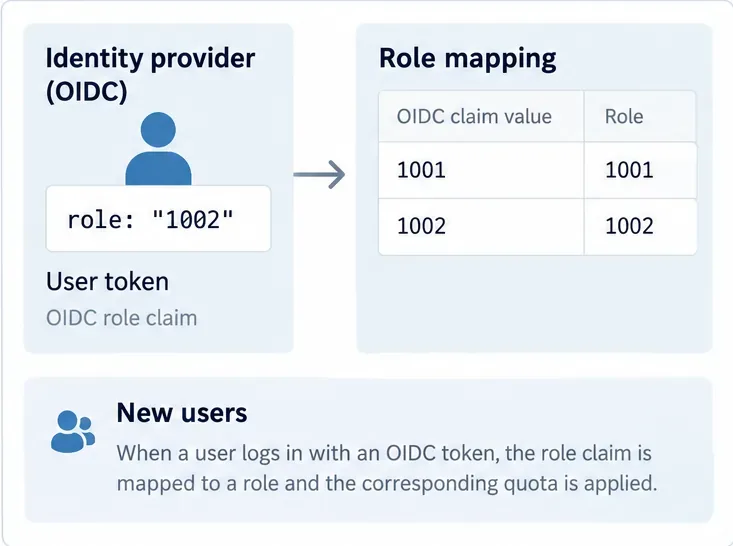
For OIDC, the Proxy can read a roles claim and map claim values to oCIS role names in proxy.yaml. The claim name and mappings must match what the identity provider actually issues. The documented default claim is roles; the default mappings include ocisAdmin, ocisSpaceAdmin, ocisUser, and ocisGuest. If you customize these mappings, check the role assignment examples and constraints. In particular, each account receives a single role, and an OIDC user whose claims do not match any configured role mapping may be unable to log in. Test claim changes in a non-production account first.
Validate the YAML syntax with your deployment’s configuration checks, if available, then restart the Proxy service or the full oCIS deployment according to your service manager. The Proxy must load the updated file before a new user receives the rule. Avoid restarting unrelated services unless your deployment requires it.
role_quotas. For an OIDC setup, inspect the issued role claim and the Proxy’s role mapping.A user who existed before the change is not a valid test of the new-user assignment path. If the test account gets the wrong limit, check the role ID rather than the display name, the role assigned at first login, the active proxy.yaml path, and whether the Proxy was restarted. Keep the backup until new-account provisioning and uploads behave as expected.
The documented role-quota mapping is an onboarding rule for new users. It does not by itself establish a Space capacity policy or prove that already-provisioned users have been updated. Manage existing accounts and Space limits through the supported administration path for your deployment. Also keep the total assigned quotas realistic for the storage capacity behind oCIS: a quota is an allocation limit, not extra disk or object-storage capacity.
Assign byte-based storage limits to new ownCloud Infinite Scale users by role, with a proxy.yaml example and a safe verification checklist.
Restore ownCloud desktop syncing by checking the server hostname, certificate chain, private CA trust, and captive portal issues without disabling TLS verification.
Use the invalid-file report to identify mismatched core files or app signatures, restore the correct release files, and verify the integrity check safely.
Deploy ownCloud Infinite Scale from its official Compose example, configure domains and persistent storage, then verify TLS, containers, and first login.
Set up the S3NG driver, bucket permissions, persistent metadata storage, and upload sizing so ownCloud Infinite Scale can store file contents reliably.
Find why an ownCloud Server upload stops near completion by checking file status, quota, temporary disk space, PHP limits, and proxy timeouts.
Set AllowOverride All only for ownCloud’s web root, validate the active Apache vhost, and reload safely to restore .htaccess rules.
Enable ownCloud’s Enterprise Auditing app, route admin_audit events to a protected log file, and confirm that real user actions are being recorded.
Align Keycloak’s realm issuer, web client, and user claims to let ownCloud Infinite Scale sign users in reliably across the web and mobile clients.
Transfer owned files and outgoing shares with ownCloud’s occ command, understand what stays behind, and verify access before deleting the old account.