How to share a computer screen on Viber

Video How to share a computer screen on Viber

Now with the latest version of Viber you can easily share your computer screen during a video call. Screen sharing of Viber on a PC is similar to sharing a screen on Teamview but does not include shared computer control. However, sharing a computer screen when video calling on Viber has also brought a lot of utilities for users. Through this feature, you can easily instruct your friends, relatives or partners about specific jobs, direct instructions on your computer.

Share screen feature computer is not new but with this feature Viber has met the great needs of users. With Viber on PC, you can only share the screen online while you are making a video call to the people we call you. You can follow the article below to know how to share the screen to guide software usage or any setting on the computer.

Instructions on how to share screens with Viber on PC
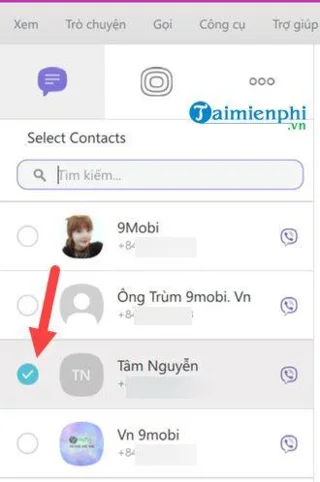
Step 1:

At the main interface of the Viber application for computers, select the person you want to chat.

In the chat window click on the icon of Video Call (top right corner) to start making calls.

How to share a computer screen on Viber

Step 2:

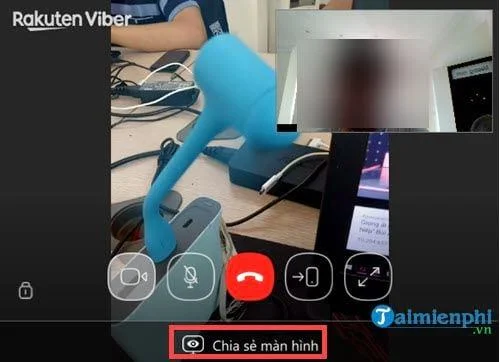
After your friend has received that video call, the video call screen will allow you to share your screen with that friend at the Share Screen button.

When you click the Share Screen button immediately your screen will appear on the computer of the person you are talking to.

How to share a computer screen on Viber

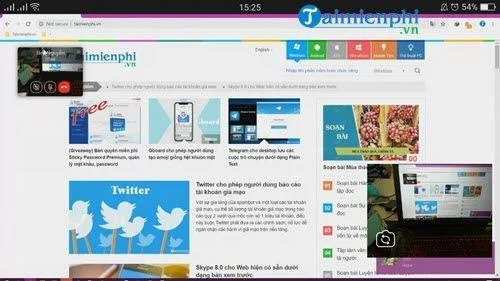
On your screen will also notice the screen is being shared through a small window in the upper corner of the screen.

How to share a computer screen on Viber

To finish sharing the computer screen, click on the red end call button.

Above we have shown you how to share the screen on the Viber PC application. Hope this feature will be really useful for everyone.

Update new 2021:

Video calling on Viber computer has allowed sharing screen calls between 2 people.

As well as calling video calls on Facebook, or video calls on Zalo, Viber users can also call video right on the computer or on the phone. And in the latest computer version of Viber, you can share the screen between two people when calling a video call.

Accordingly, the Share Screen feature on Viber when making video calls will allow you to send the computer screen to the recipient of the call. And the caller will also receive the computer screen from you.

Although the screen sharing feature when calling video is not new, very similar to TeamViewer tool or screen sharing software. But for Viber users, especially on computers will be very helpful. The following article will show you how to share video call screens on Viber.

How to share a video call screen on Viber PC

Step 1:

After upgrading Viber computer to the latest version, click on the name of the person you want to call. At the chat interface, click on the Video Call icon in the top right corner of the screen.

Picture 1 of How to share a video call screen on Viber

Step 2:

The video call will be done soon after. We will see the webcam screen at our computer. Below will have the Share Screen option.

Picture 2 of How to share a video call screen on Viber

When the person picks up the call, click the Share Screen button to share your computer screen. At the same time we will see the screen with a large size and a small screen in the upper right corner.

Picture 3 of How to share a video call screen on Viber

You can hide Viber and only display thumbnails.

Picture 4 of How to share a video call screen on Viber

Step 3:

When sharing a computer screen on Viber, the other party will see your computer screen. We can press the icons on the screen to customize the call like zooming in on the screen, turning on the microphone, .

Picture 5 of How to share a video call screen on Viber

The operations performed on your computer will be transferred to the computer Viber. If your partner also clicks Share Screen, you will also get their computer screen.

Picture 6 of How to share a video call screen on Viber

Step 4:

In case you don't want to share the screen anymore, click Stop Sharing . Or you can end the call to stop the call.

Picture 7 of How to share a video call screen on Viber

You can see the screen sharing feature on Viber when calling video is quite similar to TeamViewer. In the case of remote instructions you can use this feature to support your friends.

INSTRUCTIONS FOR SHARING VIDEO CALL SCREEN ON VIBER

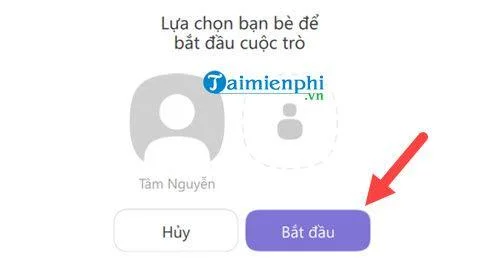
Step 1: To use the screen sharing feature of video calling on Viber, you must use it on Viber PC version, select an object to conduct a video call.

Then click start to conduct a video chat with them.

Step 2: The next step is to click on the video call section on the chat interface with the object you have selected.

Step 3: Wait for the other party to respond to your call .

Step 4: When the subject has agreed to video chat with you, notice below that there is a screen sharing feature . Click on it to activate the video call screen sharing feature on Viber.

Step 5: Right now on the phone screen of the object you share, all your desktop information will appear, any operation will always be updated on the object's screen interface. share.

With the screen sharing feature of video calls on Viber, users can share for both computers and mobile phones, as long as the user uses the screen sharing feature to call video on Viber on the computer.

Leave a Comment

How to Fix Microsoft Edge Youtube Error: Black Screen and Lag

How to Fix Microsoft Edge Youtube Error: Black Screen and Lag

Struggling with Microsoft Edge YouTube error like black screen and lag? Discover step-by-step fixes for smooth playback. Clear cache, toggle hardware acceleration, and more – ultimate guide to resolve black screen and lag issues fast.

How to Completely Uninstall Microsoft Edge from Windows 11 in 2026

How to Completely Uninstall Microsoft Edge from Windows 11 in 2026

Master how to completely uninstall Microsoft Edge from Windows 11 in 2026. Step-by-step, no-trace removal for gamers seeking max performance. Say goodbye to bloatware!

How to Reset Microsoft Edge to Default Settings in 2026

How to Reset Microsoft Edge to Default Settings in 2026

Discover how to reset Microsoft Edge to default settings in 2026 effortlessly. Fix crashes, slowdowns, and pop-ups with proven step-by-step methods for a fresh, blazing-fast browser.

Troubleshooting Microsoft Edge Certificate Not Trusted Warnings

Troubleshooting Microsoft Edge Certificate Not Trusted Warnings

Tired of Microsoft Edge "Certificate Not Trusted" warnings blocking your browsing? Discover proven troubleshooting Microsoft Edge "Certificate Not Trusted" warnings steps to resolve SSL errors securely and regain smooth access. Works on latest Edge versions.

Removing Your Microsoft Edge Profile and Personal Data Safely

Removing Your Microsoft Edge Profile and Personal Data Safely

Discover how to safely remove your Microsoft Edge profile and personal data without risks. Our expert guide ensures a clean slate while protecting your important info – perfect for privacy pros!

How to Change Microsoft Edge Home Page and Startup Settings

How to Change Microsoft Edge Home Page and Startup Settings

Discover simple, step-by-step instructions on how to change Microsoft Edge home page and startup settings. Customize your browser for a faster, personalized experience today!

Troubleshooting Microsoft Edge Update Errors on Windows 11

Troubleshooting Microsoft Edge Update Errors on Windows 11

Tired of Microsoft Edge update errors crashing your Windows 11 browsing? This ultimate guide delivers proven, step-by-step fixes for common issues like 0x80070005, stuck updates, and more. Update Edge effortlessly today!

How to Fix This Site is Not Secure Error in Edge Browser

How to Fix This Site is Not Secure Error in Edge Browser

Struggling with "This Site is Not Secure" error in Edge? Discover step-by-step fixes to restore secure browsing instantly. Clear cache, update certs, and more—no tech skills needed!

How to Fix Microsoft Edge 404 Not Found Browser Error

How to Fix Microsoft Edge 404 Not Found Browser Error

Tired of the frustrating Microsoft Edge "404 Not Found" error? Discover quick, proven fixes to resolve 404 errors in Edge browser. Step-by-step guide with latest tips for smooth browsing.

How to Fix Microsoft Edge Out of Memory Error During Streaming

How to Fix Microsoft Edge Out of Memory Error During Streaming

Tired of Microsoft Edge "Out of Memory" error crashing your streaming sessions? Get step-by-step fixes to resolve it fast, boost performance, and stream smoothly without interruptions. Updated with the latest tips.

Troubleshooting Microsoft Edge Cortana and Copilot AI

Troubleshooting Microsoft Edge Cortana and Copilot AI

Struggling with Troubleshooting Microsoft Edge "Cortana and Copilot" AI? Get proven fixes for crashes, unresponsiveness, and errors in the latest Edge versions. Restore your AI assistant effortlessly!

Solving Edge Browser Clock Behind Error on Windows 11

Solving Edge Browser Clock Behind Error on Windows 11

Struggling with the Edge Browser "Clock Behind" error on Windows 11? Discover proven, step-by-step fixes to sync your clock, clear caches, and restore smooth browsing. Quick solutions that work!

Troubleshooting Microsoft Edge Video Stuttering and Frame Drops

Troubleshooting Microsoft Edge Video Stuttering and Frame Drops

Tired of Microsoft Edge video stuttering and frame drops ruining your streaming? Discover proven troubleshooting steps to restore smooth playback in this comprehensive guide. Fix it fast!

How to Fix Microsoft Edge BitLocker Recovery Loop Error

How to Fix Microsoft Edge BitLocker Recovery Loop Error

Struggling with the Microsoft Edge BitLocker recovery loop error? Discover simple, step-by-step fixes to escape the endless loop and regain access to your PC without data loss. Updated with the latest solutions.

How to Fix Microsoft Edge Core Isolation Settings Error

How to Fix Microsoft Edge Core Isolation Settings Error

Struggling with the Microsoft Edge "Core Isolation" Settings Error? Discover proven step-by-step solutions to resolve it fast, restore smooth browsing, and boost your PC security. Works on latest Windows versions.