How to use Disk Quota to limit Windows storage capacity

Disk Quota is a great way to control the storage space on your computer, ensuring that users cannot use more storage space than is allocated. When you exceed the allocated storage space, you will see a warning and even prevent you from storing files. Here is a guide on how to use Disk Quota on Windows.

How to limit storage space on Windows using Disk Quota

Step 1:

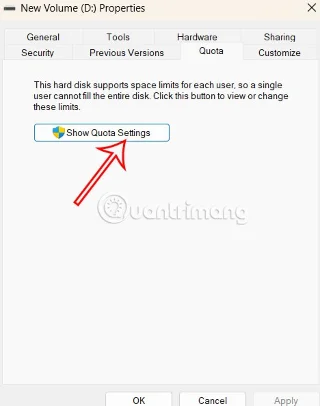
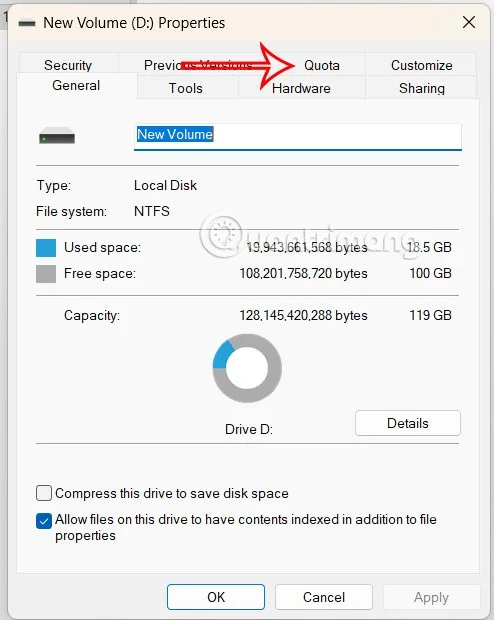
Open File Explorer, right-click the drive you want to limit and select Properties . Then, click the Quota tab to adjust.
How to use Disk Quota to limit Windows storage capacity

Step 2:

Click Show quota settings below.

How to use Disk Quota to limit Windows storage capacity

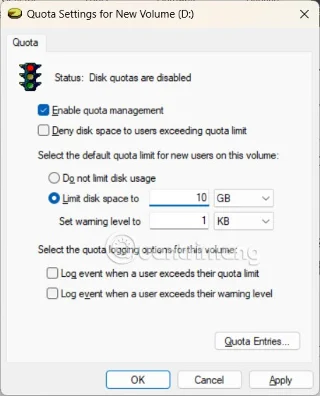
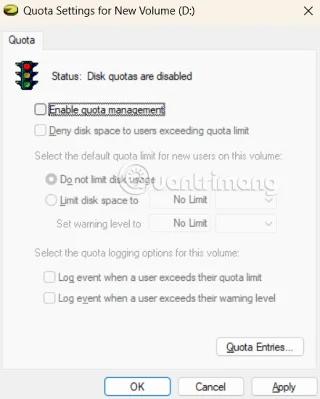
Switch to the interface as shown, first you need to select Enable quota management to enable storage capacity limit. Below click Limit disk space to .

How to use Disk Quota to limit Windows storage capacity

Enter the capacity limit you want to set for all users of that drive.

How to use Disk Quota to limit Windows storage capacity

Step 3:

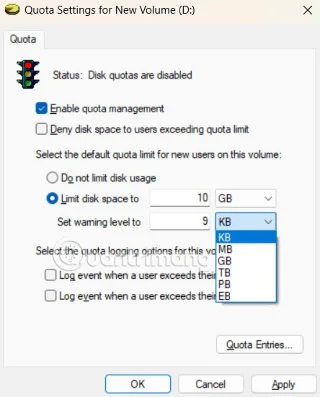
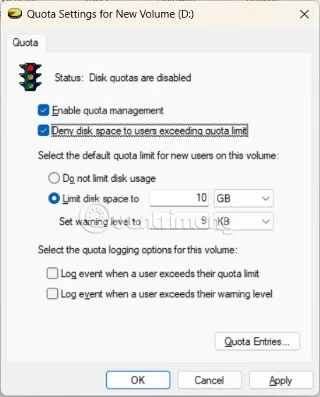
At Set warning level to , we set the warning level you want Windows to notify when the storage limit is about to be reached. If you want to prevent users from storing more files when they exceed their quota, select Deny disk space to users exceeding quota limit.

How to use Disk Quota to limit Windows storage capacity

How to set storage limits for each user

Step 1:

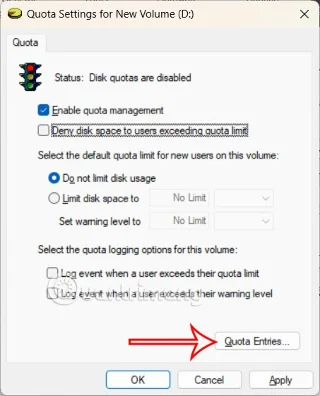
We also need to select Enable quota management and then click Quota Entries .

How to use Disk Quota to limit Windows storage capacity

Step 2:

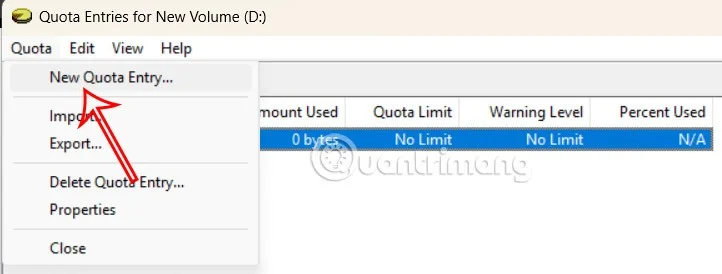
To display the new interface, click on Quota and select New Quota Entry in the displayed list.

How to use Disk Quota to limit Windows storage capacity

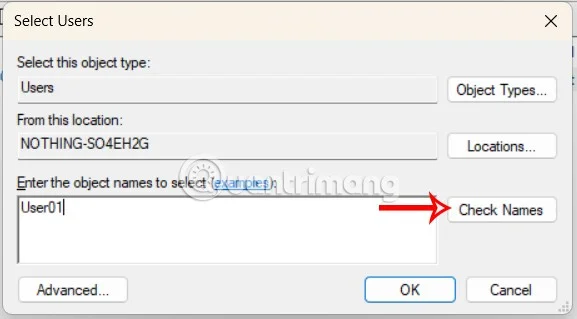
In the interface displayed at Enter the object names to select, enter the name of the user account you want to set the storage limit for and then click Check Names below.

How to use Disk Quota to limit Windows storage capacity

Step 3:

Click Limit disk space to and set the storage limit for this account . Under Set warning level to, also enter the warning level when the limit is approaching.

Repeat these steps for all user accounts you want to limit.

Storage Usage Monitoring Guide

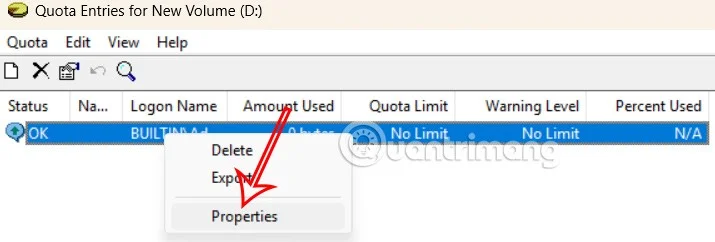
You click on Quota Entries and see a list of different user accounts along with their usage. Right-click on the account and select Properties .

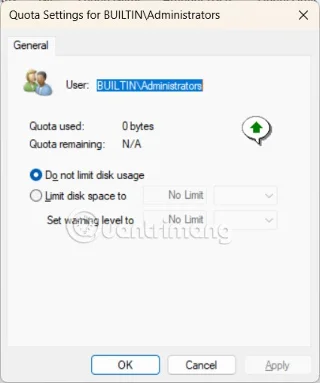
Here you can directly change the amount of storage allocated to an account.

How to use Disk Quota to limit Windows storage capacity

How to turn off storage limit

Step 1:

In the Quota Settings for interface, uncheck Enable quota management . To turn off the capacity limit for each account, click the Quota Entries button .

How to use Disk Quota to limit Windows storage capacity

Step 2:

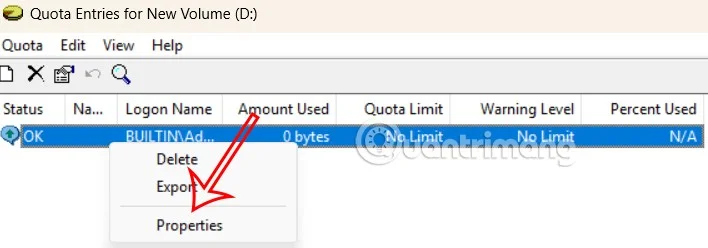
Right- click on the account you want to disable and select Properties .

How to use Disk Quota to limit Windows storage capacity

Step 3:

Then you check Do not limit disk usage to turn off the storage limit for that account.

How to use Disk Quota to limit Windows storage capacity

Leave a Comment

Enable SLES Live Patching and Verify a Kernel Fix

Enable SLES Live Patching and Verify a Kernel Fix

Set up the right Live Patching path for SLES 16.0 or 15 SP7, apply eligible kernel fixes, and confirm what is active without confusing it with a reboot-required kernel update.

Install and Sign Custom Kernel Modules on SLES 15 Secure Boot

Install and Sign Custom Kernel Modules on SLES 15 Secure Boot

Load a custom SLES 15 kernel module without disabling Secure Boot. Match the running kernel, sign the .ko file, enroll a MOK key, and verify loading.

Keep Services Available During a SLES 15 SP5 to SP6 Upgrade

Keep Services Available During a SLES 15 SP5 to SP6 Upgrade

SLES 15 SP5 can migrate online to SP6, but each node must reboot. Use a tested rolling upgrade or blue-green cutover to keep workloads reachable.

Apply the SLES 15 STIG Safely with OpenSCAP

Apply the SLES 15 STIG Safely with OpenSCAP

Use SUSE’s supported STIG profile to scan SLES 15, test remediation, review remaining findings, and retain assessment evidence.

Restore Cockpit Access to SUSE Linux Enterprise Server

Restore Cockpit Access to SUSE Linux Enterprise Server

Trace a failed Cockpit connection through DNS, port 9090, the systemd socket, firewalld, TLS, and login settings using current SUSE guidance.

Configure Reliable Ethernet Failover with SLES 15 Bonding

Configure Reliable Ethernet Failover with SLES 15 Bonding

Create a redundant Ethernet connection on SLES 15 with YaST and Wicked, configure active-backup bonding, and verify both ports and failover.

Build a Reusable AutoYaST Profile for SLES 15 Installs

Build a Reusable AutoYaST Profile for SLES 15 Installs

Turn an existing SLES 15 system into a reviewed AutoYaST profile, validate it, and use it to deploy a test server with fewer manual steps.

SLES 15 KVM Setup: Make Selected VMs Start at Boot

SLES 15 KVM Setup: Make Selected VMs Start at Boot

Install the SLES 15 KVM and libvirt tools, enable the right host service, and configure selected virtual machines to start after a reboot.

Diagnose a SUSE Server That Hangs at the systemd Shutdown Screen

Diagnose a SUSE Server That Hangs at the systemd Shutdown Screen

Use systemd jobs and the previous boot journal to locate a slow service, mount, or storage dependency, then correct it without masking the cause.

Open Only the Web Traffic Your SLES 15 Server Needs

Open Only the Web Traffic Your SLES 15 Server Needs

Use firewall-cmd to inspect the active zone, allow HTTP safely, preserve SSH access, and verify that the rule survives a reload on SLES 15.