Windows does not provide a built-in tool to allow users to pin any window to always on top. There are many third-party tools for this, but they are often heavy and complicated.
While there are many tools for pinning a window to stay on top of other windows, some of them are old and don’t work well with modern versions of Windows or 64-bit versions. This article will outline the best and most reliable ways to do exactly what you need. Whether you want to use a keyboard shortcut or a graphical menu, these are the ideal ways to make a window stay on top of other windows. And, these tools are compatible with most versions of Windows.
One thing to note: there are some great apps that can make a window stay on top of other windows, among other things, but in this article we’re only looking at lightweight free tools that only serve the purpose of pinning windows. However, the article also mentions some other apps in case you’re interested or have used them.
4 Best Ways to Pin Windows on Windows Desktop
1. How to pin windows on Windows 10, Windows 11 screen using PowerToys
In the latest update, the PowerToys toolkit has brought desktop pinning capabilities to all Windows applications. After installing PowerToys 0.53.1, you can easily pin a Windows window to the top of the screen by using the Win + Ctrl + T keyboard shortcut.
The specific steps are as follows:
Step 1 : First, you need to download PowerToys 0.53.1 from GitHub or Microsoft Store and then proceed to install.
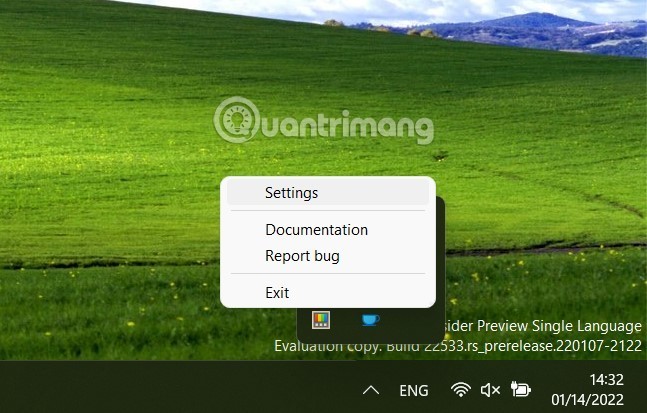
B2 : Right-click on the PowerToys icon in the system icon tray on the Taskbar and select Settings.
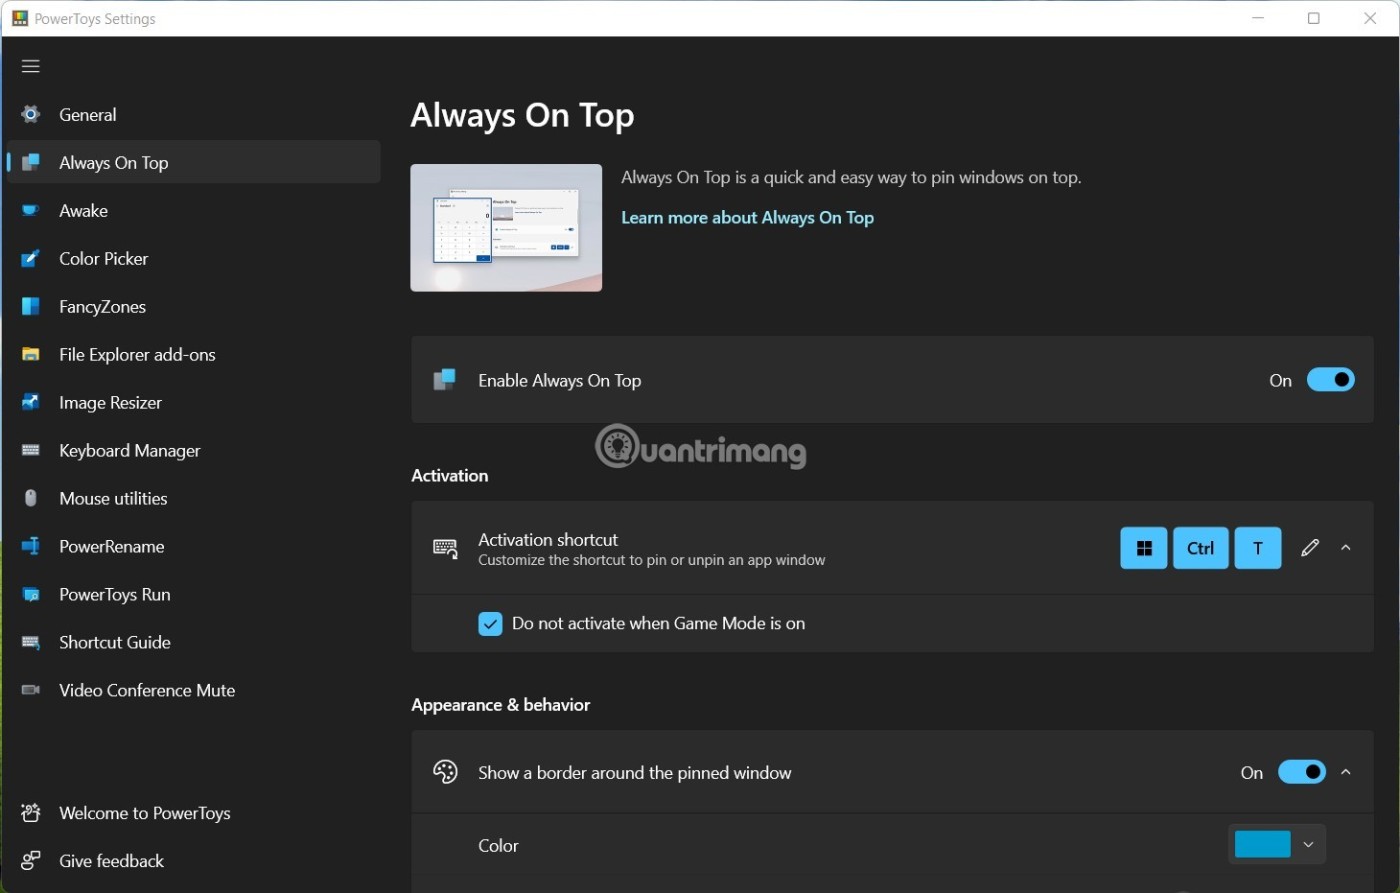
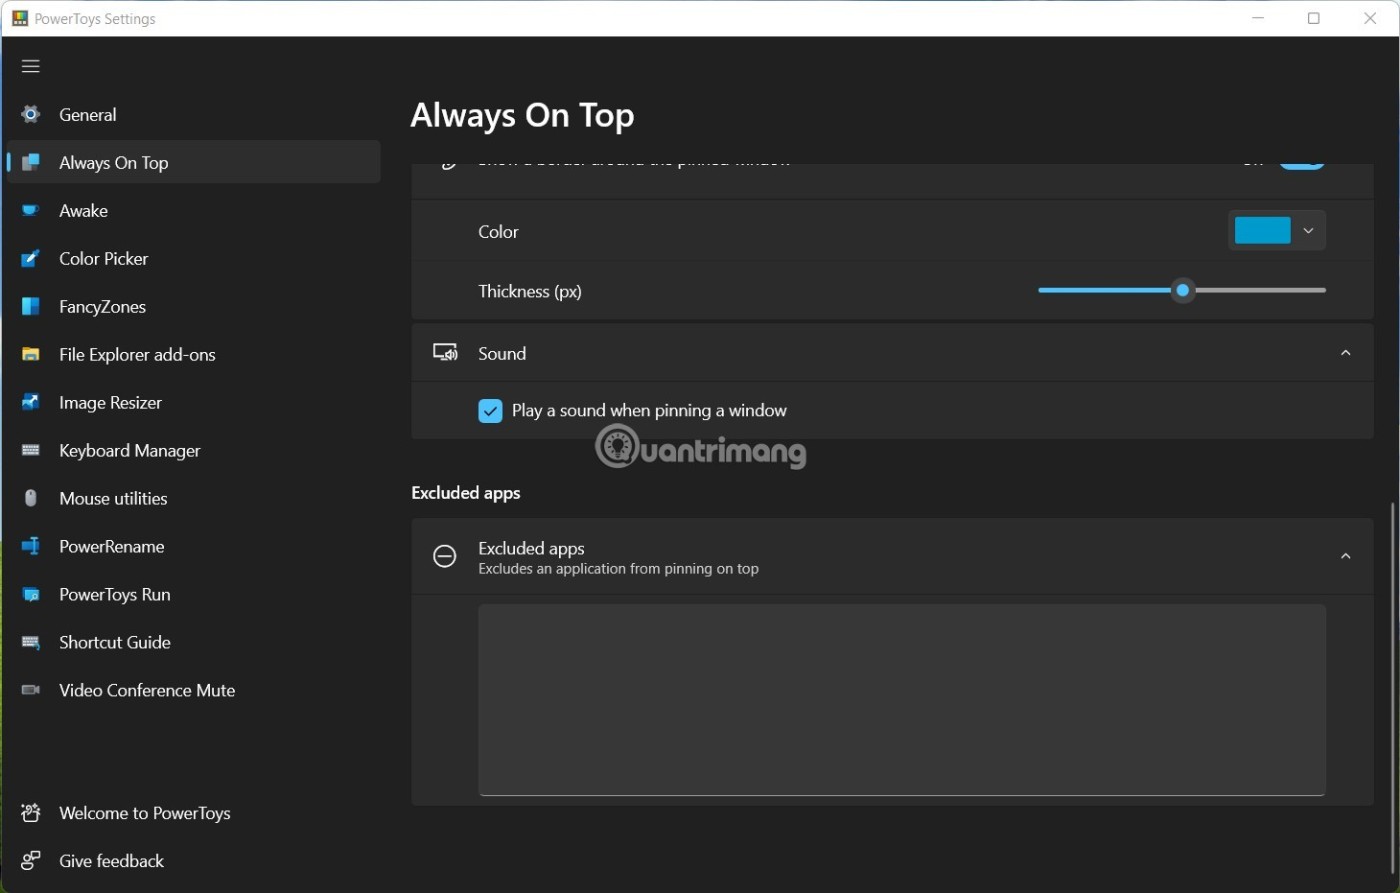
B3 : Click Always On Top . Here you can customize Always On Top on/off, adjust the shortcut key to turn Always On Top on/off, the default is Win + Ctrl + T. You can also check Do not activate when Game Mode is on to disable the window pinning feature when you play games. In the section below, you can choose whether to display borders for the pinned window or not, if you choose yes, you will be able to choose the color and size of the screen border. In addition, you can set a notification sound when Always On Top mode is turned on/off as well as set up excluded applications that are never put into Always On Top mode.
Note : Always On Top feature will only work when PowerToys is running in the background. If you exit PowerToys, this feature will also stop working. Therefore, you will have to open PowerToys first or set PowerToys to start with Windows.
2. Use a shortcut: AutoHokey
Using the excellent and useful AutoHotkey program, you can create a script that sets the active window to always stay on top of other windows when you press a certain key combination. This script is lightweight and doesn't use a lot of resources or create unnecessary system clutter. You can even use AutoHotkey to compile the script into its own executable if you don't want to keep the entire AutoHotkey program running, or want an easy way to execute the script on other PCs.
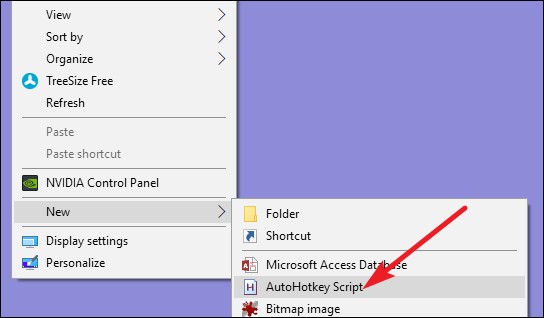
First, you'll need to download and install AutoHotkey . Once that's done, you'll need to create a new script (if you're already using AutoHotkey, add an existing script or create a new one). To create a new script, right-click anywhere on your desktop or in a File Explorer window, point to the " New " menu, then select the "AutoHotkey Script" option , name the script file whatever you want.
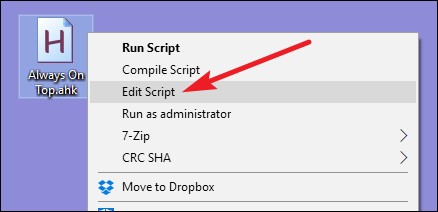
Next, right-click on the new AutoHotkey script and then select the “ Edit Script ” option . This will open the script for editing in Notepad or whatever editing program you use.
In the Notepad window, paste the following line of code at the bottom of the page. You can then save and close the script.
^SPACE:: Winset, Alwaysontop, , A
Next, double-click the script to run it. You'll know it's running because a green "H" icon will appear in your system tray to indicate it's running in the background.

You can now press Ctrl + Space to set any active window on top of all other windows. Press Ctrl + Space again to return to the normal window.
And if you don't like the Ctrl + Space key combination , you can change the ^SPACE part of the script to whatever key you want. Refer to the Hotkeys documentation on the AutoHotkey website for help.
3. Using the mouse: DeskPins
If you prefer using the mouse over keyboard shortcuts, DeskPins provides a simple way to make a window always stay on top of other windows by pinning them.
First, you need to download and install DeskPins . Once installed, run DeskPins. You will see it add an icon to the system tray.

When you want to pin any window, click the DeskPins icon in the system tray. The cursor will turn into a pin and you can click any window to bring it to the top. Pinned windows have a red pin added to the title bar so you can easily tell which windows are pinned and which are not.
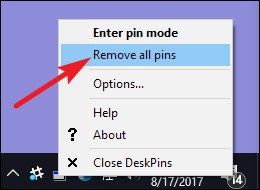
To remove a pin from a window, hover your mouse over it. Your cursor will show a small “X” on it to let you know you’re about to remove the pin. And if you want to remove the pin from all the windows you pinned at once, right-click its icon in the system tray and then select the “Remove All Pins” option.
4. Use the k or system menu : TurboTop
TurboTop pins a menu system on its system tray icon so you can make a window float on top of other windows. After downloading and installing TurboTop , click the system tray icon to see a list of all your open windows. Click on a window name to make it float to the top. Windows that are on top will have a checkmark, click them again to un-float them.
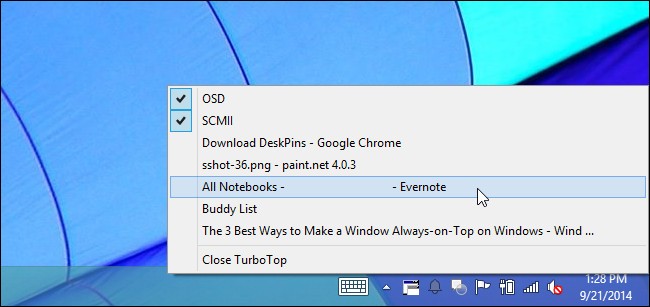
This app is impressive because it's a small utility that hasn't been updated since 2004 and yet it still works so well thirteen years later, which is a testament to the power of this tool.
Don't install anything: Built-in app options
Many applications have built-in options that let you set windows to stay on top of other windows. You often see these options in media players, system utilities, and other popular tools. Programs that accept plug-ins may also have a plug-in that you can install to pin the program's own window to the top.
For example, here's how to enable the built-in option in some popular programs:
- VLC: Click Video > Always on top.
- iTunes: Click the menu button in the upper-left corner of the iTunes window and select Preferences . Click the Advanced tab and enable the “Keep MiniPlayer on top of all other windows” or “Keep movie window on top of all other windows” option . Switch to the MiniPlayer window by clicking the menu button and selecting Switch to MiniPlayer.
- Windows Media Player : Click Organize > Options. Select the Player tab and check the "Keep Now Playing on the other windows" box.
- Firefox: Install the Always on Top extension . Once it's downloaded, press Alt and select View > Always on Top . You can also just press Ctrl + Alt + T to make the current Firefox window always stay on top of other windows.
- Pidgin : Click Tools > Plugins in the Buddy List window. Enable the included Windows Pidgin Options plugin, click Configure Plugin and set "Keep Buddy List windows on top".
- Process Explorer: Click Options > Always on Top.
In addition to these apps, there are a number of larger, more fully featured window and desktop utilities that also offer the ability to keep windows always on top. DisplayFusion, for example, offers this feature (even in its free version), but also offers tools for managing multiple monitors, controlling desktops and windows in all sorts of ways, and even tweaking other Windows settings. Actual Windows Manager also offers this feature, plus over 50 other desktop management tools. If you’re already using one of them or are interested in the others, give them a try.
Above are three ways to pin a window on top of other windows in Windows, hope the article is useful to you.
Good luck!
