Home
» How to
»
Cant type Vietnamese in Office and the browser? Please try the following!
Cant type Vietnamese in Office and the browser? Please try the following!
Video Cant type Vietnamese in Office and the browser? Please try the following!
Not being able to type Vietnamese is a common mistake in the office world, or for people who often use computers for their daily work. It is not a serious error, but it also affects more or less and is quite annoying. There are many causes of this error that not everyone knows. So, how to overcome this annoying Vietnamese typing error?
This article will cover the most common, common and common Vietnamese language errors you encounter. Even on internet browsers (Firefox, Chrome ) as well as Word and Excel. Before performing the following steps, make sure your computer has installed Vietnamese input methods such as Unikey or Vietkey : D.
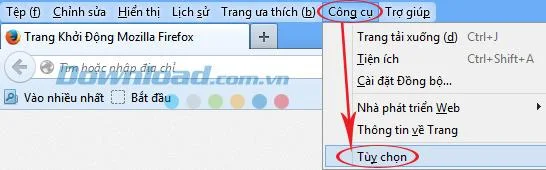
Step 1: From the main interface of the browser. Left-click on Tools , select Options.
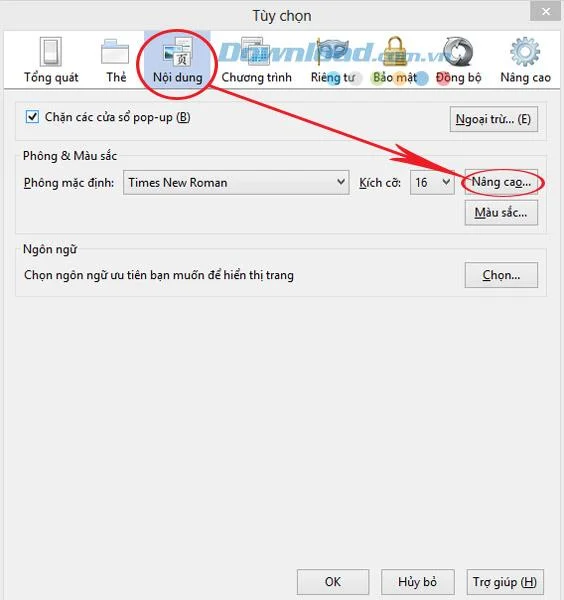
Step 2: In the Options view , click the Content tab . Find and click on the Advanced section (Advanced ..).
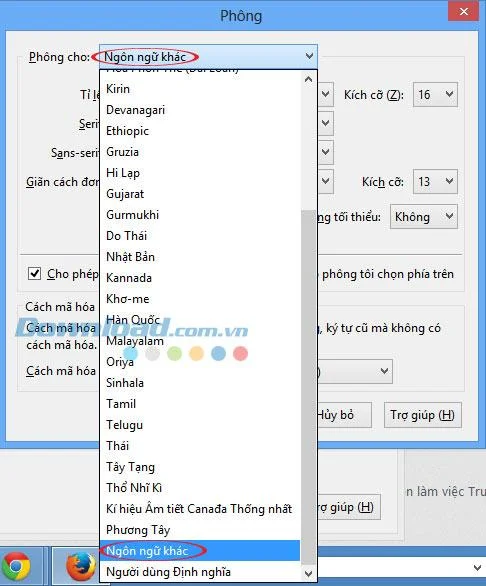
Step 3: Fonts window (Fonts) appears, you can see Fonts for (Font for) displaying the current language of Firefox. To change, just click and select Other Languages.
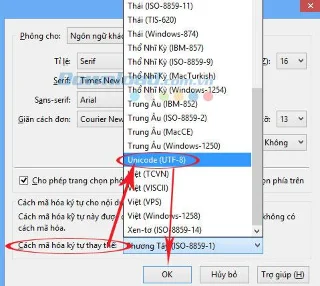
- Still in this window, look at the bottom, section How to replace alternate characters (Fallback Charater Encoding) you also click and select OK to finish. Then restart the browser to start over.
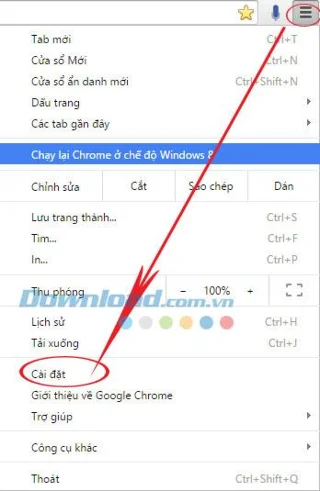
Step 1: From the main interface of Chrome , click on the icon 3 dashes (upper right corner of the screen) and select Settings (Settings).
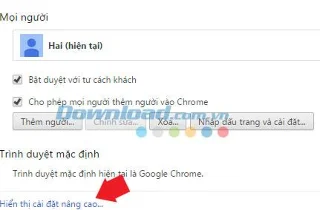
Step 2: In the Settings interface , scroll down, find Show advanced settings - Show Advanced Settings (in blue text), click.
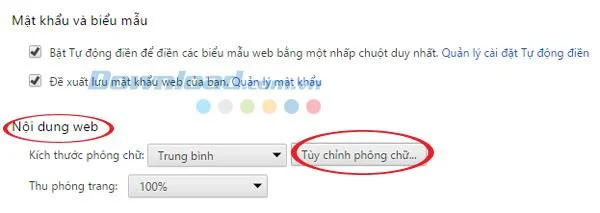
Step 3: Scroll down, find the section called Web content (Web content) and click Customize fonts ( Customize fonts ...).
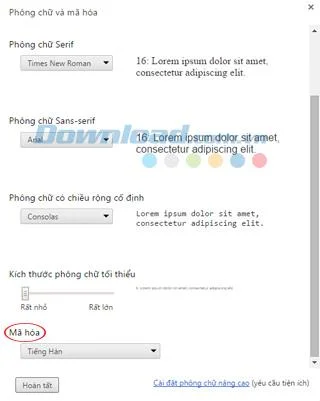
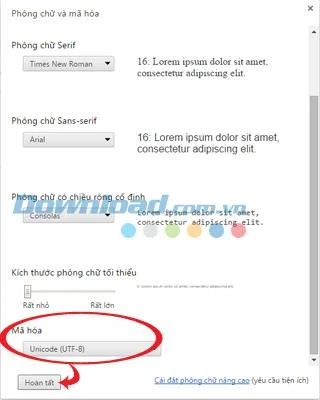
Step 4: The Fonts and encoding window appears. You look down to see the Encryption section . Click and select Unicode (UTF-8 ). Then click Finish to finish.
Step 5: Turn off all browsers and restart.
Fix Vietnamese typing errors in Word, Excel
For office applications such as Office , to be sure of where the error is, you should carefully check the settings of the machine and application. Some basic errors often occur like:
Error due to application setup
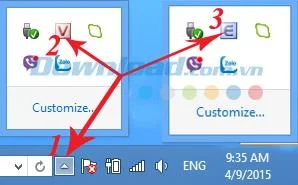
Check to see if Unikey or Vietkey is accidentally turned off (not enabled) by looking at the application's icon on the Taskbar . If it is an E (English) , you cannot type Vietnamese, and you need to switch to the V (Vietnamese) . This approach applies to both Unikey and Vietkey.
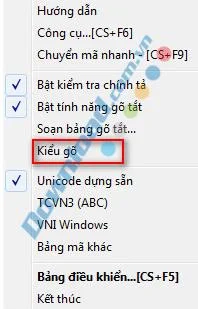
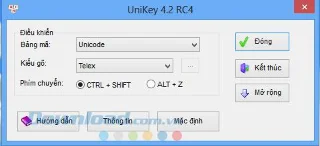
Or it might be because you didn't choose Telex or VNI typing method correctly .
In addition, choosing the wrong encoding and font is also the reason why you do not use Vietnamese (Unicode encoding and Telex typing method are the most popular options).
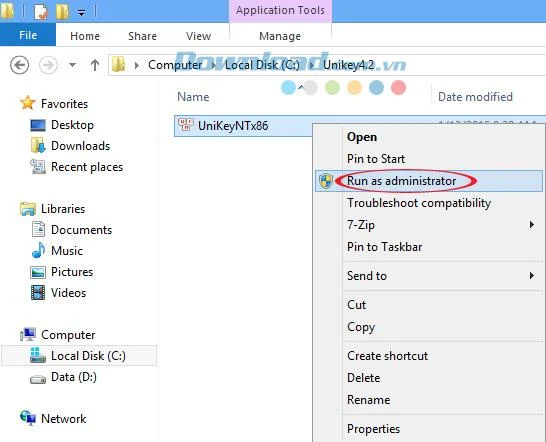
Try running by right-clicking the file containing Unikey and selecting Run as administrator.
Vietnamese errors due to typing in the wrong standard
This is the "dumbest" reason but also many people still meet. Let's review the standard Vietnamese typing method:
- aa: â
- oo: o
- ee: ê
- dd: đ
- s: acute accent
- f: grave accent
- r: question mark
- x: tilde
- j: heavy accent
- w: (aw = ă; ow = ơ; uw = ư)
- z: delete the previously typed sign (tairz = ears; delete the question mark)
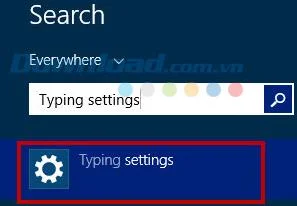
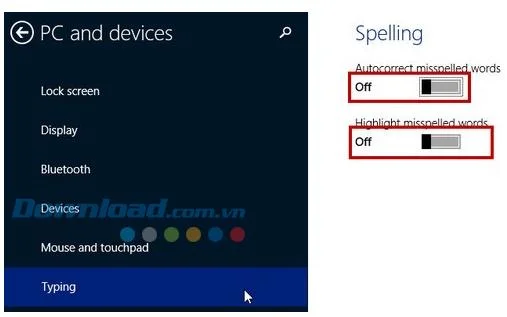
If you are using Windows 8, then you should also turn off the Spelling feature to avoid the Windows self-correction will cause the situation when typing Vietnamese, sometimes not. By pressing the appropriate key combination to open the search dialog directly. Then type in Typing settings
And change the 2 options of Autocorrect misspelled words and Hightlight misspelled words from ON to OFF .
In addition, there are some other reasons, such as: Your computer does not have Vietnamese font, the font you are using is not Vietnamese, the keyboard is faulty or even because you have many Vietnamese keyboards open. can also happen this situation.
Above is a summary of errors and how to handle and overcome the situation of not being able to use Vietnamese on the computer. Hope this article will be helpful for you in your daily work.