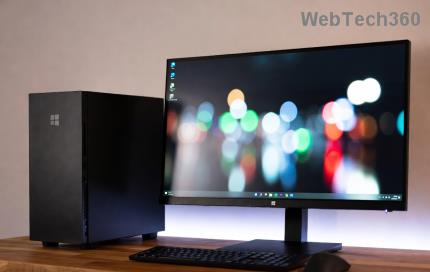
How to change User Profile folder name in Windows 11
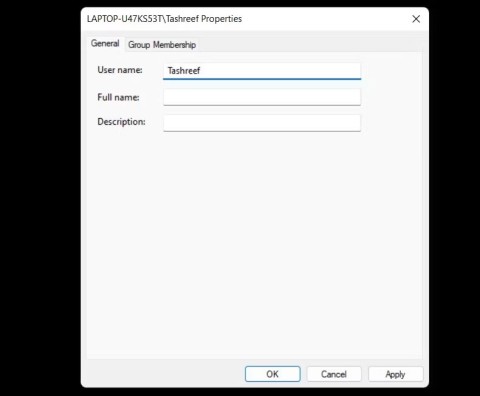
If you don't like the name of the User Profile folder, you can change it by editing the registry.
WebTech360 – In this series of articles, we will introduce you to how to customize the default user profile in Windows 7.
As an administrator of a Windows network, there are probably a number of reasons why you would want to customize the default user profile. For example:
However, the method used for customizing the default user profile in previous versions of Windows – customizing the Administrator account, then copying the Administrator user profile to the default User profile – doesn’t really work in Windows 7. In fact, this method has been used since Windows NT. It worked pretty well for that Windows NT operating system, but as profiles became more and more complex through Windows 2000, Windows XP, and Windows Vista, this method started to cause some strange problems on users’ computers, such as certain user profile folders being misnamed, files for certain applications being stored in the wrong folders, and a host of other unpredictable problems.
So if you want your desktops to have a supported configuration, you need to follow this new method of customizing the default user profile, which is fully supported by Microsoft. In this series, we will walk you through the steps involved in customizing the default user profile for Windows 7 and Windows Server 2008 R2, explain how to use a custom profile as the default network profile in roaming scenarios, and discuss the limitations of customizing profiles on these platforms. The method used to customize the default user profile involves using MDT 2010, so if you are unfamiliar with how to use MDT, you can review our Deploying Windows 7 series.
1. Create a task sequence to deploy the reference settings
To customize the default user profile, we will deploy Windows 7 on a host or reference computer. Accordingly, the installation will be called a host or reference installation. Then we will customize the reference architecture as desired, perform sysprep and capture the installation image, and finally deploy the customized and captured image to the target computers (user computers).
Start by opening the Deployment Workbench on the computer that has MDT 2010 Update 1 installed. Open your deployment share and right-click the Task Sequences folder , select New Task Sequence to create a new task sequence for deploying the reference installation. We will call this task sequence STEP-1 as shown in the image below:
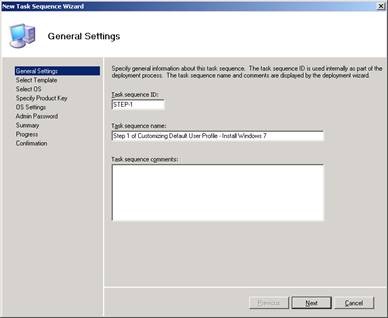
Figure 1: Step 1 in creating a task sequence for deploying the reference installation
Select Standard Client Task Sequence from the list of task sequence templates:
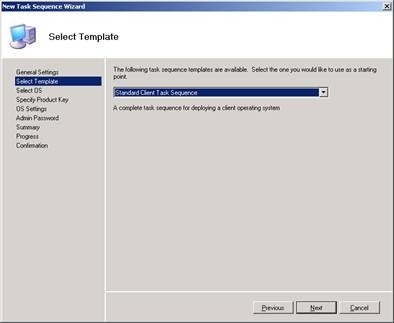
Figure 2: Step 2 in creating a task sequence for deploying the reference installation
Select the operating system you want to deploy, in this tutorial example it is Windows 7 x64 Enterprise Edition :

Figure 3: Step 3 in creating a task sequence for deploying the reference installation
Work through the required sections on the remaining pages of the wizard until you reach the end. For example, you need to specify a password for the local Administrator account in the task sequence:
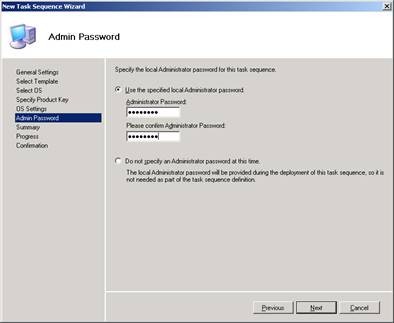
Figure 4: Step 4 in the task sequence creation process for deploying the reference installation
2. Create a task sequence to ' Sysprep' and capture the reference settings
Next, we need to create a second task chain. This chain will be used for two purposes:
Once the custom reference installation has been “ sysprepped ” and captured , you can use MDT to deploy the captured image to target computers. From the Deployment Workbench, launch the New Task Sequence Wizard and create a new task sequence named STEP-2 as shown in the figure below:
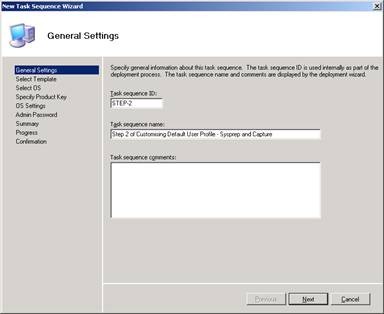
Figure 5: Step 1 in the task sequence creation process for “sysprep” and capturing reference settings
From the list of templates, select Sysprep and Capture as shown in the image below:

Figure 6: Step 2 in the task sequence creation process to “sysprep” and capture reference settings
Complete the remaining steps of the wizard. You will see two task sequences in the Deployment Workbench:

Figure 7: Two task chains have been created.
3. Customize reference settings using Unattend.xml
Now you are ready to customize your reference settings. However, since we have not deployed the reference settings yet, we need to pre-define other customizations for our reference settings by making changes to the answer file (unattend.xml) that MDT will use to perform the automatic installation of the reference. Whenever possible, you should use this method to customize your reference settings because it will automate the customization process, which will save you a lot of time in the long run.
Start by clicking the task sequence that will be used to deploy the reference installation (we'll call this step 1) and select Properties to open the task sequence's properties page. Then select the OS Info tab as shown in the image below:

Figure 8: The OS Info tab in the task sequence properties sheet will be used to deploy the reference installation
In the tab above, click the Edit Unattend.xml button . Open Windows System Image Manager (Windows SIM) to change the settings in the answer file:
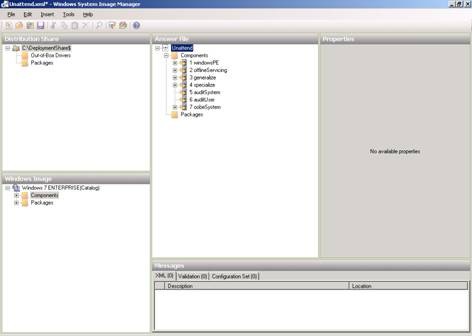
Figure 9: Using Windows SIM to change settings in the answer file
Tip : If you don't know how to use Windows SIM, please refer to part 6 of our Deploying Vista series.
To continue, we will modify the Unattend.xml file so that 5 customizations will be made automatically during the deployment of the reference installation. The 5 changes are shown below:
We will start by disabling the Internet Explorer First Run Wizard, which is the Wizard that when users log in for the first time asks them if they want to enable IE 8 features. Using Windows SIM, open the Specialize section of the Unattend file and select the Microsoft-Windows-IE-InternetExplorer component as shown in the image below:
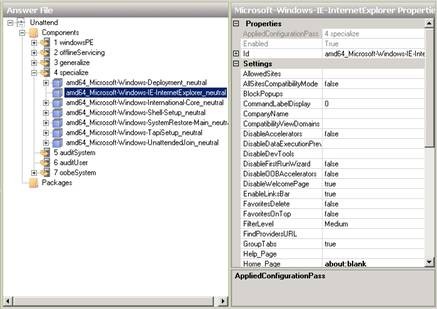
Figure 10: Step 1 of disabling the Internet Explorer First Run Wizard.
In the Properties window of this component, click the field next to the DisableFirstRunWizard setting and change the value from False to True :
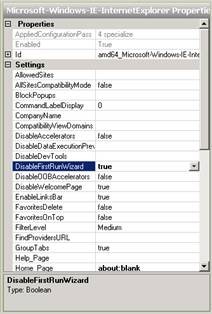
Figure 11: Step 2 in disabling the Internet Explorer First Run Wizard.
Next, we'll assign a home page to Internet Explorer. On the same Properties page, click the field next to the Home_Page setting and change it from about:blank to the website you want to use as your home page.
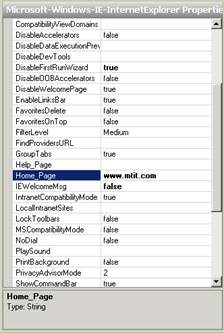
Figure 12: Specifying a home page for Internet Explorer.
Next, we configure WER so that the selected data will be automatically uploaded to Microsoft without any user interaction. To do this, we need to add a component to our answer file. The component we need to add here is Microsoft-Windows-ErrorReportingCore , and to add it to our answer file, we need to click on the Components button under the category in the Windows Image panel of Windows SIM, find the component we want to add , right-click on it and add it to the Specialize section as shown below.
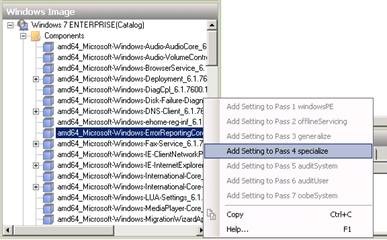
Figure 13: Step 1 in configuring Windows error reporting behavior
So how do we know what components we need to add to our answer file? The answer is by looking for the Unattended Windows Setup Reference Help (.chm) file included in the Windows 7 installation kit.
How do we know which configuration pass (e.g. Specialize) is needed to add this component? In this case, the other configuration options are disabled so you can't select them. However, for some components that need to be added to the answer file, there may be several passes that you can choose from. In general, we should use the Specialize or OobeSystem configuration pass to automate the customization of the reference settings. For more information about configuration passes, see Part 3 of the Deploying Windows Vista series .
Once you've added the Microsoft-Windows-ErrorReportingCore component to the Specialize pass of your answer file, you'll see it displayed in the Answer File pane of Windows SIM. We then change the DefaultConsent setting for this component to 4 to indicate that all data is sent automatically.
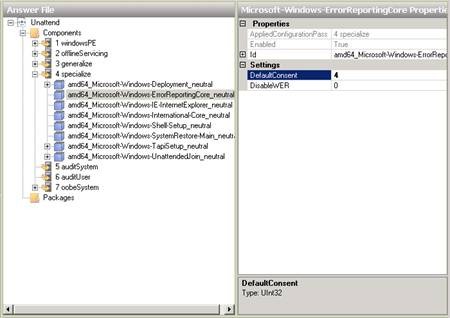
Figure 14: Step 2 in configuring Windows error reporting behavior
How do we know that the value 4 specifies that all data will be sent automatically? Let's look in the Unattended Windows Setup Reference Help (.chm) file, section "DefaultConsent".
Next, we need to enable the Games feature, which is included in Windows 7 but not installed by default in the Enterprise edition (for some reason). To do this, we need to integrate a package into our answer file. This is the Microsoft-Windows-Foundation-Package package , which is located in the Windows Image panel , under Catalog\Packages\Foundation , as shown below. Right-click on this package and select Add to Answer File :
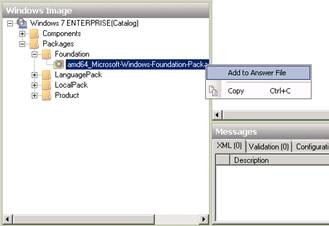
Figure 15: Step 1 in the process of activating the Games feature
Finding out which software packages to add to your answer file is also in the Unattended Windows Setup Reference Help (.chm) file under "Games".
Once successfully added, you will see the Games entry displayed in the Windows SIM Answer File panel. We can then change the value of the InboxGames setting from Disabled to Enabled :
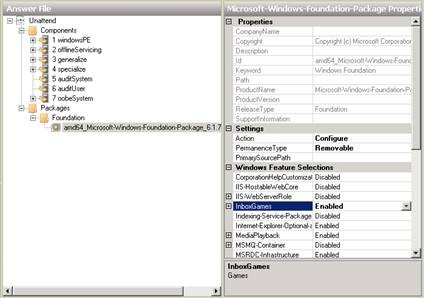
Figure 16: Step 2 in the process of activating the Games feature
Finally, we need to set it to prevent the XPS Viewer application from being installed (it will normally be set to install by default). Since this is a setting included in the same package when enabling the Games feature, we just need to find in the Properties window the setting Xps-Foundation-Xps-Viewer and change its value from Enabled to Disabled :

Figure 17: Blocking the installation of the XPS Viewer application
Conclude
Now that we have completed the 5 automatic configuration customizations for our reference settings, to finish click the Save button in Windows SIM to save your changes to the answer file, then close the task sequence Properties window.
In the next part of this series, we will show you how to do some additional customization after installing the reference build. We will then “ sysprep ”, capture, and deploy the customized image to see how the default user profile customizations work.
Discover how to safely convert MBR to GPT without data loss in Windows 11. Follow our step-by-step guide using built-in tools and third-party software for a seamless upgrade to modern partitioning.
Struggling with the 0x80072ee7 Store connectivity error? Discover proven, step-by-step fixes to restore your Microsoft Store access quickly and easily. Say goodbye to frustrations!
Struggling with background change errors on Windows 11 Pro? This step-by-step guide helps gamers fix the issue fast, restoring your custom setups without hassle. Discover proven methods to personalize your desktop effortlessly.
Discover how to set up Windows 11 Dynamic Refresh Rate for buttery-smooth performance on compatible displays. Follow our step-by-step guide to optimize your PC
Struggling with slow browsers on Windows 11? Discover proven fixes for memory leaks in Chrome, Edge, Firefox, and more. Boost performance and end frustration today.
Struggling with the Windows 11 Photos App File System Error? Discover proven, step-by-step fixes to restore your photo viewing experience without hassle. Updated with the latest troubleshooting tips for seamless performance.
Struggling with OBS Studio black screen on Windows 11? Discover proven fixes for smooth streaming and recording. Step-by-step guide to resolve black screen issues quickly and easily.
Struggling with "GPT Partition Style Not Supported" error on your old PC? Discover proven solutions to convert partitions safely, upgrade your system, and get back to smooth computing without data loss. Perfect for legacy hardware users.
Struggling with stylus pen pressure sensitivity on Windows 11? Discover proven fixes to restore smooth, responsive drawing and note-taking. Step-by-step guide with tips for optimal performance.
Discover step-by-step how to use Windows 11 PowerShell as administrator. Learn to launch, run commands, and troubleshoot with elevated privileges for ultimate control. Perfect for beginners and pros alike.
Discover all essential methods to take a screenshot on Windows 11, from basic keyboard shortcuts to advanced tools. Get step-by-step guides, tips, and tricks to capture your screen perfectly every time.
Discover the ultimate guide to optimizing Java settings for Windows 11. Boost performance, reduce lag, and enhance your Java apps with these expert-recommended tweaks for maximum efficiency.
Discover a step-by-step guide on how to setup Windows 11 BitLocker on external USB drives. Protect your data with easy encryption tips, troubleshooting, and best practices for ultimate security.
Struggling with the Windows 11 "Clock Out of Sync" error? Discover proven, step-by-step fixes to resolve time synchronization issues, restore accuracy, and keep your PC running smoothly. No tech expertise needed!
Struggling with gaming lag on Windows 11 due to VBS and HVCI? This comprehensive guide explains what they are, why they cause stuttering, and step-by-step troubleshooting to boost your FPS without compromising security. Get back to seamless gaming today!
