By default of the Windows operating system, the files created and saved on the computer will be yellow, the file names are black. Normally, users will not have any way to change this, except for changing the icons (icons for those files). But if you want to try a little naughty, we still have a way to change the file color and the name of the files in it.
To change the color of the file name, we can do it directly on the computer, but if you want to change the folder color, it will need support, and Rainbow Folders is the tool to help us do that.
Change the folder's color with Rainbow Folders
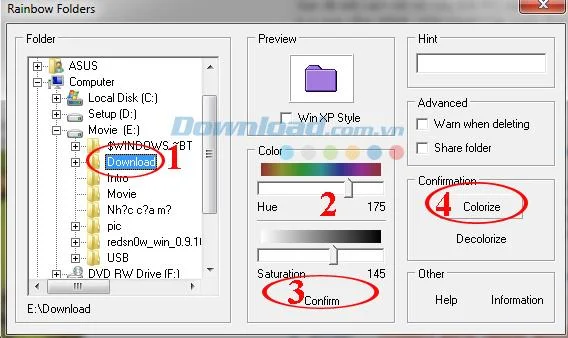
Step 1: After downloading and installing the Rainbow Folders, you run the RainbowFolders.exe.

Step 2: The interface of Rainbow Folders appears, follow the instructions:
- In the Folder : You find and click on the folder you want to change color.
- Preview : Preview the folder color to change. If you want to change the shape of the folder, you can tick the Win XP Style box.
- The two items Color and Hue will allow us to choose an arbitrary color for the folder. You drag the color bar on either side to change the color for the folder. True to the name Rainbow (rainbow), we can choose for ourselves any color simply.
- Click Confirm to confirm the color selected.
- Finally click on Colorize to finish, or Decolorize to return to the default color.

Step 3: Go back to the main screen, you will see the selected folder has "changed" other colors. It also looks quite striking and fancy!

Change the color of the file name in the computer

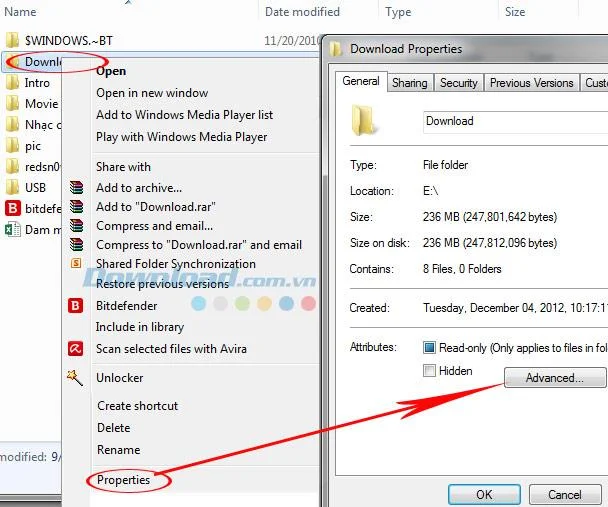
Step 1: You choose right-click the folder you want to change the name of the folder color inside, click Properties . After the new interface appears, continue to click on Advanced.

Step 2: Advanced Attributes appear, click on Compress contents to save disk space under Compress or Encrypt attributes, then OK . At Confirm Attributes Changes, you will have two options:
- Apply changes to this folder only: Change the name color for the selected folder, keeping the name of the files inside.
- Apply changes to this folder, subfolders and files: Change the color of the name of the selected folder and the color of the names of the files and subfolders inside.

Tick the option you want and then click OK to finish.
And here is our result, the folder name color change has been successful!

And this is the color of the filenames inside the selected folder.

This way, there is a restriction that we cannot arbitrarily change the color of the file name , only the default will be blue. But anyway, this color-changing tip of the folder also makes our computer interface change, fancy and more beautiful than the original default settings.
I wish you successful implementation!