4 ways to edit smiles in portrait photos on Photoshop
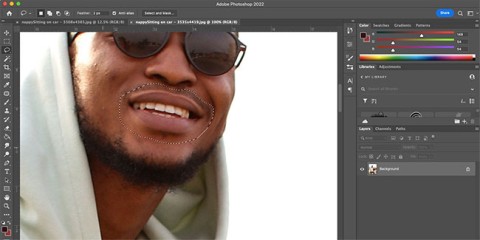
There are several ways to edit smiles in photos using Photoshop, such as using the Liquify tool, Neural Filter, layers, and the Puppet Warp tool.
This tutorial will show you the best way to round corners in Photoshop. It will also show you how to add a border to your image after rounding the corners. And finally, the most important step, how to save the result with the transparency in the corners preserved.
Step 1: Unlock the Background layer
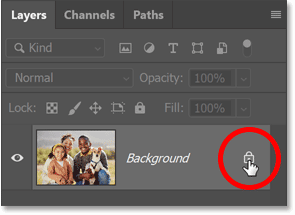
With the image open in Photoshop, start by going to the Layers panel where the image is located on the Background layer.
Click the layer's lock icon to unlock it. Photoshop will rename the layer to Layer 0 and the lock icon will disappear.
Step 2: Select Rectangle Tool
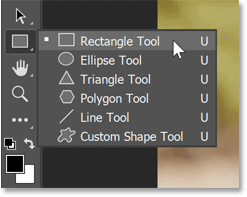
In the toolbar, select the Rectangle Tool.
If another shape tool is available, click and hold on that tool's icon and select the Rectangle Tool from the list.
Step 3: Set shape options
In the Options Bar, click the Stroke Color swatch.

Set color to None to not show stroke.
Then press Enter ( Return on Mac) to close the color options.
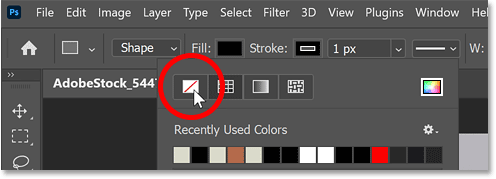
To the left of the stroke color is the Fill Color swatch .
Any color for the shape will do, so for the example we will leave it black (default shape color).

Also in the Options Bar is the Corner Radius option, where you can enter dimensions for the corners before drawing the shape.
Leave it at 0 for now because we will round the corners after drawing the shape.

Step 4: Draw a rectangle
Click and hold in your document and drag the shape out. Don't worry about the size or position of the shape, we'll change it later.
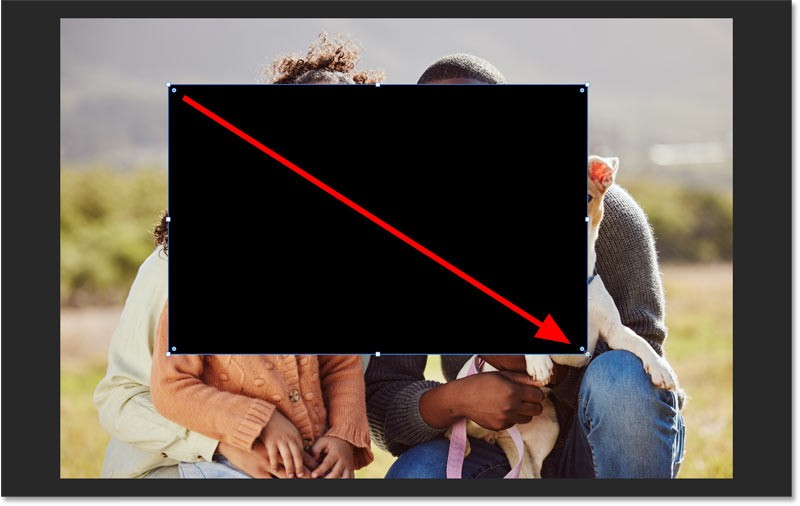
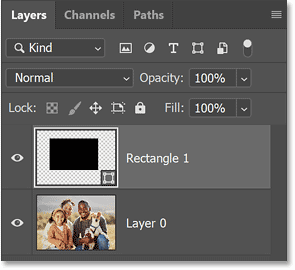
In the Layers panel, the shape will appear on its own shape layer above the image.
Step 5: Center and resize the shape
Before resizing the shape, center the shape on the canvas.
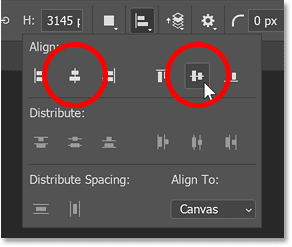
In the Options Bar, click the Path Alignment icon .

Change the Align To option from Selection to Canvas .
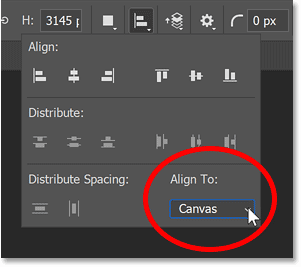
Click the Align Horizontal Centers and Align Vertical Centers icons .
Then click anywhere on the Options Bar to close the box.
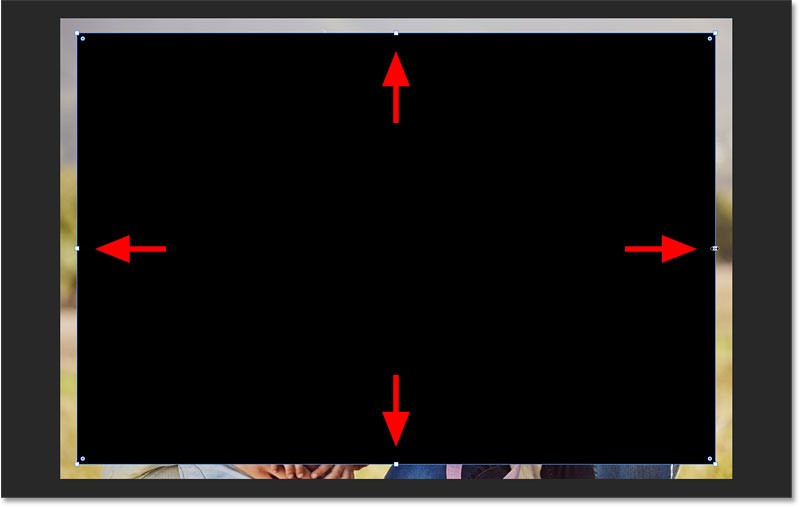
Now that the shape is centered, you can resize it from its center by holding down the Alt key on a Windows PC or the Option key on a Mac and dragging any of the transform handles.
Step 6: Round the corners of the shape
Notice the small circles at each corner of the shape. These are the Corner Radius controls .
To round the corners, simply drag one of the circles.
All four corners of the shape are rounded to the same extent.

Round corners from the Properties panel
Another way to round corners is in the Properties panel. This second way is useful when you know the exact radius value you need.
In the Properties panel, go to the Corner Radius options . You may need to scroll down to find them.
Here you can enter values for the angles at the top left, top right, bottom right, and bottom left corners of the shape.
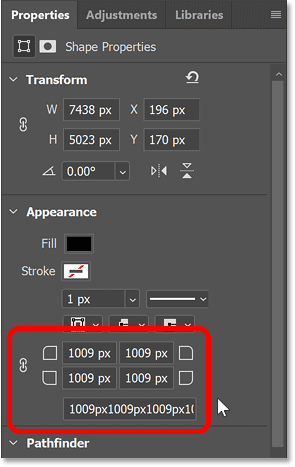
To set the radius for all 4 corners at once, first make sure the link icon is selected.
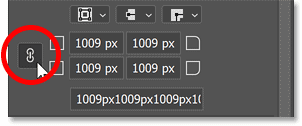
Then enter a value in any cell. For example, we will enter 800 px for the top left corner.
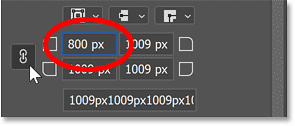
Press Enter ( Return on Mac) to accept and set that value for all 4 corners.
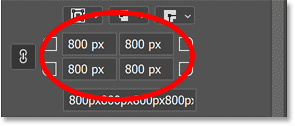
How to round a corner separately from the others
In addition to rounding all four corners together, you can round each corner individually.
The easiest way is to hold down the Alt key on a Windows PC or the Option key on a Mac, then drag the circle for the angle you want to adjust.
So if you want the top right corner to be pointed while the other corners remain rounded, you can hold down the Alt (Win) / Option (Mac) key and drag the circle of that corner back to its original position.
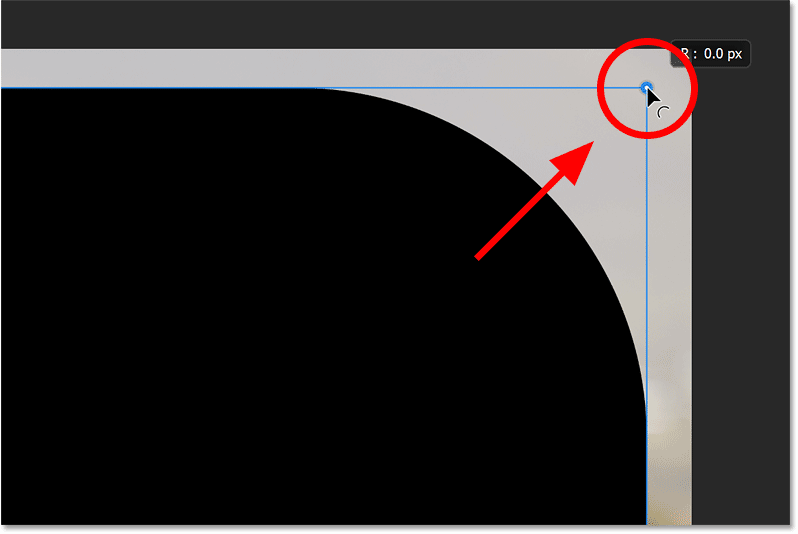
Hold down Alt (Win) / Option (Mac) to drag the circle without affecting the other corners.
And now we have one sharp corner (in the upper right corner) and three rounded corners.

Another way to adjust a corner individually is from the Corner Radius option in the Properties panel.
First, unlink the corners by unchecking the link icon.
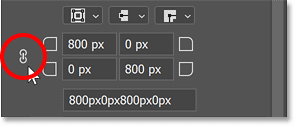
Then enter a radius value for the corner. So if you want the bottom left corner to be pointed as well, you can enter a value of 0 px.
Press Enter ( Return on Mac) to accept.
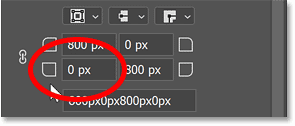
Now, we have two rounded corners and two acute corners.
Set bottom left radius to 0.
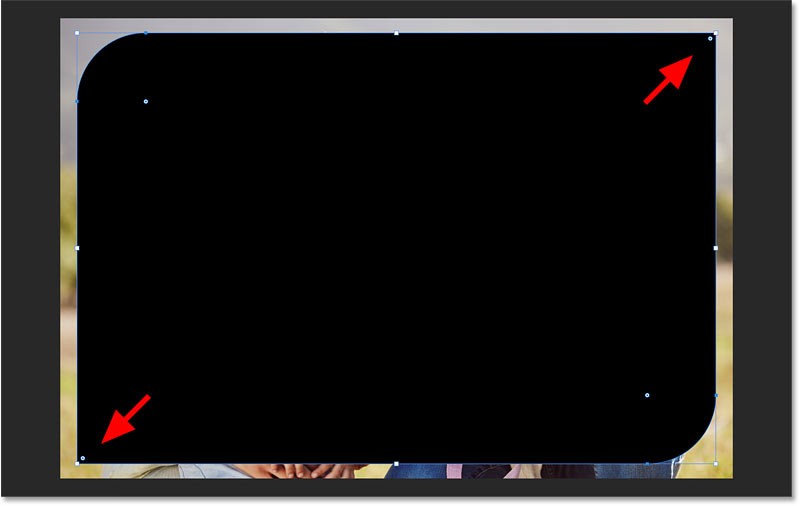
But notice that if you now drag a circle (without holding down the Alt or Option key ) to adjust all four corners together, the corners in the upper right and lower left corners are still less rounded than the other corners.
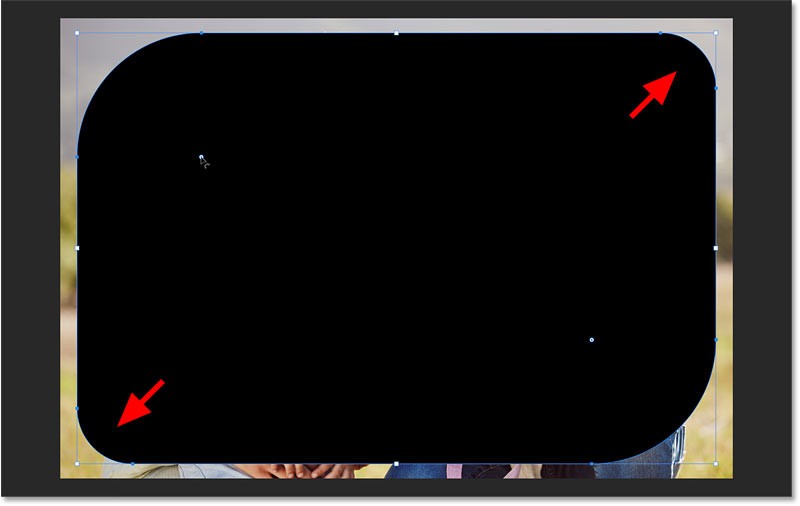
Reset corners
Drag the circles back to the corners to reset them to their original sharp corners.

Then drag one of the circles to round them all to the same amount as you want.

Step 7: Create clipping mask
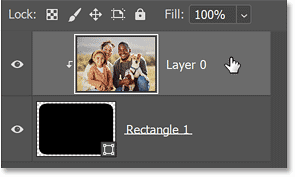
Now that you have rounded the corners of the shape, you need to move the image into the shape. To do that, use a clipping mask.
In the Layers panel, drag the image layer above the shape layer.
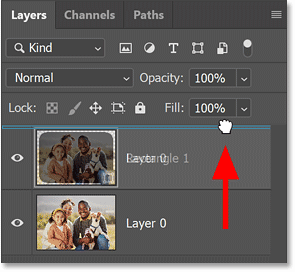
Then, while the image layer is active, click the menu icon of the Layers panel.
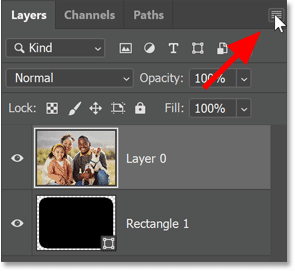
Click the menu icon.
Select Create Clipping Mask .
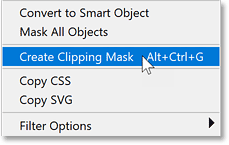
This command places the image inside a shape, making it appear to have rounded corners.
And everything outside the shape is now transparent, represented by a checkerboard pattern.

Step 8: Make final adjustments to the corners
You can still adjust the corners if needed, even if the photo is inside the shape.
Just reselect the shape layer in the Layers panel.
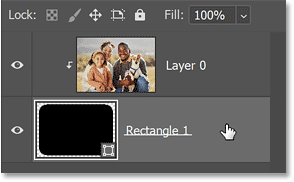
As long as you keep the Rectangle Tool (or any shape tool) selected in the toolbar, the circles at the corners will reappear.
Drag a circle to adjust the roundness until you are satisfied with the result.
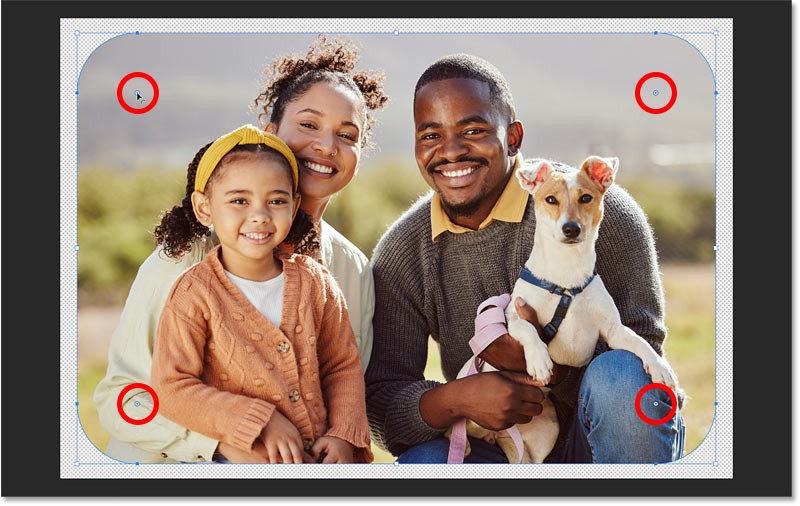
To view the image without the shape controls getting in the way, select the image layer in the Layers panel.
And to bring the controls back, select the shape layer.
Step 9: Cut out the transparent areas
Before we go any further, let's cut out the unnecessary transparent areas around the image, as all we really need is the transparency in the corners.
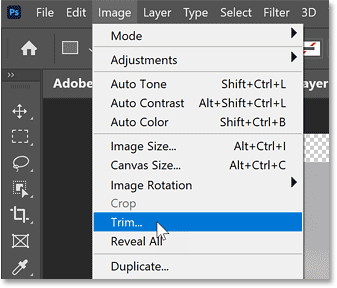
Go to the Image menu and select Trim .
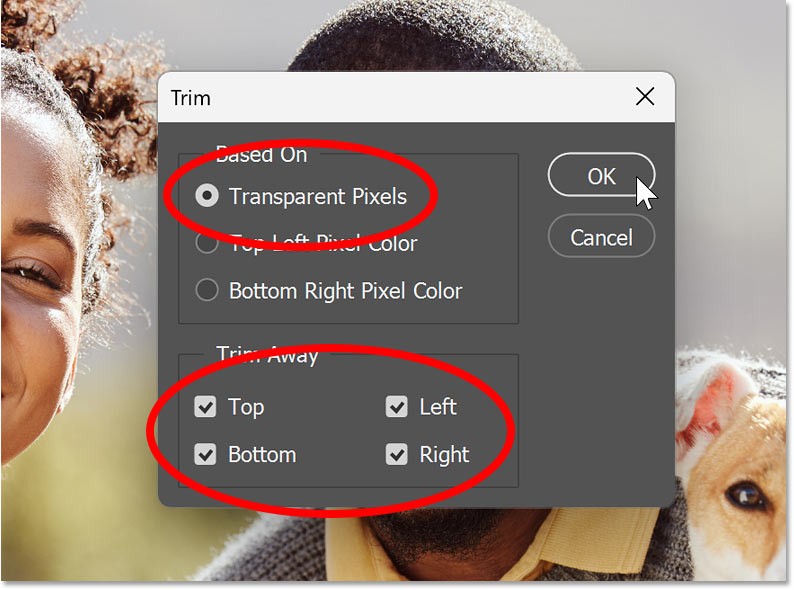
In the Trim dialog box , select Transparent Pixels at the top and make sure Top, Bottom, Left , and Right are all selected at the bottom.
Then click OK.
Photoshop cuts off all transparency except what remains in the corners.

Step 10: Add a border around the photo (optional)
If you want to add a border around your image, make sure the shape layer in the Layers panel is selected.
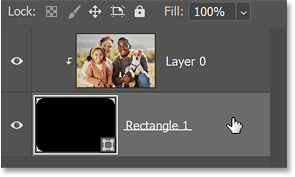
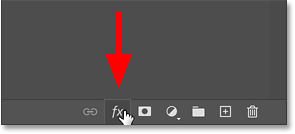
Click the layer effects (fx) icon at the bottom of the Layers panel.
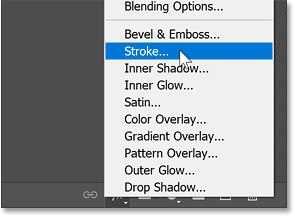
Select Stroke from the list.
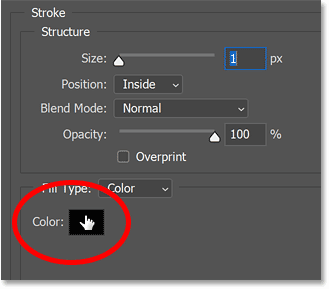
In the Layer Style dialog box, click the color swatch to select a color for the stroke.
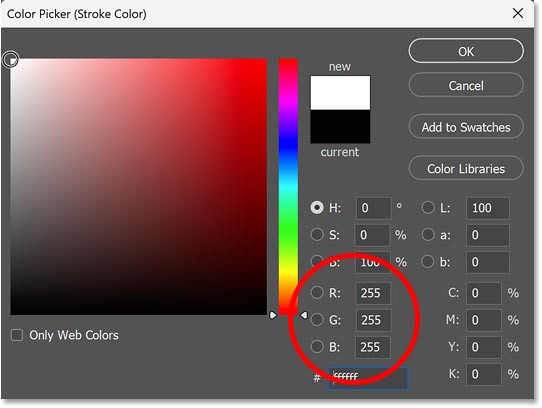
Then, select a color from the Color Picker. For example, we will select white (with R, G, and B values of 255).
Click OK to close the Color Picker when finished.
Back in the Layer Style dialog box, make sure that Stroke Position is set to Inside.
Then, drag the Size slider to set the width of the line. The size you need will depend on the size of your image.
Click OK to close the Layer Style dialog box when you're done.
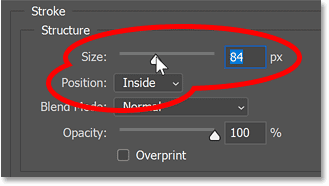
This is the image with the stroke (outline) added.

Step 11: Save image
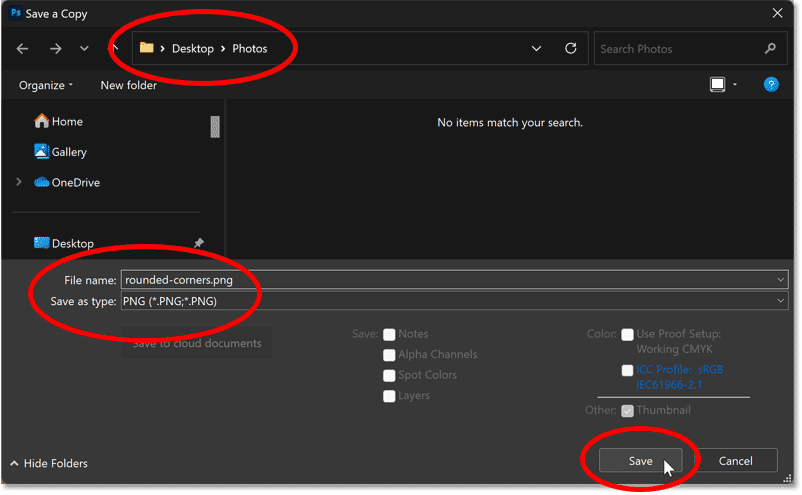
Finally, to save the image and keep the rounded corners, you need to save the image in a format that supports transparency. JPEG won't work. Instead, save the image as a PNG .
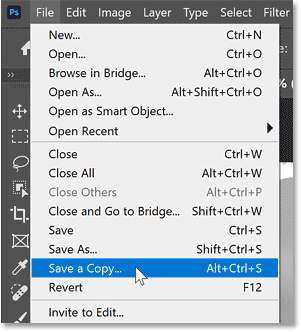
Go to the File menu and select Save a Copy (not Save As).
In the Save a Copy dialog box:
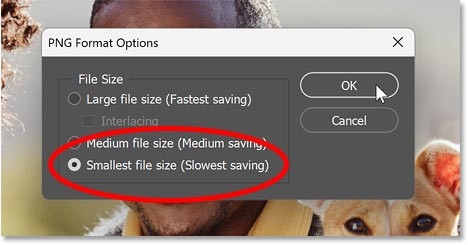
In PNG Format Options, select Smallest file size and click OK .
Your image is now saved with rounded corners.
And that's it! That's how to round corners in Photoshop.
There are several ways to edit smiles in photos using Photoshop, such as using the Liquify tool, Neural Filter, layers, and the Puppet Warp tool.
How to change the color of an object in Photoshop, Photoshop helps you easily isolate and change the color of an object in a photo. Here's how to change the color of an object
Frustrated by Microsoft Teams "For Linux" installation error? Discover proven, step-by-step solutions for Ubuntu, Debian, Fedora & more. Fix it fast and get seamless collaboration now!
Struggling with Microsoft Teams "Password Error" because you forgot your password? Follow our step-by-step guide on how to fix Microsoft Teams password error forgot issues quickly and securely. No tech skills needed!
Struggling with Microsoft Teams "Image Error" in chat? Discover proven step-by-step troubleshooting tips to resolve image display issues fast. No more frustration—get your chats working smoothly today!
Tired of the frustrating Microsoft Teams "Free" Subscription Error blocking your meetings? Discover proven, step-by-step solutions to resolve it fast and restore smooth teamwork. Works on latest versions!
Struggling with Microsoft Teams "Web App" Browser Error? Discover proven, step-by-step solutions to resolve it fast. Clear cache, update browser, and more for seamless Teams web app access. Works on latest browsers!
Struggling with Troubleshooting Microsoft Teams Group Chat Not Loading? Discover proven, step-by-step fixes for the most common issues to get your chats loading smoothly again. Quick wins for desktop, web, and mobile.
Tired of Microsoft Teams proxy error blocking your calls? Discover simple, step-by-step fixes to resolve proxy connection issues instantly. No tech expertise required – get back to seamless teamwork!
Tired of Microsoft Teams "Time Limit" Error crashing your meetings? Follow our proven, step-by-step guide to fix it quickly—update app, clear cache, and more for seamless collaboration. Works on latest versions!
Facing Microsoft Teams Layout Error after the latest update? Discover proven step-by-step fixes to resolve layout glitches, restore perfect UI, and boost productivity fast. No tech skills needed!
Struggling with Microsoft Teams "Error K" Security? Follow our step-by-step guide to fix it quickly—no tech expertise needed. Get back to seamless collaboration today!
Struggling with Microsoft Teams Update Error 0x80070002? Discover step-by-step fixes to resolve it quickly. Clear cache, repair files, and get back to seamless updates today!
Tired of Microsoft Teams "Web Error" blocking your browser login? Follow our step-by-step guide with proven fixes to resolve Teams web login issues fast and securely. Get back to work!
Stuck with Microsoft Teams "Error O" Offline? Discover proven, step-by-step fixes to get back online fast. Clear cache, restart, and more – no tech skills needed!
Frustrated by the missing Microsoft Teams icon in Outlook? Learn exactly where to find it, why it disappears, and proven steps to restore it for effortless meetings. Updated for the latest versions!
Struggling with Microsoft Teams "Windows 10 Error" login issues? Get instant fixes for cache clears, updates, and more. Step-by-step solutions to solve Microsoft Teams login error on Windows 10 fast and frustration-free.

