Do you want to manage all your emails in Gmail ? Let's learn with WebTech360 how to easily manage and add multiple email accounts on Gmail !
Add an email account to Gmail
Like a desktop client, Gmail can handle multiple email accounts. Furthermore, it makes importing mail from POP3 accounts simple by automatically filling in POP server information for you.
How to import email accounts into Gmail
Are you planning on getting rid of an old email account but want to sync your contacts and store those emails in Gmail? You should use Gmail's Import feature .
To import emails from your old Yahoo Mai or other webmail account, here's what you need to do:
- Open Google Mail , click the wheel icon on the top right and select See all settings from the Quick settings sidebar appearing on the right.
- In Gmail settings, go to the Accounts and Import tab .
- Click Import mail and contacts.
- Enter your email address, click Continue and follow the on-screen instructions.
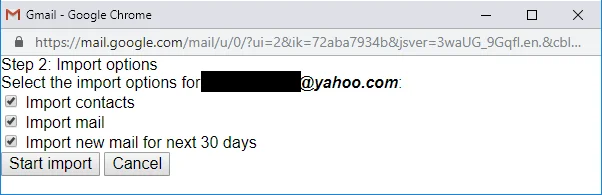
- In the next window, select the details you want to enter.

Note: Gmail can only import mail located in the old account's inbox. If you want to import mail from a folder, you must gradually move the mail to the old account's inbox. You can also label emails when they arrive in your Gmail account.
How to add another email address to Gmail using POP3
If you want to manage another account in Gmail while still using it to send and receive emails, the steps will be a little different.
To add a third email account to Gmail, follow these steps:
- In Gmail, go to Settings > Accounts and Import .
- In Check mail from other accounts , click Add a mail account .
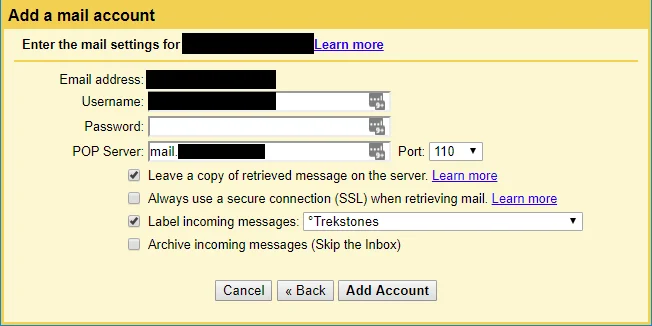
- Once you've entered an email address, Gmail can pre-fill some information, provide a password, and choose favorite settings.

Tip: Create a label for the corresponding account if you want to use this additional account as a separate email.
Once you've successfully added the account, Gmail will offer to add it as an alias, meaning you can send emails from that address. If you agree, you must authenticate your new email alias as follows:
- Go to Settings > Accounts and Import .
- Under Send mail as , click Add another email address .
- Enter email address and click Next Step .
- Make sure the pre-filled information is correct, enter the password and click Add Account .
- Wait for the email containing the confirmation code to arrive, click the verification link or enter the code and click Verify .

Manage multiple email accounts in Gmail
You can treat all incoming mail as equal and rely on email aliases to automatically adjust. Additionally, if you want to get rid of an old email address, you can select Always reply from the default address and let your contacts find the new address themselves.
How to enable multiple inboxes in Gmail
If you've added email accounts for work or different projects, you may want to keep your inboxes separate. In this case, you should use the old Gmail Labs feature called Multiple Inboxes .
Go to Settings > Inbox > next to Inbox type , select Multiple Inboxes from the drop-down menu.
How to customize Multiple Inboxes in Gmail
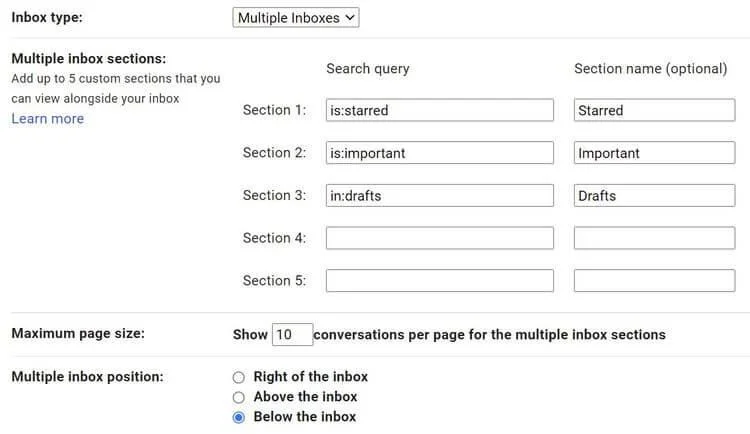
However, selecting Multiple Inboxes allows you to create up to 5 queries that appear along with the regular inbox.
The example here sets up separate inboxes for follow-up mail (Section 1), important mail (Section 2) and drafts (Section 3). You can use standard search algorithms to create query-based inboxes. You can set a maximum page size of 99 conversations per panel and position the inbox above, below, or right next to the normal inbox.

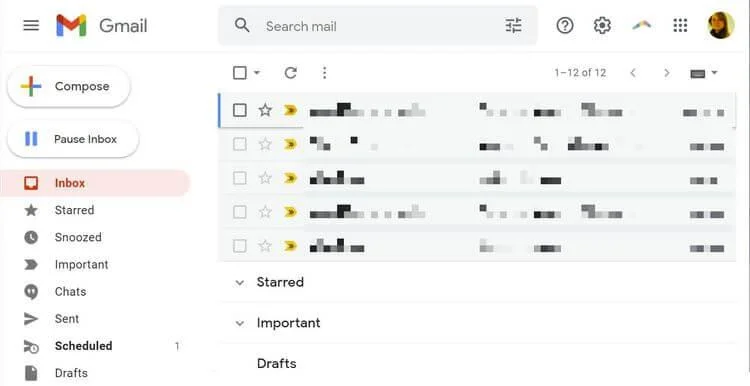
After setting everything up, you should see Gmail like this:

Above is how to add and manage multiple email accounts in Gmail . Hope the article is useful to you.