The Technology Powering Todays Live Blackjack Experience
Walking into a casino has a specific vibe. You hear the chips clacking, see the cards shuffling, and feel the energy of the room.
Did you know that with the right BIOS settings , you can squeeze more performance out of your existing hardware? If you don’t know about Resizable BAR and how it boosts performance, chances are you’ve turned it off. Here’s how you can enable Resizable Bar and what to expect from the feature.
Table of Contents
Resizable BAR (Base Address Register) is a feature that allows the CPU to access the entire graphics card memory or VRAM at once instead of in small, fixed 256MB chunks. This feature is part of the PCI Express standard and is intended to improve the efficiency of data transfer between the CPU and GPU, improving overall system performance for GPU- intensive games and applications .
Under normal circumstances, the CPU can only access a portion of the GPU's memory at a time due to the limitations of the traditional PCIe standard. With the Resizable Bar disabled, the default bandwidth is limited to 256MB at a time. This limited bandwidth can cause bottlenecks, especially in data-intensive tasks like gaming, video editing, and simulation.
Resizable BAR eliminates these limitations by allowing the CPU to access all of the VRAM in a single operation. This increases the speed of data transfer between the CPU and GPU, resulting in improved performance in supported games and applications.
AMD's implementation of Resizable BAR is called Smart Access Memory (SAM). Introduced with Ryzen 5000 series CPUs and Radeon RX 6000 series GPUs, SAM allows these components to communicate more efficiently, taking advantage of the full potential of the hardware. AMD claims up to a 16% improvement in gaming performance with SAM enabled, although actual gains may vary depending on the game and specific hardware configuration.
To use Resizable BAR, your system must meet certain hardware requirements:
Be sure to check your motherboard manufacturer's website for BIOS updates that enable Resizable BAR support.
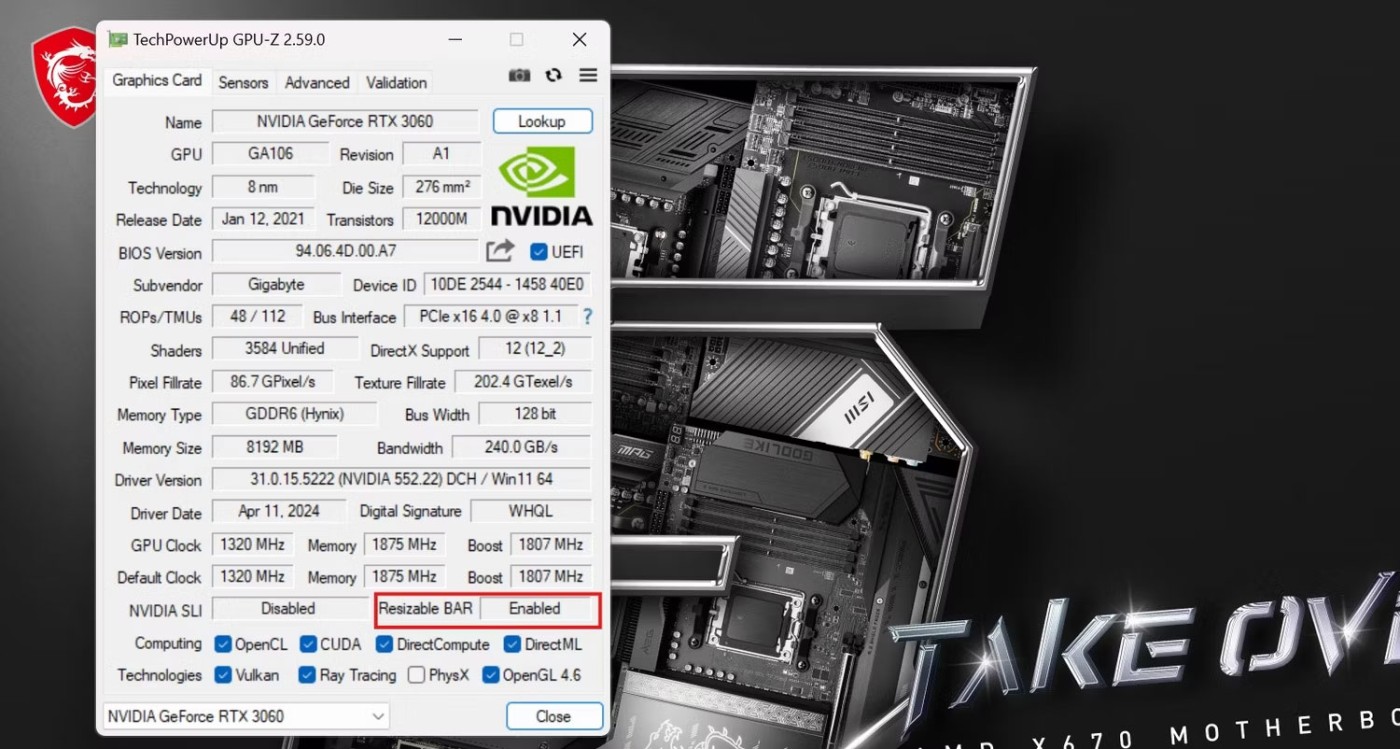
Before enabling Resizable BAR, you can check its status using CPU-Z . GPU-Z is a popular utility for monitoring graphics card information. To check if Resizable BAR is enabled, download and install GPU-Z. Once installed, open GPU-Z and look for the "Resizable BAR" entry to see if it is enabled or disabled. This can save you some time by confirming whether your system supports the feature. If Resizable BAR is disabled, you can enable it through the BIOS.
Enabling Resizable BAR can result in performance improvements in many games by reducing latency and accessing GPU memory beyond the 256MB limit at a time. For example, AMD claims performance gains of up to 16% in some games, although actual benefits can vary. Many users report performance gains in the 6-10% range, with some games seeing even higher improvements. It’s important to note that not all games will benefit equally, and some games may even experience slight performance drops. That’s why it’s important to test your games first to understand the true performance impact of Resizable BAR.
If your system has a CPU, GPU, and motherboard that support Resizable BAR, you can easily enable this setting in your BIOS. It only takes a few steps to enable Resizable BAR. Here's how:
Restart your computer and enter BIOS by pressing the DEL or F12 key as it boots. Some motherboards may use different keys to enter BIOS. A quick search online should tell you which key to press for your particular motherboard.
In your computer's BIOS, navigate to the PCIe settings menu and enable Above 4G Decoding . This setting enables a 64-bit address space for PCIe devices, allowing access to more than 4GB of memory space for each PCI Express device like a GPU.
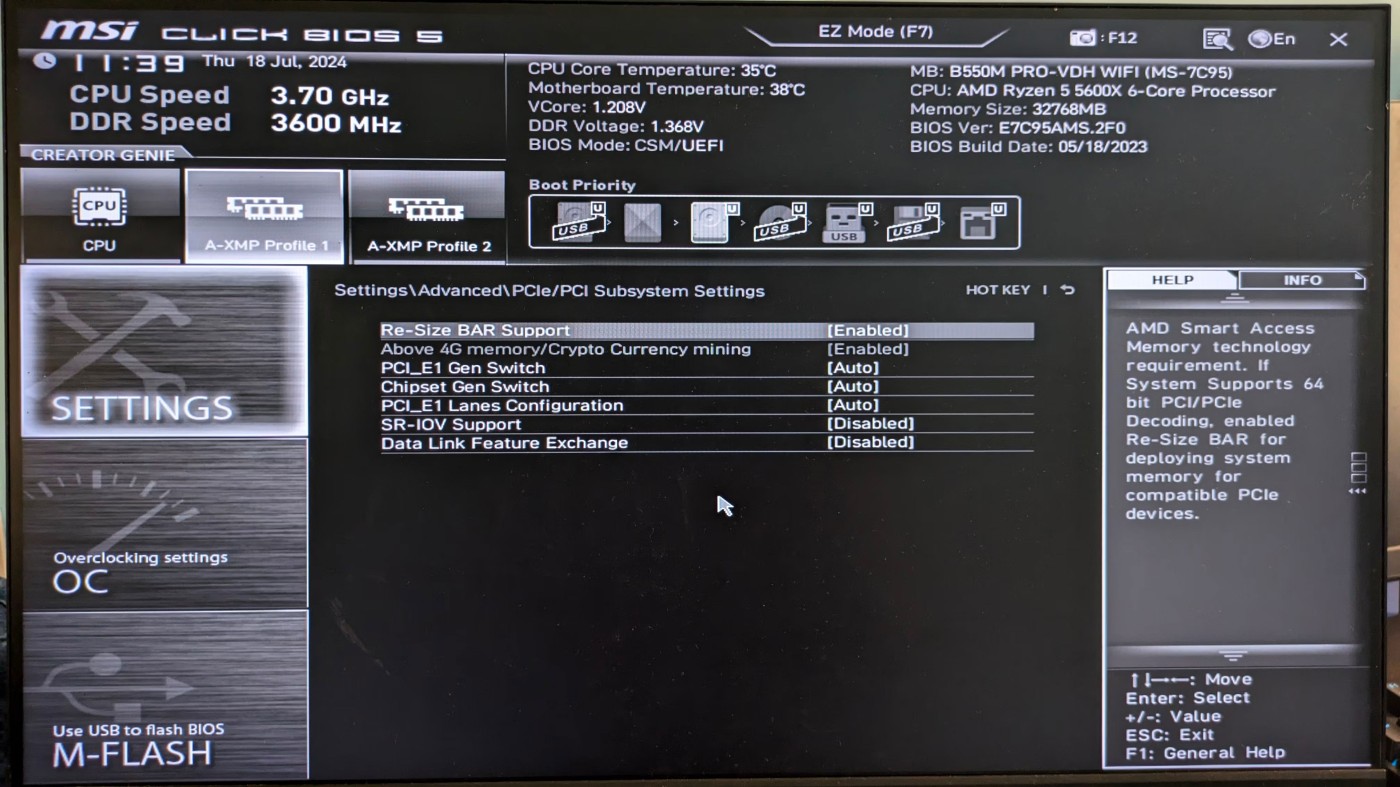
Now that you have enabled 64-bit addressing, navigate to Re-Size BAR and toggle it to on. This option may be listed under different names depending on your motherboard manufacturer. AMD may call it Smart Access Memory (SAM), while Nvidia uses Re-Size BAR or Resizable BAR.
Some motherboards may have the Above 4G Decoding and Resize BAR settings merged into one. If so, switching Re-Size BAR to on will also enable Above 4G Decoding.
Make sure all changes are made to the current XMP/EXPO profile you are using before hitting save and exit. After rebooting, check GPU-Z to confirm Resizable BAR is enabled.
If your system fails to boot or crashes, you may need to disable CSM (Compatibility Support Module) and make sure your system drive uses GUID Partition Table (GPT) instead of the older MBR format.
While Resizable BAR may provide a free and relatively easy performance boost, it is not without potential drawbacks. Some games may not see any benefit, and some may even perform worse. Additionally, enabling the feature involves changing the BIOS, which carries a small risk of system instability if not done properly. Always make sure you have the latest BIOS and drivers, and proceed with caution.
Overall, if you want to get the most out of your gaming rig, enabling Resizable BAR is a tweak worth exploring. It promises better performance without breaking the bank, making it an appealing option for gamers and PC enthusiasts alike.
Walking into a casino has a specific vibe. You hear the chips clacking, see the cards shuffling, and feel the energy of the room.
There are many games that you can enjoy without Wi-Fi connection or data usage. If you are looking for such offline games then this article is for you.
In Lien Quan Mobile, there are many short terms that help you communicate quickly and effectively when competing. And now, Lien Quan Council will review the most basic terms for Generals to understand.
Blackjack is one of the most thrilling casino games around. You beat the dealer, not other players. However, did you know that the number of decks used can influence your chances of winning?
Thanks to Nintendo Switch Online, exploring hundreds of classic games on the NES, SNES, N64, Game Boy, and Sega Genesis has never been easier.
Before upgrading your memory, try the tweaks in this guide to improve game data loading times in Windows.
A good TV for gaming is judged on many factors. The biggest focus is on picture quality, contrast, color, accuracy, and one more factor is input lag.
Everyone loves getting something for free. However, when it comes to free mobile games, we all know that they aren't really free.
Error 500 is a familiar message that many players encounter when using the Epic Games Store.
Football Manager 2024 is available for free on the Epic Games Store until September 12 so you can download it to your computer.
Zombies have always been an attractive theme in PC games and horror movies. Game publishers have exploited this theme and achieved much success thanks to the zombie horror genre.
The game Tai Uong has now been officially released and allows players to download it on their computers via the game distribution platform Steam.
To play dinosaur game - T-rex Run on Chrome when offline and when online, you just need to follow these simple instructions. The lovely T-rex dinosaur will appear on the screen for you to start the game.
There has long been a debate among gamers about whether to use a laptop, desktop, or console for gaming. While each option offers its own benefits, gaming on a laptop stands out in a unique way.
If you're looking for a new experience, there are a few things to keep in mind before adding a mod to your game.


