Guide to creating photos with dissolution effect with PicsArt

Currently, the photos with the dispersion effect are being shared by many people on social networks . If before, to create photos with this effect, we need to use a lot of professional photo editing tools on the computer, but now with the PicsArt application , I can feel comfortable. Create photos with vanish effect.

PicsArt is a photo editing application used by many young people today, with this app, we can freely make our photos become more beautiful and unique. Today we will introduce the tutorial on creating photos with the dissolution effect with PicsArt on your phone , invite you to follow.

Download PicsArt on Android Download PicsArt on iOS

Guide to creating photos with dissolution effect with PicsArt

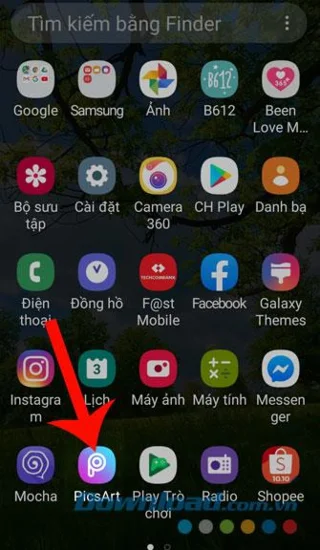
Step 1: Open the PicsArt application on the phone, this is the first thing to do before creating a vanish effect for the image.

Step 2: At the home page of the application, click on the bottom of the phone screen. plus symbol

Step 3: Click on the photo you want to create the effect.
Guide to creating photos with dissolution effect with PicsArt Guide to creating photos with dissolution effect with PicsArt Guide to creating photos with dissolution effect with PicsArt

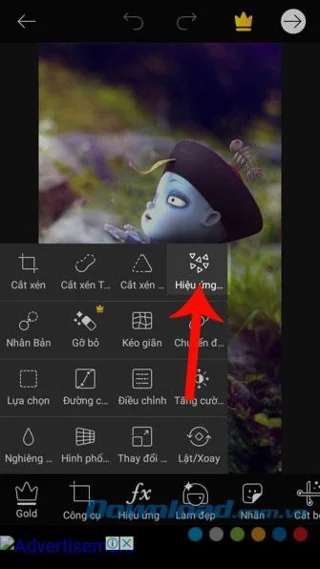
Step 4: In the main interface of Photo editing feature , click on Tools at the bottom of the screen.

Step 5: At this time, there will appear a list of tools for editing photos, click on the Vanish effect .

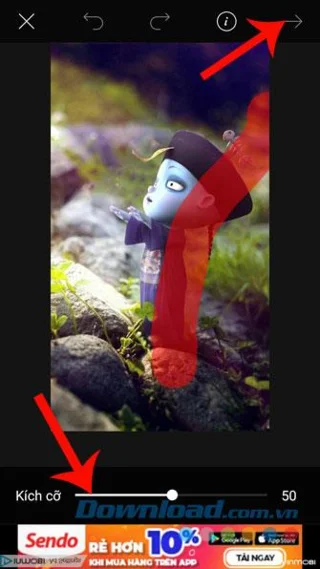
Step 6: Highlight the areas where you want to create a vanish effect and the selected area on the image will be highlighted in red .

Step 7: Next, move the size bar below to adjust the size of the zoned line , then click the arrow icon in the upper right corner of the screen.

Guide to creating photos with dissolution effect with PicsArt Guide to creating photos with dissolution effect with PicsArt Guide to creating photos with dissolution effect with PicsArt

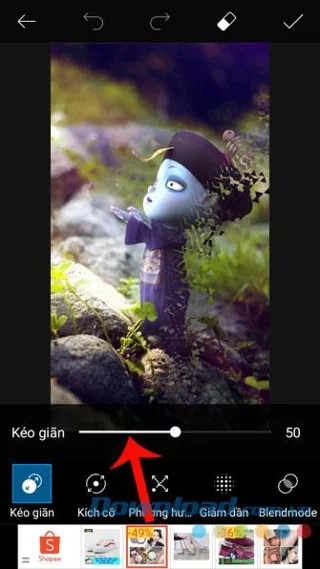
Step 8: Now the fade effect is applied to the photo. At the bottom of the screen there are a number of tools to customize the effect such as Stretch, Size, Orientation, Descending, Blendmode . There is a adjustment bar at each tool , so move this bar to correct the dissolution effect on the image.

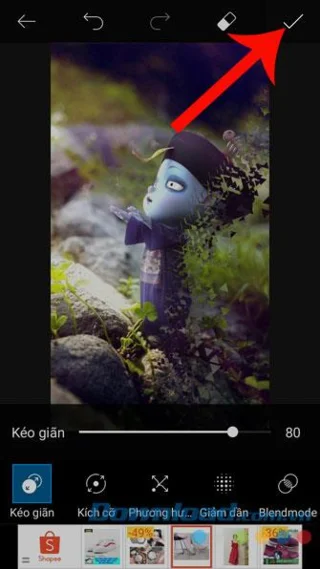
Step 9: To apply the fade effect to the image, click the tick mark at the top of the screen.

Step 10: Click the arrow icon in the upper right corner of the screen.

Guide to creating photos with dissolution effect with PicsArt Guide to creating photos with dissolution effect with PicsArt Guide to creating photos with dissolution effect with PicsArt

Step 11: In the Share section, click the Save button to save the image to your phone.

Step 12: Select the Save item .

Step 13: Then select Gallery to save the image to your device.

Guide to creating photos with dissolution effect with PicsArt Guide to creating photos with dissolution effect with PicsArt Guide to creating photos with dissolution effect with PicsArt

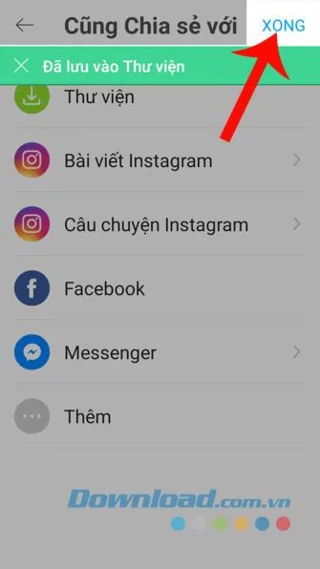
Step 14: Now there will be a message Saved to the library , click Done to finish the process of creating images with the disappearance effect.

Step 15: Finally, open Photo Library on your phone to review the newly edited picture.

Guide to creating photos with dissolution effect with PicsArt Guide to creating photos with dissolution effect with PicsArt

Above is a guide to creating photos by dissolving effect with PicsArt on the phone, we hope that after completing these steps, you can turn your photos to look better with this effect. .

In addition, you can also refer to some other articles such as:

I wish you successful implementation!

Leave a Comment

Chrome Download App Install

Chrome Download App Install

Chrome Download App Install lets you fetch and set up apps safely through Google Chrome. Follow this exact process to download installers and complete setup on Windows, Mac, or ChromeOS.

Upgrade to Windows 11 Free

Upgrade to Windows 11 Free

Upgrade to Windows 11 Free from a compatible Windows 10 device using Microsoft's official tools. This guide walks through the exact steps to install the new OS without buying a license.

How to Unsend on Outlook

How to Unsend on Outlook

Learn how to unsend on Outlook in seconds using the built-in recall tool. Follow this exact guide to retract emails sent through Microsoft Exchange or Microsoft 365 accounts.

How to Revoke an Email in Outlook

How to Revoke an Email in Outlook

How to Revoke an Email in Outlook lets you retract messages sent by mistake. Follow these precise steps for Microsoft 365 or Exchange accounts to recall unwanted emails before the recipient reads them.

Adobe DC Reader Offline Installer

Adobe DC Reader Offline Installer

Download the Adobe DC Reader Offline Installer to install Adobe Acrobat Reader DC without an internet connection. Follow this complete guide for the full offline package.

Not Getting Email on Outlook

Not Getting Email on Outlook

Fix not getting email on Outlook with these targeted troubleshooting steps for desktop, web, and mobile. Restore incoming messages quickly.

How to Recall a Mail in Outlook

How to Recall a Mail in Outlook

How to Recall a Mail in Outlook works only when both sender and recipient use Microsoft Exchange or Microsoft 365. Follow these exact steps to recall an unread email before it causes problems.

Outlook Email Does Not Work

Outlook Email Does Not Work

Outlook Email Does Not Work can halt your productivity fast. Follow these targeted fixes to restore email access in Outlook without losing data or contacts.

Adobe Acrobat Online Editor

Adobe Acrobat Online Editor

Use the Adobe Acrobat Online Editor to edit PDFs directly in your browser. Follow this practical guide to upload, modify, and export documents without installing any software.

How to Recall a Sent Email in Outlook

How to Recall a Sent Email in Outlook

Learn exactly how to recall a sent email in Outlook when the conditions are met. Follow these precise steps to delete or replace unread messages in Microsoft Exchange or Microsoft 365 accounts.