Home
» PC Tips
»
How to Dual-Boot Ubuntu 24.04 and Windows 11 With BitLocker Enabled
How to Dual-Boot Ubuntu 24.04 and Windows 11 With BitLocker Enabled
Yes, Ubuntu 24.04 LTS and Windows 11 can coexist while Windows keeps BitLocker protection, but the safe installation method depends on your disk layout. If you have a second physical drive for Ubuntu, you can generally leave the Windows drive encrypted and install Ubuntu on that other drive. If both operating systems must share one drive, Canonical's documented guided installation path requires turning BitLocker off and allowing Windows to decrypt before the Ubuntu installer changes that drive's layout.
This distinction matters: suspending BitLocker is not the same as turning it off. A suspended drive is still encrypted, and treating it as decrypted can result in an unsafe or blocked installer. The instructions below follow the Ubuntu Desktop 24.04 LTS installer documentation and Microsoft guidance available as of October 9, 2026; exact firmware and installer labels vary among computers.
Can You Keep BitLocker Enabled Throughout the Installation?
On a separate physical disk, usually yes. Ubuntu's installation documentation explicitly offers a separate, unencrypted disk when BitLocker prevents installing alongside the Windows volume. Windows retains its BitLocker-encrypted C: drive; Ubuntu uses a different drive. Boot changes may still make Windows ask for its recovery key.
On a shared physical disk, do not assume so. Canonical says the guided Ubuntu installer cannot reliably inspect an encrypted Windows installation to install alongside it. For the documented shared-disk process, decrypt Windows completely, install Ubuntu, then decide whether your Windows edition and device can re-enable encryption. Re-encryption is not guaranteed on every configuration. See Canonical's
BitLocker during Ubuntu installation.
Situation
Recommended installation path
BitLocker implication
Two physical internal drives; a suitable second drive is available
Install Ubuntu only on the second drive; confirm the disk model and capacity before approving changes
Windows C: can remain encrypted
One internal drive, Windows and Ubuntu must share it
Back up, decrypt Windows, create space, use the 24.04 guided alongside option when offered
BitLocker is temporarily off; check whether it can be re-enabled afterward
Work-managed machine or encryption must never be turned off
Get IT authorization and a separate approved disk, or use a virtual machine/WSL instead
Do not bypass corporate encryption policies
What Should You Check Before Changing the Disk?
1. Find the Recovery Key and Confirm Encryption Status
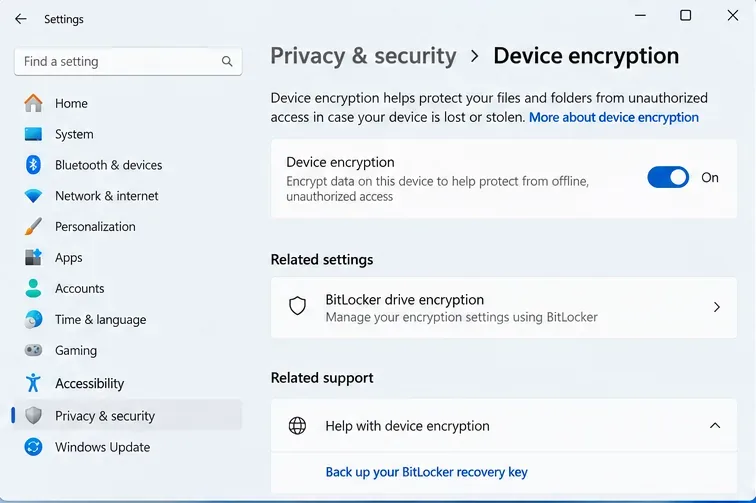
In Windows 11, open Settings > Privacy & security > Device encryption if that item exists. Windows Home can use Device Encryption on supported hardware, while BitLocker Drive Encryption management is offered on Pro, Enterprise, and Education. Search for Manage BitLocker if the classic control panel is available. Note which volumes are encrypted.
Back up the 48-digit recovery key where it will be accessible without booting this PC. For many personal devices, Microsoft provides recovery-key access through the Microsoft account linked to the computer; workplace or school devices may store keys with the organization. Match the recovery key ID shown on a recovery screen with the saved key record. Follow Microsoft's
instructions for finding a BitLocker recovery key. Do not proceed if you cannot recover the key.
The Windows 11 Device encryption settings show encryption enabled and a link to recovery-key information. Confirm your own system status and save the real recovery key before changing boot settings.
2. Back Up Files and Identify the Physical Drives
Copy important Windows files to independent storage and verify you can open them. A recovery key unlocks an encrypted volume; it does not replace a backup of your files. Keep recovery media for Windows and a working charger available.
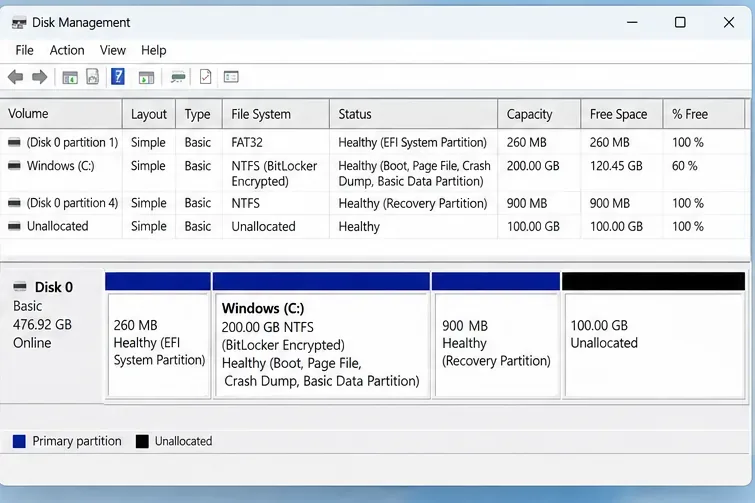
Open Disk Management (press Windows + R, enter diskmgmt.msc). Record the Windows disk number, capacity, EFI System Partition, C: volume, and recovery partition. If you have two physical drives, identify the second by its capacity and model. Disk numbers and Linux names such as /dev/nvme0n1 can change; verify the actual device during installation.
For the shared-disk method, aim for at least the Ubuntu installer minimum of 25 GB of storage; allocating roughly 50–80 GB or more is a practical planning suggestion for applications and personal files, not a Canonical requirement. Keep ample free space on Windows for updates.
Disk Management distinguishes the Windows operating-system volume, EFI and recovery partitions, and unallocated space. Identify the correct physical disk rather than relying only on its drive letter.
3. Is Your Computer Using UEFI and Secure Boot?
In Windows, run msinfo32 and check BIOS Mode. Modern Windows 11 installations normally use UEFI with a GUID Partition Table (GPT). Boot the Ubuntu USB in UEFI mode as well; mixing UEFI and legacy boot modes complicates dual booting.
There is usually no reason to disable Secure Boot simply to install Ubuntu 24.04. Turning off Secure Boot, clearing the TPM, or changing firmware storage mode can trigger recovery or prevent Windows from starting. If Ubuntu reports an Intel RST storage issue, stop and consult Ubuntu's relevant storage-controller documentation before changing firmware settings.
Windows Fast Startup also uses a form of hibernation, as explained in Microsoft's
system power states documentation. For reliable access to shared Windows filesystems, avoid mounting a hibernated Windows volume for writing from Ubuntu. A normal Windows Restart performs a fuller shutdown than Fast Startup shutdown, and an explicit full shutdown is preferable when working across operating systems.
How Do You Prepare the Windows Partition on a Single-Disk PC?
4. Turn Off BitLocker and Wait for Full Decryption
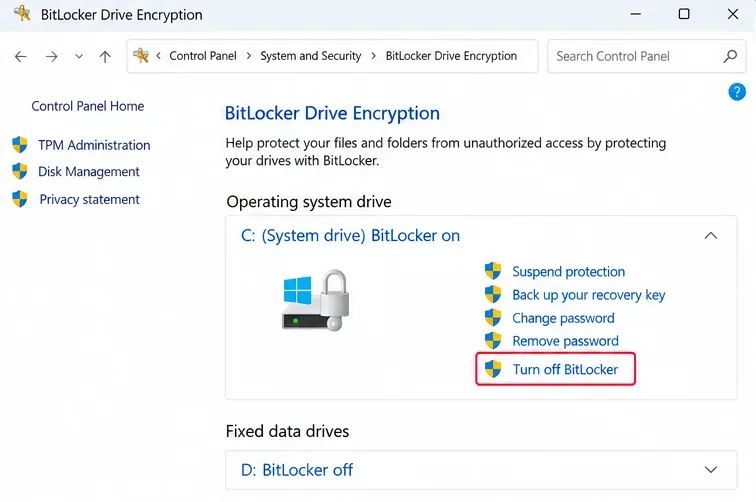
Only follow this step for the shared-disk path. In Windows, choose Turn off BitLocker for the OS volume, or turn off Device encryption where that is the available control. Confirm the decryption request and keep the PC powered while it runs. Do not select only Suspend protection: Microsoft states that suspension leaves the data encrypted and stores a temporary clear key, which does not satisfy Canonical's documented prerequisite.
Do not interrupt the process to boot the installer. If you see a BitLocker waiting for activation condition, follow Canonical's special instructions rather than assuming the disk is unencrypted; such a configuration can still block Ubuntu's installer. Also check in advance whether your Windows edition will let you enable encryption again. Canonical specifically warns that some Windows versions may not. Consult the
Ubuntu 24.04 procedure for turning off BitLocker and Microsoft's comparison of suspension and decryption.
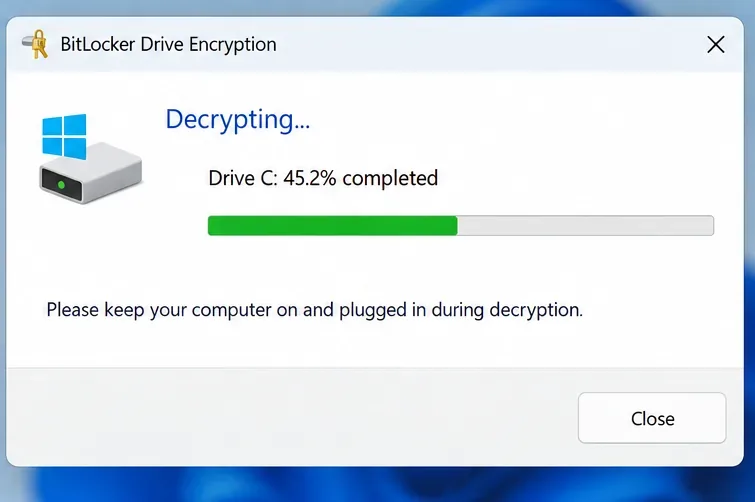
The BitLocker control panel distinguishes Suspend protection from Turn off BitLocker. For Canonical’s same-drive guided workflow, choose full decryption rather than merely suspending protection.Windows displays decryption progress while BitLocker is being turned off. Wait until the operation finishes and the disk is fully decrypted before repartitioning.
5. Shrink C: in Windows, Leaving Space Unallocated
When decryption finishes, restart into Windows and confirm your data is accessible. Then reopen Disk Management, right-click C:, and choose Shrink Volume. Enter the amount you intend to reserve for Ubuntu. For example, a request to shrink by roughly 60,000 MB creates approximately 60 GB of space; the number is only an example, not a guaranteed amount a given PC can free.
Leave the resulting area as Unallocated. Do not create an NTFS volume there, delete the EFI System Partition, remove a Windows recovery partition, or format C:. If Windows offers too little shrink space, stop and resolve the Windows disk-space limitations rather than forcing a Linux partition editor to move protected Windows structures. Microsoft's
Disk Management documentation describes the built-in shrink feature.
How Do You Install Ubuntu 24.04 Without Overwriting Windows?
6. Write the Ubuntu Installer to a USB Drive
Download an Ubuntu 24.04 LTS desktop ISO from Canonical, then use a proper USB image writer such as Rufus to create the bootable installer. Canonical recommends an 8 GB or larger USB drive. Copying the ISO to an ordinary USB folder is not sufficient, and creating the bootable drive erases its existing contents.
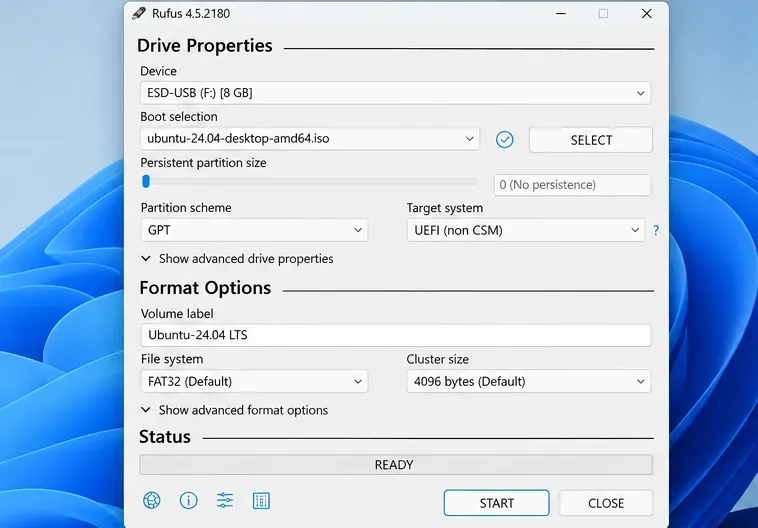
On a conventional Windows 11 UEFI/GPT computer, Rufus should normally use UEFI-compatible settings. Double-check the USB Device selection before starting. See Canonical's
Ubuntu 24.04 bootable USB instructions.
Rufus shows an Ubuntu desktop ISO, a selected USB drive, GPT partition scheme, and UEFI target system. The USB device shown is the drive that will be overwritten.
7. Boot the USB in UEFI Mode and Check the Live Session
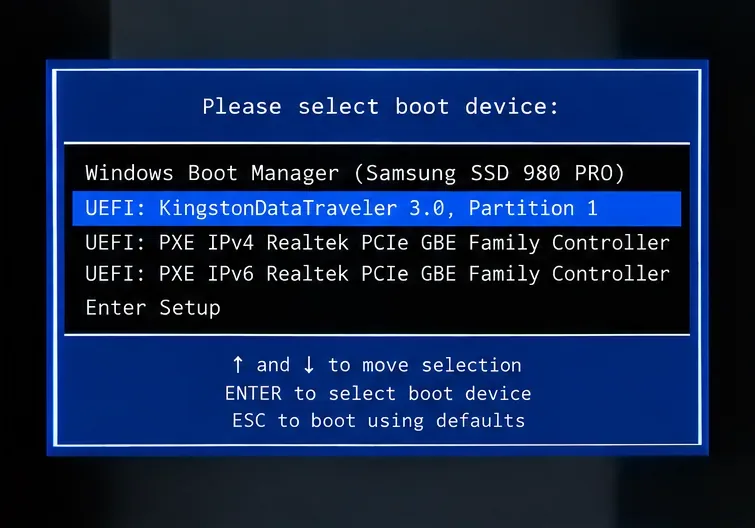
Restart and open the one-time firmware boot menu. The key varies by manufacturer; F12, Esc, F10, and F2 are common possibilities. Choose the USB option marked UEFI, if several versions are listed. Choose Try Ubuntu when offered, then check Wi-Fi, keyboard, display, and storage detection before installing.
A live session is a useful compatibility check, but it is not a guarantee that every driver or encrypted-disk interaction will work after installation. If the installer cannot see your intended second drive, or displays a storage-controller warning, stop rather than guessing at firmware changes.
The firmware boot selector highlights a UEFI USB device, separate from Windows Boot Manager. Use your computer manufacturer’s actual boot-menu key and device names.
8. Choose the Target Disk and Review Every Partition Change
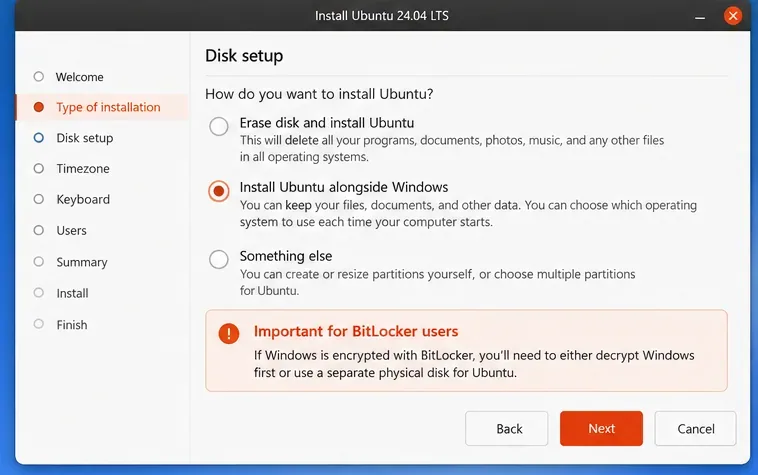
In the Ubuntu Desktop installer, select the interactive installation path and proceed to Disk setup. For a single drive that has already been fully decrypted, use Install Ubuntu alongside when the installer recognizes Windows and offers that option. Review the proposed split and use the space you intentionally made available. If the detected layout is unclear, cancel and return to Windows.
For two physical drives, select the specific second disk. Canonical documents using Erase disk and install Ubuntu on a different drive as a possible route, but that erases the selected drive completely. Only choose it when the second drive contains nothing you need and you have positively verified its model and size. If preserving data on that disk, a qualified user must plan partitions manually instead. Never choose the erase option on the Windows drive.
Manual partitioning is for advanced users. If required, recognize the existing EFI System Partition and Windows recovery partitions, avoid formatting them, and assign Linux filesystems only to the intended free space or Linux disk. Firmware layouts vary, so do not assume an EFI partition number or a fixed /dev/nvme... device name. Canonical's
Ubuntu 24.04 installer walkthrough explains guided options and the limitations of manual disk setup.
The disk setup choices contrast installation alongside Windows with the destructive erase option. Screen wording varies in Ubuntu 24.04 builds; a BitLocker warning means you must reassess the disk or decryption status, not bypass the warning.
9. Finish Installation and Boot Both Operating Systems
Review the final install summary and confirm that the Windows OS and recovery partitions are not marked for deletion or formatting. Choose an Ubuntu username and password, complete installation, and remove the USB when prompted. Depending on firmware, a GRUB menu may list Ubuntu and Windows Boot Manager, or you may need to select the OS using the firmware's one-time boot menu.
First boot Ubuntu and confirm your home directory, internet, and storage work. Then boot Windows. A changed boot path can cause BitLocker recovery even if its encrypted Windows volume was never overwritten. If prompted, enter your saved 48-digit recovery key, verify Windows starts, and keep the key available for future firmware or bootloader changes.
A GRUB boot menu can offer Ubuntu and Windows Boot Manager. Some UEFI systems use their own boot selector instead, and the entries shown depend on the finished installation.
Should You Re-Enable BitLocker After a Shared-Disk Install?
Only if Windows provides a supported way to do so. Return to Windows, verify its installation, open the appropriate encryption settings for your edition, and confirm whether BitLocker or Device Encryption can be enabled. If available, activate protection, allow encryption to finish, and save the new/current recovery information. Keep Ubuntu separate from the Windows encrypted data volume and test Windows startup again after encryption completes.
Do not assume that because BitLocker worked before the Ubuntu installation, it will automatically re-enable afterward. Windows editions, organizational policies, hardware requirements, and account configuration affect availability. On the two-drive path where BitLocker was never turned off, inspect its status rather than toggling it unnecessarily.
For a Windows terminal opened with administrator rights, manage-bde -status C: reports conversion percentage and protection status. A protected, fully encrypted C: should show that encryption is complete and protection is on; if those results differ, investigate before regarding your Windows data as encrypted. Microsoft describes these fields in its
manage-bde status reference.
What If Windows Boots to the BitLocker Recovery Screen?
Use the saved key whose ID matches the recovery prompt. This can happen after changes to EFI boot paths, Secure Boot, firmware, or the TPM's measured boot environment. It does not by itself prove Ubuntu deleted Windows files. Once Windows starts, confirm the system drive's status and investigate any recurring prompt before changing boot settings again.
If Ubuntu starts but Windows does not appear in GRUB, check the firmware one-time boot menu for Windows Boot Manager. A missing GRUB entry is different from a missing Windows partition. Avoid running random boot-repair commands or recreating EFI partitions without confirming the device layout. If neither operating system boots normally, use your recovery media and backups; prioritize data recovery over bootloader experimentation.
If Ubuntu asks for a disk-unlock passphrase, that is distinct from the Windows recovery key. Ubuntu's optional LUKS encryption and experimental TPM-backed encryption have their own prerequisites and recovery mechanisms. Canonical documents
advanced disk encryption choices and TPM-backed encryption limitations; do not assume an encrypted Ubuntu setup is automatically included in a conventional alongside installation.
How Can You Verify the Dual-Boot Setup Is Finished?
Windows: It starts, existing files open, Windows Update works, and BitLocker shows the protection state you actually intend.
Ubuntu: It starts independently, sees its own filesystem, and key hardware such as Wi-Fi, sound, and graphics works.
Boot choice: Both OS entries are reachable through GRUB or the UEFI boot menu without changing storage-controller modes.
Recovery: Current Windows recovery keys are stored separately from the machine; any Ubuntu disk-encryption credentials are also backed up.
Partitions: The Windows C:, EFI, and recovery areas remain intact; Ubuntu occupies only its planned disk or free space.
If even one of these checks fails, stop changing partitions or firmware settings and diagnose that specific failure. The dependable end state is not merely reaching an Ubuntu desktop once: it is being able to reboot into either system, preserve the intended encryption, and recover access if the boot chain changes.