3D effects of Adobe Illustrator allow users to create 3D objects from 2-dimensional (2D) drawings. You can change the appearance of a 3D object with attributes such as brightness, shadow, rotation ... You can also set the image as the surface of that 3D object. Adobe Illustrator provides two ways to create 3D objects: Extrude and Revolve.
Create 3D object with Extrude
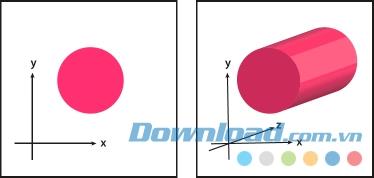
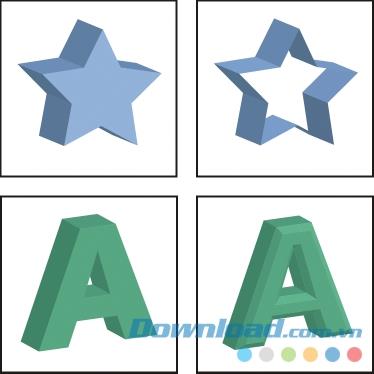
Extrude adds depth to an object by extending the 2D object along its z axis. For example, if you stretch the 2D ellipse, it becomes a cylinder.
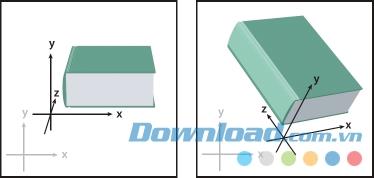
Note : The object's axis is always perpendicular to its front and moves relative when rotating the object in 3D Options.
- Select object.
- Choose Effect> 3D> Extrude & Bevel .
- Click More Options to see the full list of options or Fewer Options to hide additional options.
- Select Preview to preview the effect in the document window.
- Option:
- Position : Set how to rotate objects and views.
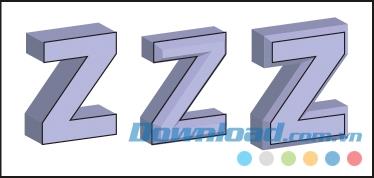
- Extrude & Bevel : Define an object's depth and expand any bevel or cut angles as you wish.
- Surface : Create a variety of surfaces, from opaque and non-glossy surfaces to a shiny, glossy plastic surface.
- Lighting : Add one or more lights, change the light intensity, change the light color of the object, move the light around the object to create impressive effects.
- Map : Arrange drawings into the surfaces of 3D objects.
6. Click OK .
Create 3D objects with Revolve
Rotate a line or silhouette of an object around the y-axis to create 3D graphics. Because the axis of rotation is fixed vertically, the open or closed line you rotate must be half of the 3D object you want to draw vertically and the front. You can then rotate the position of the 3D object in the effect panel.
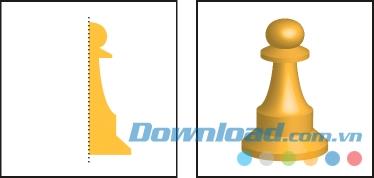
Note: Apply the 3D Revolve effect to one or more objects and rotate each object around its axis at the same time. Each object has its own 3D space and cannot be separated or shared with other objects. Apply the Revolve effect to a target group or layer and rotate the objects around a single axis.
- Select object
- Rotating a dotted line is always faster than a dotted line (Stroked Path).
- Choose Effect> 3D> Revolve .
- Select Preview to preview the effect in the document window.
- Click More Options to see the full list of options or Fewer Options to hide additional options.
Set up options
Optional 3D rotation position
Follow any of the following instructions:
- Select the preset position from the Position menu
- If you want to rotate freely, drag one side of the cube. The front of the object is illustrated in blue, the top and bottom are light gray, the sides are medium gray, the back is dark gray.
- To restrict rotation along the main axis, hold Shift while dragging horizontally (y-axis) or vertically (x-axis). To rotate the object around the z axis, move in the blue strip surrounding the cube.
- To restrict rotation around the object axis, drag an edge on the cube. The cursor changes to a double-sided arrow and the edge of the cube changes color to identify the axis around a rotating object. The red edges represent the x-axis, the green edges represent the y-axis, and the blue edges correspond to the z-axis of the object.
- Enter a value between -180 and 180 into the x-axis, y-axis and z-axis depth boxes.
- To adjust the angle, enter a value between 0 and 160 in the Perspective box . A smaller angle is similar to a remote camera lens, a larger angle is similar to a wide-angle camera lens.
Note:
A lens angle higher than 150 can cause the object to expand beyond your view and become distorted. In addition, you should pay attention to the position of the x, y, z axes of the object and the main axis. The object axis is relative to its position in 3D space. The spindle is fixed, corresponding to the computer screen. The x-axis is horizontal, the y-axis is vertical, and the z-axis is perpendicular to the computer screen.
Extrude & Bevel Options
- Extrude Depth : Set the depth value of the object from 0 to 2,000
- Cap : Determine whether objects are solid (Enable Revolve Cap) or empty (Revolve Off)
- Bevel : Apply beveled edges along the z axis of the object
- Height : Set the height from 1 to 100. The oblique edge height is too large compared to the object that can cause the object to intersect and create unwanted results.
- Bevel Extent Out : Add beveled corners to the original image.
- Bevel Extent In : Removes beveled corners from the original image.
Revolve option
- Angle : Sets the degree of rotation of the line from 0 to 360.
- Cap : Select an object that is solid or hollow.
- Offset : Add the distance between the axis and the rotation (for example, when you want to create a circular object). You can enter values from 0 to 1,000.
- From : Position the axis around a rotating object, both left and right.
Optional shading surface
- Surface : Options polishing the surface
- Wireframe : Outlines the geometry of the object and makes each surface transparent.
- No Shading : Do not add any new surface attributes. 3D objects have the same color as the original 2D objects.
- Diffuse Shading : Make the object reflect light as if it were made of a bright and highly polished material. Illustrator offers many different brightness options. If the object only uses 3D Rotate effect, only two available Surface options are Diffuse Shading or No Shading .
- Light Intensity : Fine tune the light intensity between 0% to 100%.
- Ambient Light : Adjust the whole light, change the surface brightness of the object uniformly. Enter a value between 0% and 100%.
- Highlight Intensity : Control the object reflecting light with the value from 0% to 100%. Lower values create a matte surface, higher values give a brighter surface.
- Highlight Size : Control the size of the highlight from large (100%) to small (0%).
- Blend Steps : Control the amount of blur shown on the surface of the object. Enter a value from 1 to 256. Higher numbers give smoother shading and more lines than low values.
- Draw Hidden Faces : Displays the hidden backs of objects. Hidden faces show up when the object is transparent or enlarged and dragged out. Note: If the object is transparent and you want to show the back through the front, use the Object> Group command before applying the 3D effect.
- Preserve Spot Color (Extrude & Bevel effect, Revolve effect, Rotate effect) : Keep the color of the points in the object. This color will be deleted if you choose Custome for Shading Color .
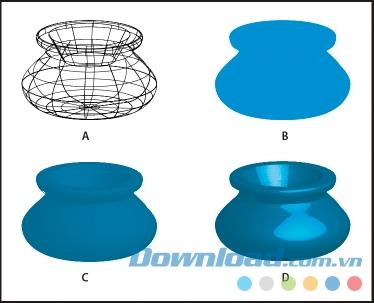
A . Wireframe B . No shading C . Diffuse shading D . Plastic shading
Optional light
- Light : Locate lighting. Drag that bright area to the position you want on the sphere.
- Move Light Back button : Move the light to the back of the object.
- Move Light Front Button : Move the light to the front of the object.
- New Light button : Adds light. By default, new light sources are currently at the center of the globe.
- Delete Light button : Delete the selected light. Note: By default, 3D Effects assigns a light to the object. You can add and remove lighting, but the object must always have at least one light.
- Light Intensity : Change the light intensity from 0% to 100%.
- Shading Color : Control the color of the object, depending on the command you choose.
- None : Do not add polish colors.
- Custom : Lets you choose a custom color. If this option is selected, click the Shade Color box to select the color in the Color Picker . Change the point color to process colors.
- Black Overprint : Avoid color processing if tinted. The subject is shaded by bold black shadow above the object color. To see the shadow, select View> Overprint Preview.
- Preserve Spot Color : Allows the user to keep blend colors in the object. The blend color will not be kept if Custom is selected when using Shading Color .
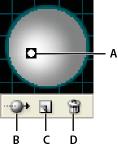
A . Lighting option in the front B . Transforming it into the back light or front button C . New light button D . Clear light button
Add custom angled lines
1. Open the Bevels.ai file located in Adobe Illustrator [version] \ Support Files \ Required \ Resources \ en_US \ folder (Windows) or Adobe Illustrator [version] \ Required \ Resources \ en_US folder ((Mac OS) .
2. Create an open path in the Bevels.ai file .
3. Choose Window> Symbols , and then do one of the following to create a path for an icon:
- Drag the link to the Symbols panel.
- With the path selected, click the New Symbol button in the Symbols panel or select New Symbol from the menu on the panel.
4. To rename the symbol, double-click the symbol in the Symbols panel, enter a name in the Symbol Options dialog box , click OK .
5. Select File> Save .
6. Exit Adobe Illustrator , and then restart Illustrator. The Bevel menu in 3D Extrude & Bevel Options will list the oblique angles.
7. To apply a custom bevel, do one of the following:
- Apply an angled edge or edge to a molded 3D object, select it, then double-click the 3D Extrude & Bevel effect in the Appearance panel . In the 3D Extrude & Bevel Options box, select the bevel / edge from the Bevel menu.
- To apply an oblique angle / edge to the 2D drawing, select the 2D object, then select Effect> 3D> Extrude & Bevel . In the 3D Extrude & Bevel Options box, select a custom slant angle from the Bevel menu.
Rotate objects in three dimensions
1. Select object.
2. Select Effect> 3D> Rotate .
3. Select Preview to preview the effect in the document window.
4. Click More Options to see the full list of options or Fewer Options to hide additional options.
5. Define options:
- Position : Choose how to rotate and view the object.
- Surface : Create a variety of surfaces from opaque to shiny as a mirror.
6. Click OK .
Arrange drawings into 3D objects
Each 3D object consists of many different surfaces. For example, a square becomes a square block made up of 6 surfaces: the front, the back and 4 sides. You can arrange 2D drawings into each side of that 3D object. For example, you can label or text on a jar object or simply by adding different textures on each face of an object.
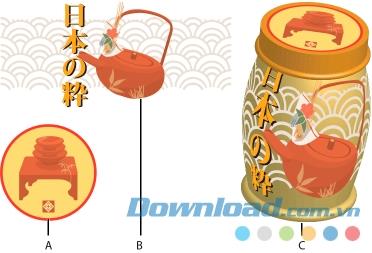
A . Symbol artwork B . Symbol artwork C . A and B have been incorporated into 3D objects
You can only draw 2D maps saved in the Symbols panel onto 3D objects. These symbols can be an illustration of an object on any drawing, including paths, compound paths, text, raster images, grid objects, and groups of objects.
When building 3D objects, consider the following guidelines:
- Because the Map Art feature uses icons to draw, you can edit an icon, then automatically update all mapped surfaces with it.
- You can interact icons in Map Art with normal boundary box controls to move, zoom, or rotate objects.
- The 3D effect remembers each surface mapped on an object using numbers. If you edit a 3D object or apply the same effect to a new object, you will have fewer or more faces than the original. If the surface is less than the specified number, the software will skip the extra drawing.
- Because the symbol position is relative to the center of the object's surface, if the surface shape changes, the symbol will be remapped to correspond to the new center point of the object.
- You can draw on objects using the Extrude & Bevel or Revolve effects, but you can't do that using the Rotate effect only.
1. Select a 3D object.
2. In the Appearance panel , double-click the 3D Extrude & Bevel or 3D Revolve effect.
3. Click Map Art .
4. Select the drawing to map to the selected surface from the Symbol menu .
5. To select the surface of the object you want to map, click the arrow buttons indicating the surface First, Previous, Next and Last , or enter the number of surfaces in the box. A light gray mark appears on the surface being displayed. The dark gray mark appears on the surface hidden below the current position of the object. When selecting a surface in the box, it will be highlighted in the document window in red.
6. Follow any of the following instructions:
- To move the icon, locate the cursor inside the bound box and drag; to zoom in, drag an edge or corner; to rotate, drag the cursor outside, near the limit box.
- To create a mapping drawing that fits within the selected surface limit line, click Scale To Fit .
- To move a drawing from a surface, select that surface using the Surface option , then select None in the Symbol menu or click Clear .
- To move the entire mapping from all 3D object surfaces, click Clear All .
- To polish and apply object lighting on the mapping drawing, select Shade Artwork .
- To display only the drawing diagram, which does not contain 3D object shapes, select Invisible Geometry . This feature is extremely useful when you want to use the 3D mapping feature as a tool to create three-dimensional space. For example, you can use this option to map text to rippled road surfaces. At that time, the text appeared as if it were on a flag.
- To preview the effect, select Preview .
7. Click OK in the Map Artwork box .
Note : 3D tools work independently of Illustrator's Perspective Grid tools .
Hope the article is helpful to you.
Adobe Illustrator CC Adobe Illustrator CC for Mac


