Online privacy and security are constantly under attack. It seems every day there is a new threat to your personal information. Choosing and configuring your web browser properly is a way to protect yourself. Right now Firefox is the best option for that. Firefox is an open source browser, gives you tons of options to control, and has lots of security and privacy utilities you'll need.
Download Firefox for Mac
Download Firefox for Linux
Download Firefox for Android
Download Firefox for iOS
This is an ever-evolving topic, and threats continue to change. The following article will show you how to optimize the security and privacy in Firefox so that you can protect yourself from common threats. You should also note that the configuration and utilities used here will break the site. So you can go back and turn off add-ons on websites that you trust.
1. Basic installation
The best place to start is with the main Firefox settings menu. Open this menu and click on Preferences .
1.1. Search - Search
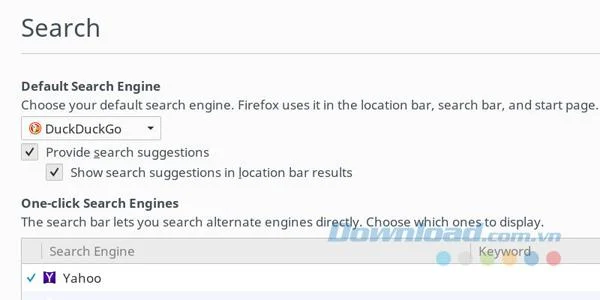
There is nothing "wrong" with any search provider, but some crawl based on your searches. The best option here is DuckDuckGo . If you feel you want to add an additional search service, then Startpage is another good option.
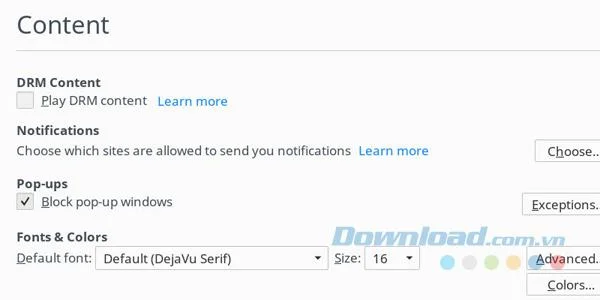
1.2. Contents - Content

DRM is closed source. Believe it or not, it's up to you, but you have no way of really knowing exactly what it does. Therefore, it is better to deselect it. Of course, make sure that you uncheck Block pop-up windows .
1.3. Privacy - Privacy

There are a few important settings in the Privacy tab . Focus on these options:
Tracking
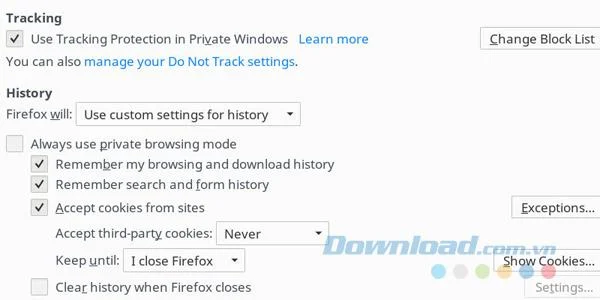
First in the Tracking subsection , make sure that you tick Use Tracking Protection in Privacy Windows .
Under this option is a link with the label manage your Do Not Track settings . You click on this link and put a checkmark in the box in the results window. Do Not Track does not work perfectly, but it also helps in some cases.
Cookies
Next, under the History sub-section , you need to manage how Firefox handles cookies. Use the drop-down menu to let Firefox use custom settings for your history. This will open a few new options.
You can adjust it however you like, but one configuration that offers a balance between security and usability is Accept cookies from sites . You tick it. Then set Accept third-party to Never and Keep until to I close Firefox.
1.4. Data report

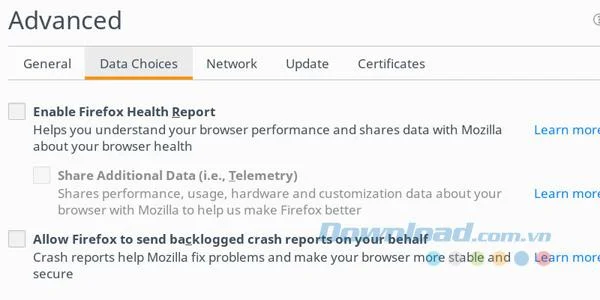
You go to the Advanced tab and click on the Data Choices tab , you uncheck everything.
2. Advanced settings
There are many advanced settings that you cannot access via the regular menu. These settings may damage Firefox and cause it to not function properly. Therefore, you should proceed with caution.
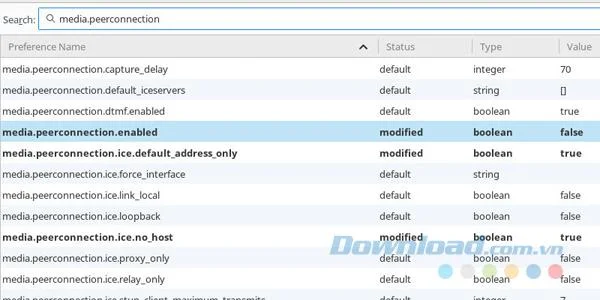
In a browser, type about: config in the address bar. Firefox will give you a warning, click Accept to continue. The window you will see displays a table of different settings and their values. At the top of the window, you'll find a search bar. That is the tool you will use to navigate to the settings you need to change.
2.1. WebRTC

WebRTC is a real-time communication protocol that browsers have integrated to access microphones and cameras for browser-based communications. Malicious websites may also request that data, so WebRTC is dangerous. It also collects information about your computer and its location on your network. That means it can expose your concealment when using a VPN.
Search media.peerconnection.enabled and click on it to change the value to false . Do the same with media.navigator.enabled.
2.1. Pocket

There is no evidence that Pocket is doing anything nefarious, but it is an exclusive service, and that is not necessarily reliable. To disable Pocket, search for extensions.pocket.enabled and set it to false .
2.2. WebGL

WebGL allows browsers to load a number of different dynamic content including animations. Unfortunately, it also reveals information about your browser and can even be used to track fingerprints based on your graphics card.
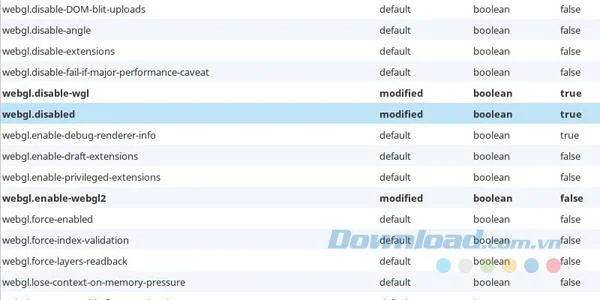
To disable WebGL, find webgl.disabled and webgl.disable-wgl and set them to true , then find webgl.enable-webgl2 and set it to false .
3. Extensions
Extensions offer more options to protect your online privacy and security. They enhance the availability of Firefox, and many separate privacy concerns. All of these utilities are open source and have a strong reputation for user protection.
3.1. HTTPS Everywhere
HTTPS Everywhere is an extension developed by Electronic Frontier Foundation. This utility forces your browser to connect to an encrypted version of a website (HTTPS), if it exists. This can help prevent unwanted unencrypted data from leaking to the Internet.
3.2. Privacy Badger
Privacy Badger is another great extension from EFF. It is intended to enhance the current function of the Do Not Track by blocking known followers.
3.3. NoScript
NoScript blocks JavaScript, all JavaScript. This is one of the most invasive utilities available, but it is also one of the most effective.
The best policy with NoScript is to have it block everything and whitelisted sites you trust. If that is too annoying then you just need to set it to allow JavaScript, and the utility will try to block malicious code and potential attacks.
3.4. uBlock Origin
uBlock Origin is not simply an ad blocker. It actually blocks all content from certain servers and domains. This way, nothing else can slip through from an ad server. It also changes the size of the ad or uses other popular techniques.
3.5. Self Destructing Cookies
Self Destructing Cookies erase cookies from websites you have visited after you left. You will not have to worry about tracking cookies yourself, but you will also not face broken websites.
3.6. Disconnect
Disconnect is another tracking blocker like Privacy Badger. Using both types is redundant, but really helpful. Disconnect has its own database of known threats, so there may be some information that Privacy Badger doesn't have.
3.7. Random Agent Spoofer
The Random Agent Spoofer is not simply an add-on to change the agent data of your requests. Certainly, this utility can and make it look like you are using another browser. This can be useful to prevent browser fingerprinting by making periodic changes or using a more popular browser.
It also gives you access to other privacy settings that can help conceal your personal data. That option allows you to disable HTML Canvas to stop fingerprinting of the canvas. To do this, go to about: config with the feature enabled and search for extensions.agentSpoof.canvas . Set it to true .
3.8. CanvasBlocker
CanvasBlocker is a utility specifically designed to block tracking of canvas fingerprints. It disables the ability of HTML Canvas. If you are using the Random Agent Spoofer then you do not need this add-on.
3.9. Decentraleyes
Much of what you see on the web comes from major content delivery networks (CDNs). These networks can theoretically track you using requests you make to this content. Decentraleyes cuts that possibility by serving local versions of the content you'll pull from CDN.
3.10. uMatrix
uMatrix was created by the same developer as uBlock Origin. It provides a convenient grid matrix to manage external content such as JavaScript, CSS and cookies. uMatrix has some redundancy if combined with other plugins here, especially NoScript. If you really don't like NoScript, consider using uMatrix instead.
Hopefully, with the information shared above, you will keep the security and privacy on Firefox better. In addition, you need to learn about new security changes to stay updated because what is true today can radically change tomorrow. Moreover, there is no way or any gadget that can truly hide your identity or browsing location, but only contributes to protecting you from common threats.