How to add exceptions in Windows Defender on Windows 10

Windows Defender , built into Windows 10, runs in the background and scans files for malware. To improve performance for tasks like compiling code or running virtual machines, you can add exceptions so Windows Defender never scans those files.

Warning : Be careful about what you exclude. Windows Defender will not scan excluded files and folders for malware.

How to add exceptions to Windows Defender in Windows Security

Step 1:

First, you need to launch Windows Security to change some settings. Open the Start menu and type Windows Security . Then, select the Windows Security app.

Step 2:

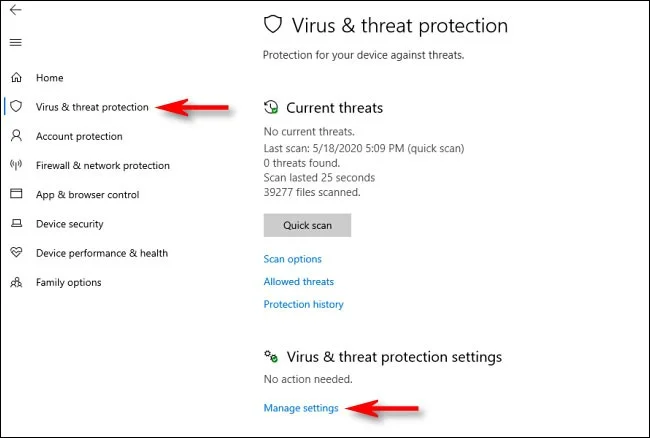
In Windows Security , navigate to Virus & Threat Protection . Then, click Manage Settings.

How to add exceptions in Windows Defender on Windows 10
In Windows Security, navigate to Virus & Threat Protection

Step 3:

In Virus & Threat Protection Settings , scroll to the bottom of the page and click Add or Remove Exclusions .

Step 4:

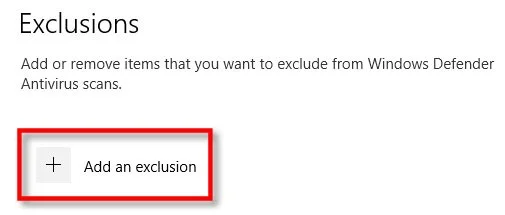
On the Exclusions page , you can add or remove files that you want to exclude from Windows Defender scanning. To add an exception, click the Add An Exclusion button next to the large plus sign ( + ) icon.

How to add exceptions in Windows Defender on Windows 10
Click the Add An Exclusion button

Step 5:

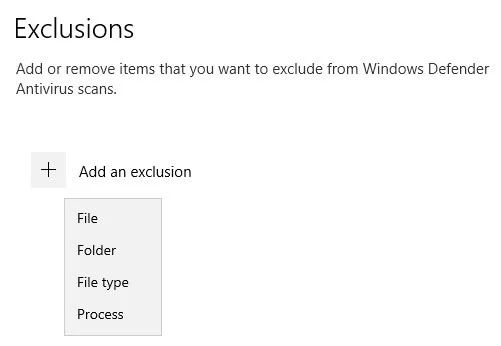
A small menu will appear that allows you to specify the exception by File, Folder, File type or Process .

How to add exceptions in Windows Defender on Windows 10
A small menu will appear allowing you to define the exception.

What you choose depends on the type of exception you are trying to throw. Here is what each option will do.

  • File: If you select this, a box will appear that allows you to browse your computer to select a file that will be excluded from future scans. Select the file you want, then click Open.
  • Folder: Like the File option , this will allow you to browse your computer for a specific folder and exclude it from scanning. The contents and subfolders within this folder will also be excluded.
  • File type : A box will appear asking you to enter the file extension (e.g. .MID ) that represents the type of file you want to exclude. All files of that type will be excluded from future scans. This is dangerous, as you could accidentally exclude a large group of potentially malicious files, such as PDF or DOC files.
  • Process : A window will appear asking you to enter the name of a process (a running program, such as explorer.exe ) to exclude from scanning. If there is a program that you know is safe, but would be flagged by Defender, you can enter it here.

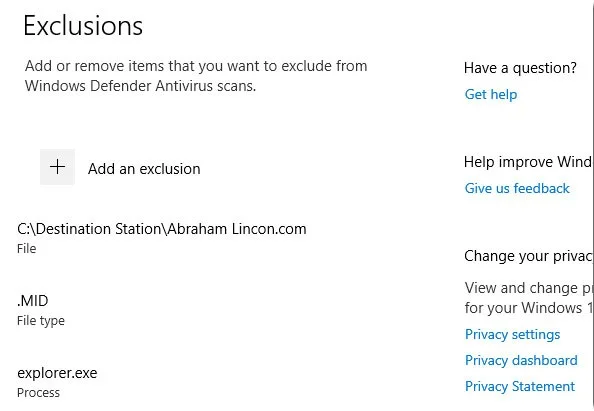
Select one of these options and make the necessary selections in the following pop-up dialog box. When you add an exception, it will appear in a list on the Exclusions page.

How to add exceptions in Windows Defender on Windows 10
Exceptions will be displayed in a list on the Exclusions page.

Step 6:

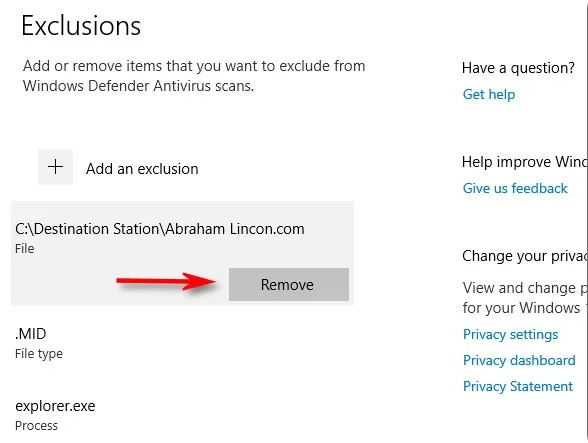
If you want to remove a defined exception, hover your mouse over it until a down arrow appears, then click the Remove button .

How to add exceptions in Windows Defender on Windows 10
Click the Remove button to remove the exception.

Step 7:

Once you're done, close Windows Security and your settings will be saved. The next time the system runs a Defender scan, the items you added to the exclusion list won't cause any problems.

How to Add Exceptions in Windows Defender Using PowerShell

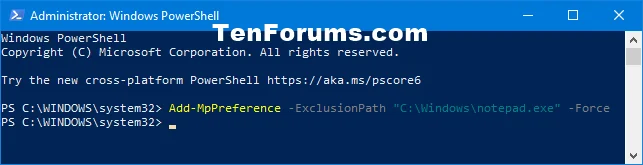
Add exception file for Microsoft Defender Antivirus in PowerShell

This option is used to add a specific file as an exception, preventing it from being scanned by Microsoft Defender Antivirus.
1. Open PowerShell with admin rights .

2. Type the command below into PowerShell and press Enter.

Add-MpPreference -ExclusionPath "<đường dẫn="" đầy="" đủ="" của="" file="">" -Force

3. You can now close PowerShell if you want.

How to add exceptions in Windows Defender on Windows 10
Add exception file for Microsoft Defender Antivirus in PowerShell

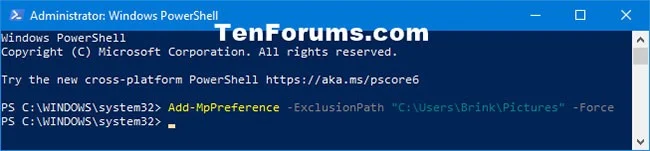
Add an exception folder for Microsoft Defender Antivirus in PowerShell

This option is used to add a specific exception folder, making it no longer scanned by Microsoft Defender Antivirus.
1. Open PowerShell with admin rights.

2. Type the command below into PowerShell and press Enter.

Add-MpPreference -ExclusionPath "<đường dẫn="" đầy="" đủ="" của="" file="">" -Force

3. You can now close PowerShell if you want.

How to add exceptions in Windows Defender on Windows 10
Add an exception folder for Microsoft Defender Antivirus in PowerShell

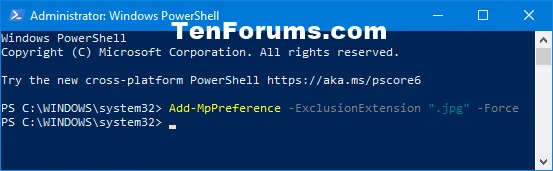
Add file type exceptions to Microsoft Defender Antivirus in PowerShell

This option is to add a file extension to the exception, causing all files of that type to no longer be scanned by Microsoft Defender Antivirus.
1. Open PowerShell with admin rights.

2. Type the command below into PowerShell and press Enter.

Add-MpPreference -ExclusionExtension "" -Force

3. You can now close PowerShell if you want.

How to add exceptions in Windows Defender on Windows 10
Add file type exceptions to Microsoft Defender Antivirus in PowerShell

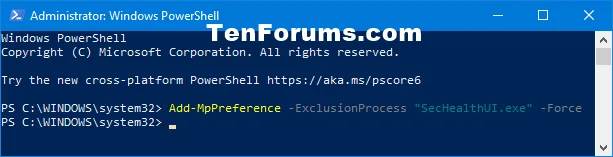
Add process exceptions to Microsoft Defender Antivirus in PowerShell

This option is used to add an exception process, which prevents any files associated with it from being scanned by Microsoft Defender Antivirus.
1. Open PowerShell with admin rights.

2. Type the command below into PowerShell and press Enter.

Add-MpPreference -ExclusionProcess "" -Force

3. You can now close PowerShell if you want.

How to add exceptions in Windows Defender on Windows 10
Add process exceptions to Microsoft Defender Antivirus in PowerShell

See also:

Leave a Comment

Reduce Ubuntu 24.04 Audio Distortion with Targeted ALSA Tweaks

Reduce Ubuntu 24.04 Audio Distortion with Targeted ALSA Tweaks

Trace whether clipping, ALSA format conversion, or HDA power saving is causing Ubuntu 24.04 audio distortion, then apply the matching reversible fix.

Build a PipeWire Output Toggle Script That Moves Active Audio

Build a PipeWire Output Toggle Script That Moves Active Audio

Switch Debian audio between named PipeWire outputs with a pactl script that updates the default sink and reroutes streams already playing.

Restore Bluetooth Headset Microphone Input on Ubuntu 24.04

Restore Bluetooth Headset Microphone Input on Ubuntu 24.04

Get your Bluetooth headset mic working by selecting the right input, using a hands-free audio profile, and checking Ubuntu’s PipeWire route.

Fix Flatpak Apps Not Respecting GTK Themes in Ubuntu 24.04

Fix Flatpak Apps Not Respecting GTK Themes in Ubuntu 24.04

Learn why Flatpak apps may ignore Ubuntu 24.04 GTK themes and follow safe steps to check theme extensions, refresh Flatpak apps, and diagnose portal issues.

How to Dual-Boot Ubuntu 24.04 and Windows 11 With BitLocker Enabled

How to Dual-Boot Ubuntu 24.04 and Windows 11 With BitLocker Enabled

Install Ubuntu 24.04 alongside Windows 11 with BitLocker safely. Compare separate-drive and shared-drive paths, recovery keys, partitioning, and boot checks.

How to Fix Nvidia Drivers Not Loading After a Kernel Update on Ubuntu

How to Fix Nvidia Drivers Not Loading After a Kernel Update on Ubuntu

Diagnose NVIDIA driver failures after an Ubuntu kernel update. Check DKMS and Secure Boot, rebuild the matching module, enroll a MOK, and verify the fix.

How to Fix Ubuntu 24.04 Wi-Fi Disconnecting After Suspend

How to Fix Ubuntu 24.04 Wi-Fi Disconnecting After Suspend

Fix Ubuntu 24.04 Wi-Fi drops after suspend with checks for NetworkManager, radio blocks, updates, power saving, and drivers—then verify each resume.

Fix High CPU Usage by Tracker-Miner-3 in Ubuntu GNOME

Fix High CPU Usage by Tracker-Miner-3 in Ubuntu GNOME

Learn why tracker-miner-fs-3 uses high CPU in Ubuntu GNOME and how to check indexing, exclude folders, update Ubuntu, or safely rebuild the search index.

Fix “No Bootable Device Found” After Installing Debian on UEFI

Fix “No Bootable Device Found” After Installing Debian on UEFI

Fix Debian’s UEFI boot error by checking boot mode, the EFI System Partition, GRUB files, and firmware boot order—without reinstalling Debian first.

Outlook Inbox Repair Tool

Outlook Inbox Repair Tool

The Outlook Inbox Repair Tool fixes corrupted PST files quickly so you can recover emails and restore normal Outlook function. Follow these exact steps to run scanpst.exe without data loss.