How to add fonts to Canva

If Canva doesn't have a font that matches your brand or style, you can upload a font from a third party. Here's how to add fonts to Canva .

How to add fonts to Canva

Font style plays an important part in creating a beautiful design. When it comes to designing in Canva , you have a lot of font options, from artistic fonts like Jimmy Script to normal fonts like Neue Machina.

However, sometimes, you may not find a font you like on this platform. Therefore, Canva provides the option to add new fonts. Here's how to add fonts to Canva .

How to upload fonts to Canva

Before uploading a font to Canva, it's important to remember that this feature is not available to free users, so you should upgrade your package first. Canva Pro offers many great features beyond uploading, including premium templates, social media posting scheduling, and more.

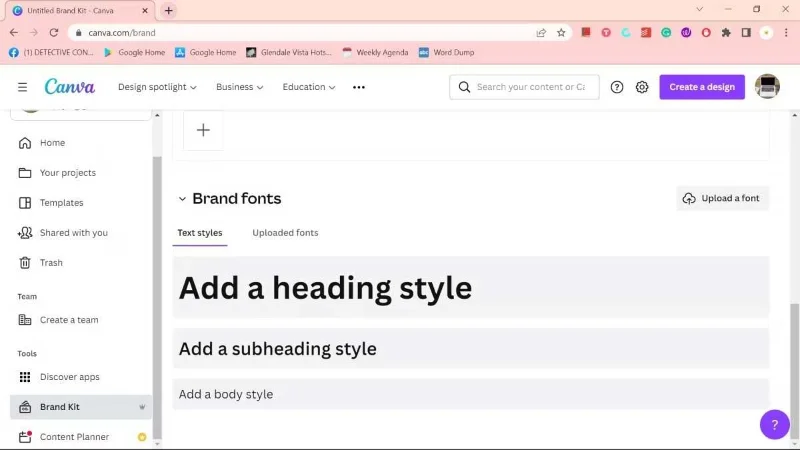
To add beautiful Canva fonts, log in to your account and go to Brand Kit in the side panel. Scroll down to the bottom of the screen until you reach the Brand fonts section.

How to add fonts to Canva

Click Upload a font and navigate to where you saved the file. You can also upload several files simultaneously. Make sure the font is in TTF, OTF or WOFF format and select the font file, not the .zip file.

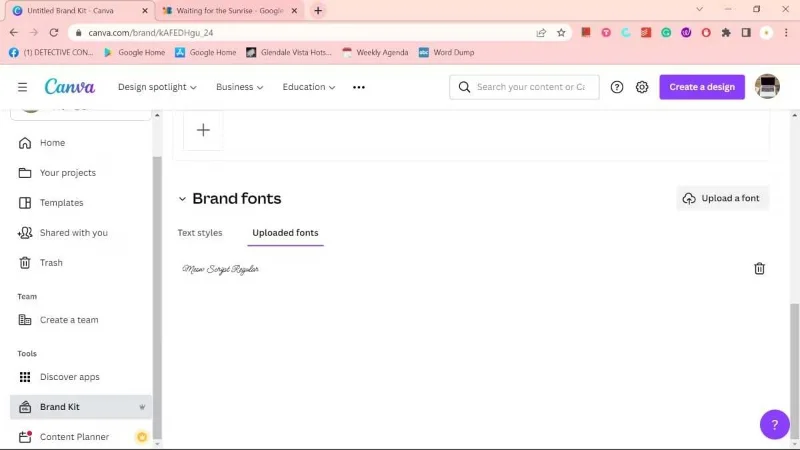
After selecting the font, a window appears, confirming the font you want to use on the design. Select Yes, upload anyway . The upload process usually takes less than 10 seconds. If the upload is successful, you will see the new font in the Uploaded fonts tab .

How to add fonts to Canva

You can also follow the steps above when downloading a font via the Canva app on Android or iOS. Just make sure you have downloaded the font file on your mobile device.

Use the uploaded font in Canva

To use a new font uploaded to Canva, click Create a design or go to one of the designs in Your Projects .

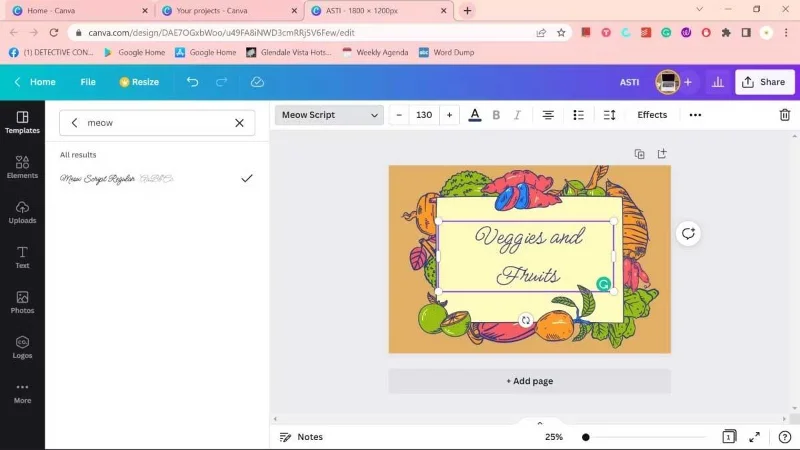
Click the font style menu and enter the font name in the search bar. Choose a font, your text will automatically use it.

How to add fonts to Canva

Why can't I add fonts to Canva?

If uploading a font fails or gets an error when trying to use it, the cause may be:

  • Your font is not in TTF, OTF or WOFF format. They are the formats currently supported by Canva. When downloading fonts from the Internet, they are often saved in a compressed folder, so you need to extract it first.
  • Fonts are not allowed to be embedded.
  • The file may be corrupted. Try downloading that font again.
  • Your font is not compatible with Canva, so when used, it does not appear. Look for alternative fonts.
  • You may have exceeded the maximum number of fonts uploaded. Currently, there are only 500 fonts/Brand Kit.

Above are the things you need to know about how to add fonts to Canva . Hope the article is useful to you.
Leave a Comment

Resolve ONLYOFFICE’s “Token Is Not Valid” Error in Nextcloud

Resolve ONLYOFFICE’s “Token Is Not Valid” Error in Nextcloud

Match the JWT secret used by ONLYOFFICE Docs and Nextcloud, apply it safely for Docker or Linux installs, and verify the connection without weakening authentication.

Deploy ONLYOFFICE Workspace Community on Ubuntu 24.04

Deploy ONLYOFFICE Workspace Community on Ubuntu 24.04

Install ONLYOFFICE Workspace Community on Ubuntu 24.04 with the official Docker script, check server requirements, skip Mail if needed, and verify the portal safely.

Set Up ONLYOFFICE JWT Secrets Across Server and Connector

Set Up ONLYOFFICE JWT Secrets Across Server and Connector

Configure matching JWT secrets for ONLYOFFICE Docs and its connector, with safe steps for Linux packages, Docker deployments, and verification.

Put ONLYOFFICE Docs Behind HAProxy Without Breaking Editing

Put ONLYOFFICE Docs Behind HAProxy Without Breaking Editing

Configure HAProxy HTTPS, forwarding headers, WebSocket timeouts, and health checks for ONLYOFFICE Docs, then verify editing and saves.

Brand ONLYOFFICE Docs with Your Logo and Theme Colors

Brand ONLYOFFICE Docs with Your Logo and Theme Colors

Give an embedded ONLYOFFICE Docs editor your company logo and interface colors with a custom theme file and editor configuration. See edition limits and deployment checks.

Keep Writer Revisions Visible When Exporting to DOCX

Keep Writer Revisions Visible When Exporting to DOCX

Track edits in Writer, preserve an editable ODT source, and check the exported DOCX in Word before sharing it.

Enable FIPS Mode on SLES 15 and Verify the Boot State

Enable FIPS Mode on SLES 15 and Verify the Boot State

Follow SUSE’s SP7 procedure to enable FIPS mode, reboot safely, verify the active policy, and check whether your compliance requirement calls for validated modules.

Set Up a LUKS-Encrypted Data Volume on SLES

Set Up a LUKS-Encrypted Data Volume on SLES

Compare YaST and cryptsetup for a new encrypted SLES data volume, choose LUKS1 or LUKS2, and verify unlock and mount behavior safely.

Build a Custom AppArmor Profile on SUSE Linux

Build a Custom AppArmor Profile on SUSE Linux

Create, refine, and verify a least-privilege AppArmor profile on SLES 15 SP7, with a clear note on SLES 16’s SELinux default.

Build a Local SUSE Update Server with RMT on SLES 15

Build a Local SUSE Update Server with RMT on SLES 15

Set up RMT on SLES 15, mirror entitled repositories, and verify HTTPS registration and package access from a test client.