How to Configure a WireGuard Point-to-Site VPN on Debian 12
Set up a Debian 12 WireGuard VPN server for one remote client. Configure keys, IPv4 forwarding, nftables NAT, firewall access, and connection checks.
Illustrative scenario: Maya uses a Debian 12 VPS as a personal VPN endpoint when she works from a café. Her laptop should reach the VPS over an encrypted WireGuard tunnel and send its IPv4 internet traffic through that server. This example is not a report of a live test; public IPs, keys, and terminal output shown below are placeholders or representative mockups.
This setup is a point-to-site VPN: one client connects to one server. It uses Debian’s packaged WireGuard tools, a single peer, IPv4 forwarding, and IPv4 NAT. It assumes the VPS has a public or port-forwarded IPv4 address, you can administer it with sudo, and UDP port 51820 can reach it. The walkthrough does not configure routed IPv6 or a private network behind the VPS.
The example uses 10.8.0.0/24 for the VPN, with 10.8.0.1 on the server and 10.8.0.2 on Maya’s first client. Use a subnet that does not overlap the client’s Wi-Fi, office, or cloud networks. A collision can send traffic down the wrong route even when the handshake succeeds.
WireGuard uses public-key authentication. The server needs the client’s public key, and the client needs the server’s public key; each private key stays on the device that owns it. Debian’s WireGuard documentation describes the package and peer setup, while WireGuard’s quick start documents key generation and keepalive behavior. See the Debian WireGuard documentation and the WireGuard Quick Start.
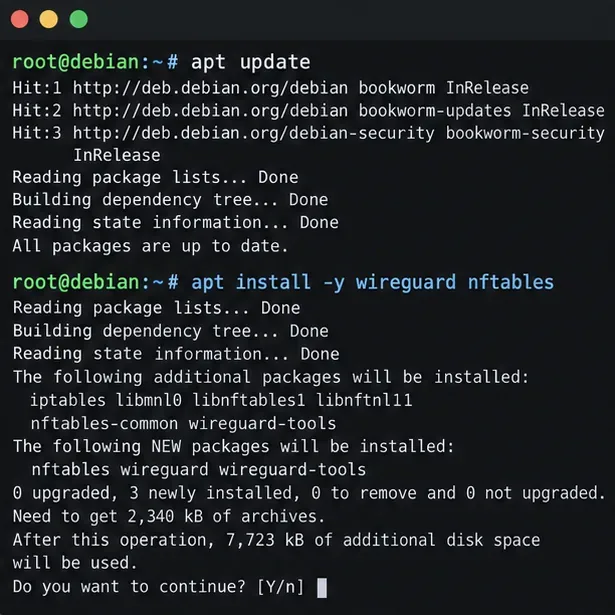
Update the package index and install WireGuard plus nftables, which will provide the example IPv4 masquerade rule. Run these on the VPS:
sudo apt update
sudo apt install wireguard nftables
Debian packages WireGuard through the wireguard metapackage and its tools. If the server already uses a firewall manager such as UFW, firewalld, or provider-managed rules, identify its active ruleset before adding anything. Do not replace an existing firewall configuration with this example.
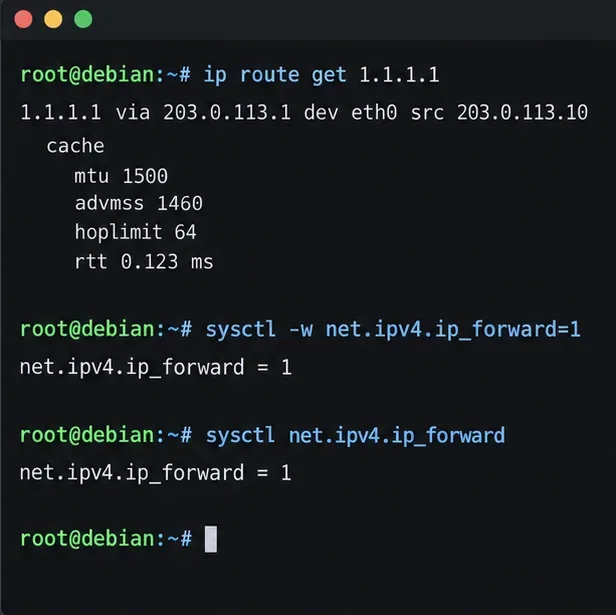
Ask the routing table which interface Debian uses to reach an external IPv4 address:
ip route get 1.1.1.1In the sample, the route uses eth0. Your VPS may show a different name such as ens3 or enp1s0; use the name from your own output in the NAT rule later. Also note the server’s public IPv4 address or DNS name. If the server sits behind a router, forward UDP 51820 from that router to the Debian host.
IPv4 forwarding is required for a full tunnel. Enable it now and persist it across reboots:
echo 'net.ipv4.ip_forward=1' | sudo tee /etc/sysctl.d/99-wireguard.conf
sudo sysctl --system
sysctl net.ipv4.ip_forward
The last command should report net.ipv4.ip_forward = 1. This setting permits packet forwarding; it does not by itself open the firewall or provide NAT.
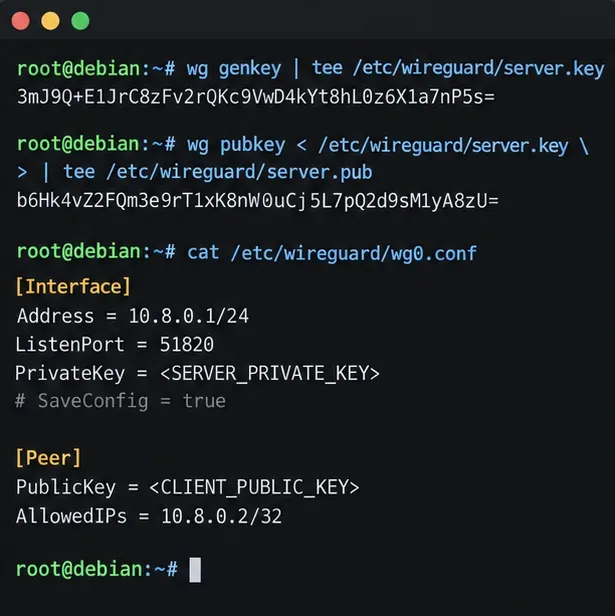
Create the server key on the Debian host with restrictive file permissions:
sudo install -d -m 700 /etc/wireguard
sudo sh -c 'umask 077; wg genkey > /etc/wireguard/server.key; wg pubkey < /etc/wireguard/server.key > /etc/wireguard/server.pub'
Generate the client key pair on the client device when possible. On a Linux client with wireguard-tools installed:
umask 077
wg genkey | tee client.key | wg pubkey > client.pub
For a phone, create a new tunnel in the official WireGuard app and let it generate the profile keys. Copy only the client’s public key to the server. Keep client.key private; never paste it into the server configuration or send it in chat. The Debian Bookworm wg(8) manual documents the key commands and interface fields.
Make /etc/wireguard/wg0.conf with the following structure. Replace each uppercase placeholder with the corresponding real key. Read the server private key locally with sudo cat /etc/wireguard/server.key; place the client’s public key in the peer section.
[Interface]
Address = 10.8.0.1/24
ListenPort = 51820
PrivateKey = SERVER_PRIVATE_KEY

[Peer]
PublicKey = CLIENT_PUBLIC_KEY
AllowedIPs = 10.8.0.2/32
Protect the file because it contains a private key:
sudo chown root:root /etc/wireguard/wg0.conf
sudo chmod 600 /etc/wireguard/wg0.conf
AllowedIPs = 10.8.0.2/32 assigns this peer one VPN address and prevents another peer from claiming it. Give every additional device its own key pair and a distinct address such as 10.8.0.3/32. Do not reuse one client profile across multiple devices if you need separate revocation or identity.
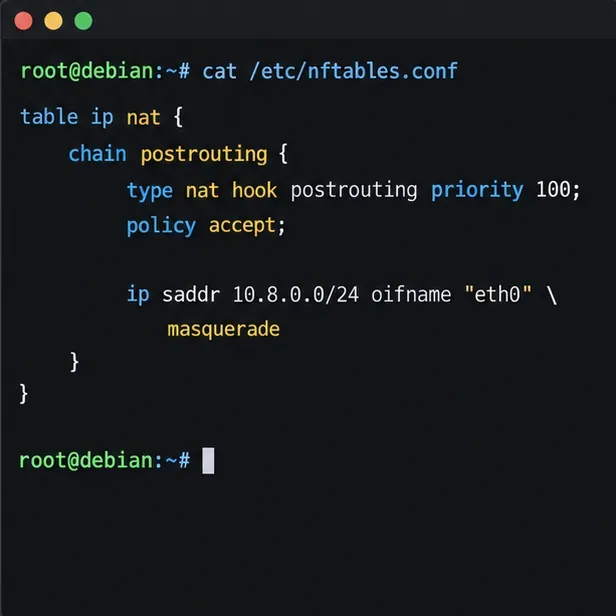
For the sample full IPv4 tunnel, outbound packets from 10.8.0.0/24 must leave through the public-facing interface with source NAT. Add an equivalent rule to the server’s existing nftables configuration or firewall manager. This standalone nftables table illustrates the rule; replace eth0 with the interface discovered in step 2:
table ip wg_nat {
  chain postrouting {
    type nat hook postrouting priority srcnat; policy accept;
    ip saddr 10.8.0.0/24 oifname "eth0" masquerade
  }
}
If you use Debian’s nftables.service, merge the table into the configuration that service loads at boot and validate the complete file with sudo nft -c -f /etc/nftables.conf before reloading it. Check whether your current configuration flushes or replaces existing rules before applying it. NAT alone does not override a forward-chain policy that drops traffic: allow forwarding from wg0 to the WAN interface and the return traffic in your active firewall. Debian’s nft(8) manual documents nftables rule loading and NAT statements.
In both the VPS provider firewall and any host firewall, permit inbound UDP 51820. Do not open TCP 51820 for this WireGuard tunnel. Keep your SSH access rule in place while changing firewall policy, and use a provider console or other recovery path if a firewall reload could disconnect you.
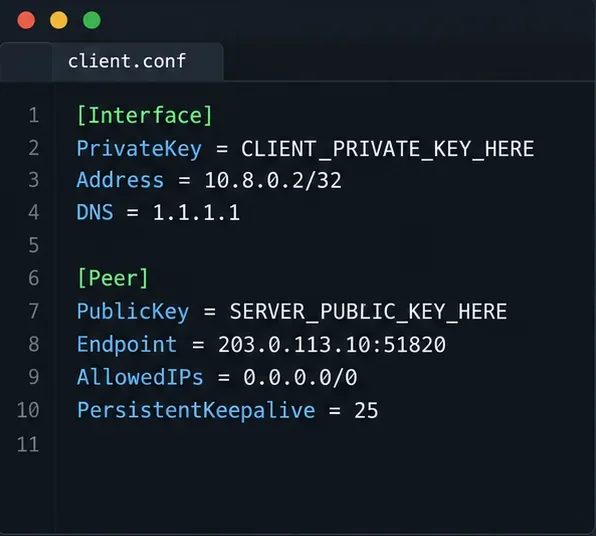
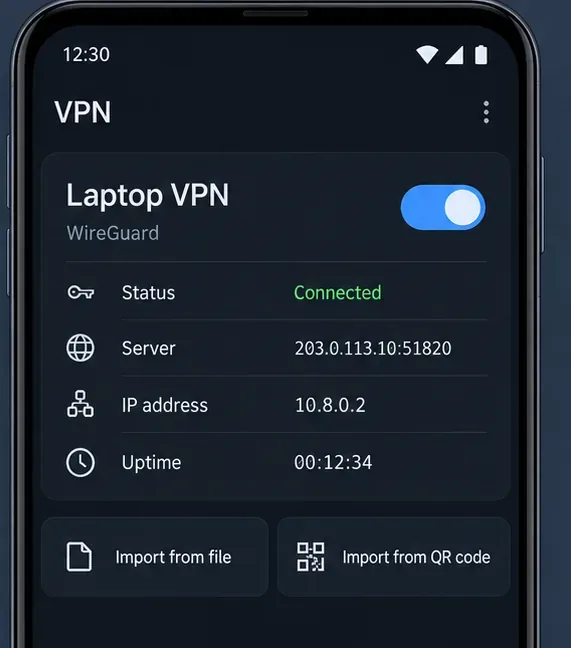
Create a new tunnel in the WireGuard client app, or save a configuration like this on a Linux client. Replace the private key, server public key, and endpoint with real values. The TEST-NET address below is only an example and will not reach a real server.
[Interface]
Address = 10.8.0.2/32
PrivateKey = CLIENT_PRIVATE_KEY
DNS = 1.1.1.1

[Peer]
PublicKey = SERVER_PUBLIC_KEY
Endpoint = 203.0.113.10:51820
AllowedIPs = 0.0.0.0/0
PersistentKeepalive = 25
AllowedIPs = 0.0.0.0/0 routes IPv4 destinations through the tunnel, so it is the full IPv4 tunnel choice. For a narrow split tunnel that reaches only the WireGuard server address, use 10.8.0.0/24 instead. To reach a LAN behind the server, include that LAN’s actual subnet in the client’s AllowedIPs, add a return route or suitable NAT, and allow the traffic through the server firewall; those steps depend on the LAN router and are outside this example.
PersistentKeepalive = 25 can help a client behind NAT remain reachable after idle periods. It is optional; WireGuard’s documentation says most users do not need it, but gives 25 seconds as a broadly useful interval when a NAT mapping must stay open. The DNS field is supported by some clients and clients based on wg-quick; if your app ignores it, set DNS through that app’s own controls.
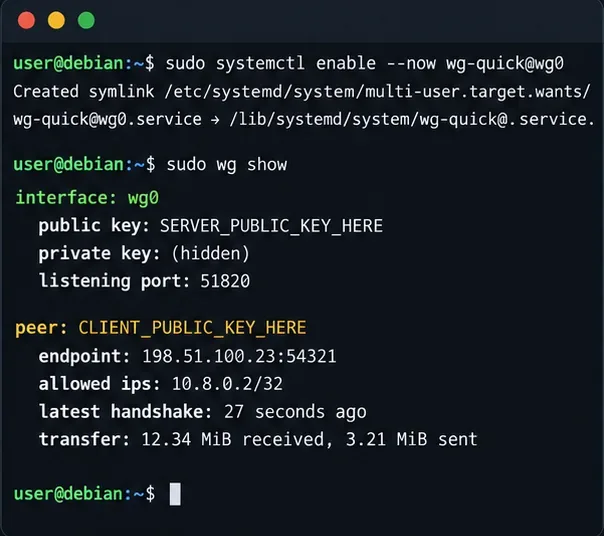
On Debian, bring the interface up at boot with:
sudo systemctl enable --now wg-quick@wg0
sudo wg show
Import or activate the client profile after UDP 51820 is reachable. In wg show, check that the expected peer appears and that latest handshake updates after the client sends traffic. The wg-quick(8) manual for Debian Bookworm describes the interface setup helper used by the systemd unit.
A missing handshake points first to reachability or key mismatches: confirm the endpoint address and port, UDP firewall rules, server public key in the client profile, client public key in wg0.conf, and correct system time. A handshake without working traffic usually points to forwarding, NAT, route overlap, or a firewall forward-chain rule.
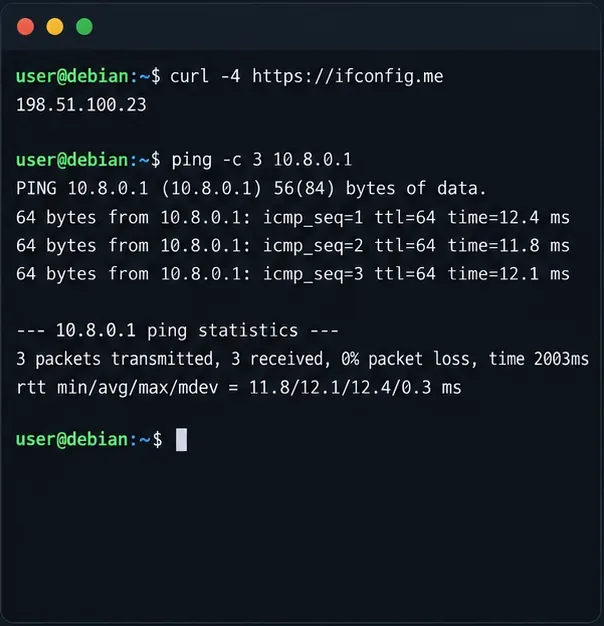
With the client connected, first test the server’s tunnel address, then check the public IPv4 address seen by an external IPv4 address-check service:
ping -c 3 10.8.0.1
curl -4 https://ifconfig.me
The ping should reach the server if ICMP is allowed. The external IPv4 check should show the VPS’s public egress address for this full-tunnel setup. If the public address does not change, inspect AllowedIPs, forwarding, the NAT interface name, and the firewall’s forward policy.
This example is IPv4-only. AllowedIPs = 0.0.0.0/0 does not route IPv6, so a client with IPv6 connectivity may still send IPv6 traffic outside the tunnel. Do not describe this configuration as a complete dual-stack privacy tunnel. To carry IPv6 through WireGuard, allocate and route IPv6 addresses for the tunnel, enable IPv6 forwarding, configure appropriate firewall and routing rules, and add ::/0 on the client only after that path works end to end. Provider support varies. Otherwise, choose a split-tunnel policy knowingly and check the client’s IPv6 behavior.
net.ipv4.ip_forward=1, the NAT rule uses the actual egress interface, and the firewall permits forwarded traffic.10.8.0.0/24 overlaps a local or remote network. Renumber the tunnel if needed, updating both peers and the firewall rule together.wg-quick@wg0 is enabled and that the firewall and sysctl settings are persisted through the system’s normal configuration.Before calling the setup complete, verify that the server service is active, wg show reports a recent handshake and increasing transfer counters, the client can reach 10.8.0.1, and an IPv4 egress check reports the server’s public address. Reboot only after persistent firewall and forwarding settings are in place, then repeat those checks. For additional peers, issue separate key pairs and unique tunnel IPs, then remove a device by deleting its peer entry and reloading the interface.
Set up a Debian 12 WireGuard VPN server for one remote client. Configure keys, IPv4 forwarding, nftables NAT, firewall access, and connection checks.
Harden a Debian 12 workstation with a careful CIS Benchmark workflow: select the right profile, patch safely, review services and access, configure nftables, and document evidence.
Diagnose MySQL OOM kills on Debian 12, check VPS memory limits, configure swap, and tune database memory and concurrency without promising a universal fix.
Learn how to create and test a Debian-derived OSTree desktop in a VM, including system-tree preparation, boot integration, deployment checks, and rollback.
Configure an SSHFS boot mount in Debian with SSH keys, fstab, and systemd automount. Includes reboot checks, permissions, timeouts, and troubleshooting.
A practical October 2026 Chicago and Illinois home-maintenance checklist covering first frost, heating safety, gutters, leaves, pipes, renters, and winter-storm preparation.
Plan Chicago’s October garden with Illinois Extension advice on garlic, bulbs, indoor herbs, microgreens, frost protection, and a week-by-week checklist—using climate normals separately from the live forecast.
National Voter Registration Day is September 15, 2026. Learn how to register online, by mail, or in person and verify your voter status.
New to podcasting? Learn the 2026 trends shaping video, discovery, transcripts, AI, analytics, monetization, and a practical launch plan.
A practical UGC masterclass for sourcing, permissioning, briefing, publishing, and measuring customer and creator content without losing authenticity.