Connect Collabora Online to ownCloud Infinite Scale

Set up the WOPI connection between Collabora Online and ownCloud Infinite Scale, configure the right service URLs, and verify document edits save.
TikTok is a video social network that is used by many users today. To help people create impressive videos, this application has released many extremely interesting video and image effects. , and among them we must mention the Domino video effect .
When creating a video with this effect, we will see the cards fall and then combine into the image we inserted for the video. Next, Download.vn will introduce an article on how to create a Domino effect video on TikTok . We invite you to watch.
Instructions for creating Domino effect videos on TikTok
Step 1: First, we will have to open the TikTok application on our phone.
Step 2: At the home page of the TikTok application, click the plus icon at the bottom of the screen.
Step 3: In the application's video recording interface, click on MV in the lower right corner of the screen.

Step 4: Move the screen to the left until you reach the Domino section , then touch the Create Now button .
Step 5: Choose any photo on your phone to be the main photo for this effect video, then click the OK button .
Note: With TikTok's Domino effect, we can only choose one photo.
Step 6: Now the domino effect video according to your image will be projected on the screen. At the video editing interface, users can add: sounds, effects, labels, text,... to the video.

Step 7: Next, click the Next button in the lower right corner of the screen.
Step 8: Write a caption for the domino video you just created, then tap the Post button .
Step 9: Finally, wait for the video to be uploaded to the TikTok application.


Wishing you success!
Set up the WOPI connection between Collabora Online and ownCloud Infinite Scale, configure the right service URLs, and verify document edits save.
Prevent document exports in Collabora Online CODE by setting the WOPI DisableExport permission, then verify the host and editor enforce it.
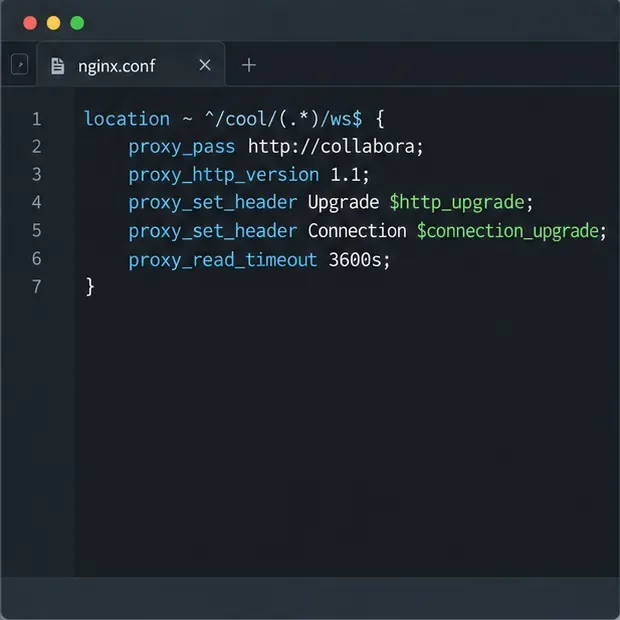
Configure Nginx TLS termination, Collabora routes, and WebSocket headers, then test the public endpoints before opening real documents.
Trace a 10-minute CODE disconnect to its proxy, load balancer, or WebSocket path, then correct the timeout and verify the session stays connected.
Install the official Collabora Helm chart, configure WOPI access and ingress affinity, and verify the deployment without common setup mistakes.
Use browser requests, WOPI logs, and targeted proxy checks to find why Collabora opens a blank document—and choose a fix that fits the evidence.
Configure CODE Docker dictionaries and tag document passages correctly so English, French, and other supported languages receive the right spell-checking.
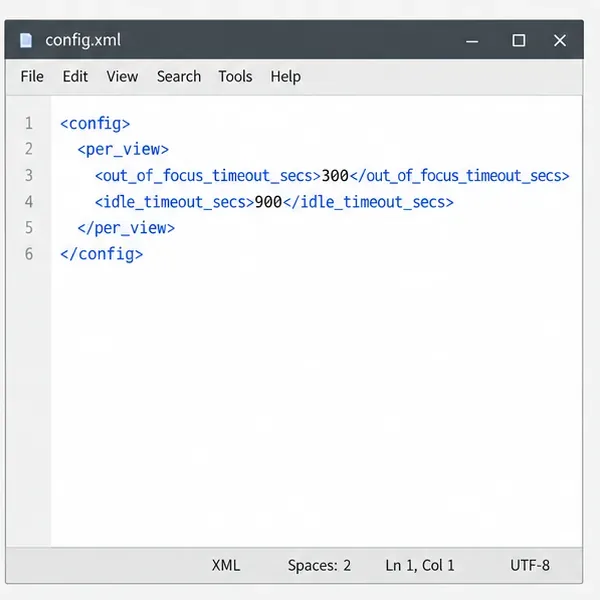
Adjust the per-view inactivity threshold in coolwsd and distinguish it from background-tab dimming, document unloading, autosave, and login expiration.
Stop scheduled CODE update checks, review optional remote services, and use outbound network controls without breaking document editing.
Enable secure document editing in Seafile by configuring Collabora’s discovery URL, HTTPS, and WOPI access for your deployment.