Nowadays, the concept of online storage is no stranger to computer users. A series of services have been launched that have met the needs of users, including Dropbox , Google Drive , or most specifically, in this article, OneDrive. By using these services, users can store and use their data anywhere, anytime, with the highest level of security.
If your computer has too much data, and saving them on portable hard drives, USB doesn't work if you have to move frequently, OneDrive (formerly SkyDrive) is what you need. As long as you have a OneDrive account and an Internet-connected device, retrieving data and using them anywhere will no longer be impossible.
How to create a OneDrive account, create a SkyDrive account
Just like creating a Dropbox account (using a Google Mail account ), since this is a Microsoft service, we only need a single Microsoft account to sign in. Not long ago, Download.com.vn has instructed you how to set up a Microsoft account to use, if you do not remember, you can refer back.
How to use OneDrive in the browser
As the name implies - online storage service, OneDrive allows users to use it directly on the system page itself without having to download it (unless you want to use it on a personal device and synchronized). The interface of this service is also quite intuitive, simple and easy to use even for new users.
Step 1: First, open your web browser ( Chrome , Firefox , Internet Explorer ...), then visit the homepage of OneDrive at: https://signup.live.com/ signup.aspx? lic = 1 and follow the instructions.
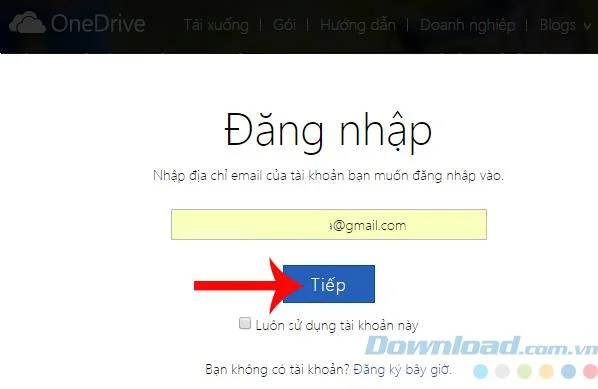
Step 2: After being moved to the next page, enter the Microsoft account you created above and click Sign in to sign in to OneDrive.

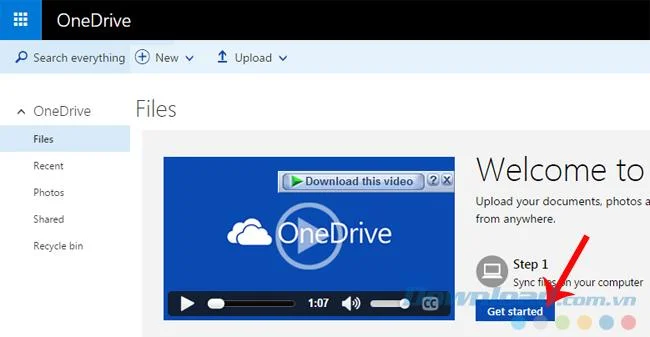
Step 3: The main interface of OneDrive appears. If this is the first use, there will be video instructions right on this page, you can see if you want, or not, click Get Started to start using.

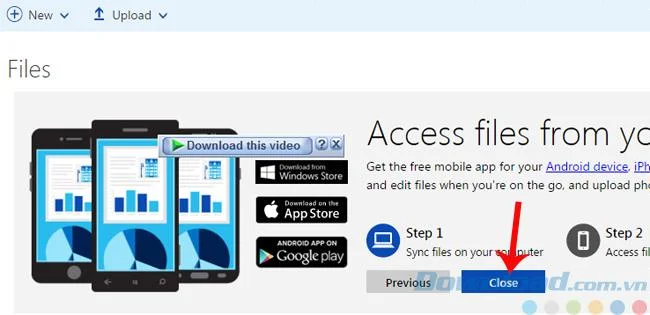
Click Next and Close at the next time to complete.

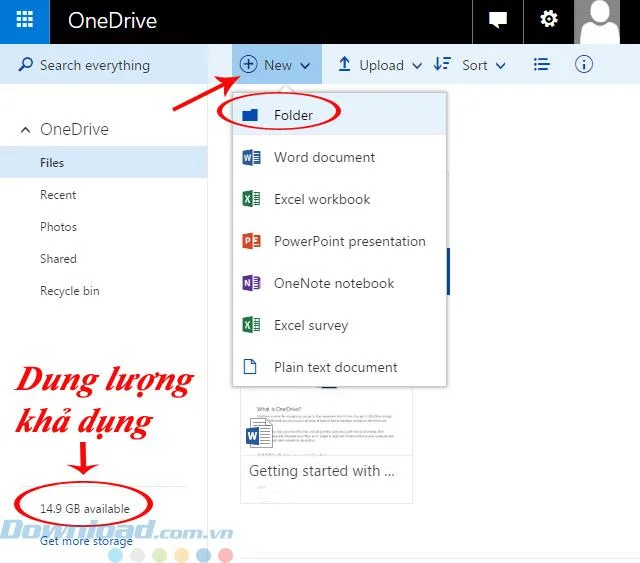
Step 4: If you want to create a new folder to save data, click New / Folder . In addition, also found in the lower left corner of the screen is the amount of free space that we can use for our OneDrive account.

First-time registration will receive a free 15GB
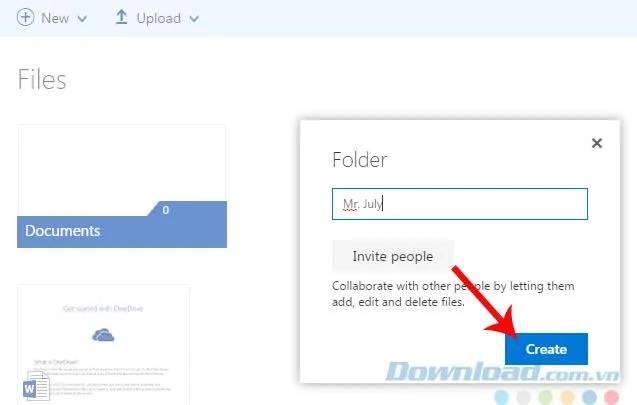
Enter a name for the Folder to create and select Create . You can also invite your friends to use this service to get more OneDrive storage (if your friends agree and also create an account, sign in to use this service).

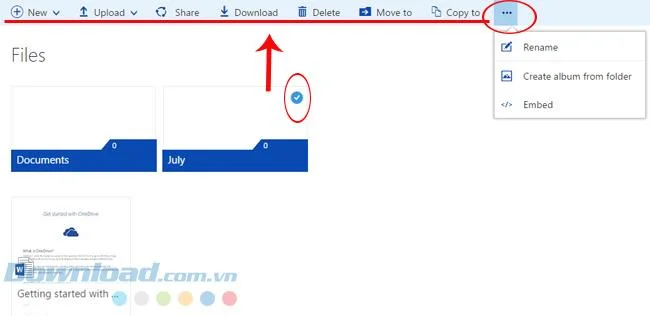
After creating, left- click on the newly created folder (in this example, the July folder), when the tick mark appears, there will also be a series of options right above for users to choose to use:
- New: Create another new folder.
- Upload: Upload data from the device to the OneDrive online storage service.
- Share: Share data with other users.
- Download: Download the backup file from OneDrive to your device.
- Delete: Delete the created folder.
- Move to: Move to another location.
- Copy to: Copy.
- Ellipsis icon: Other options, such as renaming currently selected folder, creating child albums, etc.

How to transfer data from a computer to OneDrive
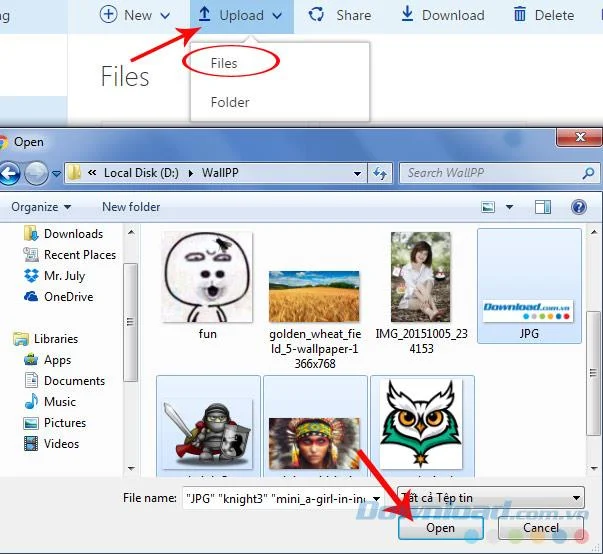
To be able to bring data that you want to save from the device onto this service, we click Upload, there are two options to use:
- Files: Download small, individual files.
- Folder: Upload multiple files, including folders to OneDrive.
In this example, Download.com.vn selects to download files, a Windows window will appear, and the path to the location of the files you want to save will be selected. Can be image files, documents, applications, software installation ...

Select the file to save on OneDrive and then click Open
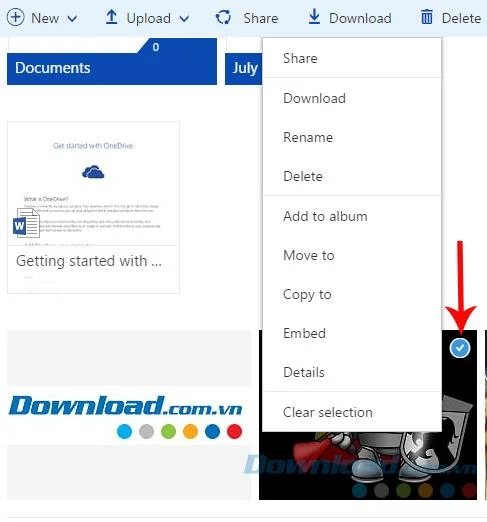
After the download is complete, the files will appear on the main interface of the page. Want to perform more operations for your data, you also left-click to mark (appears a chevron mark), then right-click on the file , an options table will appear with options. Select similar to that of Folder.

If you want to move, copy to another location, select Move to or Copy to. If you want to access this data, or download it to another device, just select Download to download.
OneDrive has absolute storage capacity, ensuring data is not lost, virus or stolen, users do not need usb or other external storage devices. If you want to use it elsewhere, just connect to the Internet, sign in to your Microsoft account as the first step is done!
I wish you successful implementation!