ERR_PROXY_CONNECTION_FAILED is a browser-based error that can occur on any Windows Operating system version. This error mainly indicates problems with the proxy settings. A proxy server connects online services with the user's network or IP address, assisting in filtering web content, ensuring privacy protection, and unlocking geo-restricted content.
It does not create a direct connection to the Internet, instead, it channels the connection through multiple servers, thus hiding the user's browsing information, such as IP addresses. Misconfigurations or issues during system setups can lead to the ERR_PROXY_CONNECTION_FAILED error.
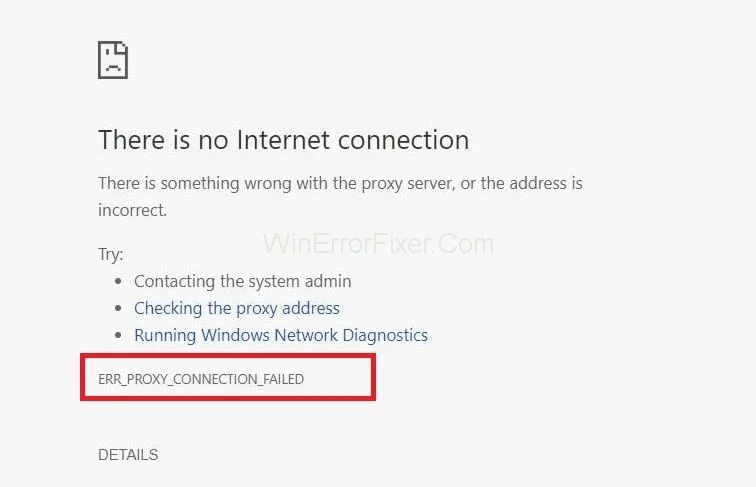
Error Message Overview
The ERR_PROXY_CONNECTION_FAILED error can be frustrating, with messages indicating:
- No Internet connection
- Issues with the proxy server or incorrect address
- Contacting the system administrator
- Checking proxy settings
- Running connectivity diagnostics
Why Is This Error Common?
Google Chrome users frequently encounter the ERR_PROXY_CONNECTION_FAILED error. When this occurs, the error message “There is no Internet Connectivity. There is something wrong with the proxy server, or the address is incorrect” blocks page views and hinders internet usage, which can lead to data loss. Fortunately, this issue can be resolved with several straightforward methods.
Contents
- Fixing the ERR_PROXY_CONNECTION_FAILED Error
- Conclusion
Fixing the ERR_PROXY_CONNECTION_FAILED Error
Before diving into detailed fixes, try these initial steps, which may quickly resolve the issue:
- Open the webpage in another browser like Mozilla Firefox to see if the issue persists; if it doesn't, you may consider reinstalling or updating Google Chrome.
- If switching browsers doesn’t help, reboot your WiFi router and check your LAN connection.
- If problems continue, follow the detailed solutions outlined below.
Solution 1: Reset Internet Settings
Resetting Internet settings can rectify many underlying errors. Here's how:
- Press Windows + R, type inetcpl.cpl, and hit Enter.
- In the Internet Options window, navigate to the Advanced tab.
- Click on the Reset button and follow the prompts.
Solution 2: Check Proxy Settings
Incorrect proxy settings can often cause the ERR_PROXY_CONNECTION_FAILED error. Please check the settings:
- Search for Control Panel via the Windows key and open it.
- Click on Network and Internet then go to Internet Options.
- Select the Connections tab.
- Click on LAN settings and ensure the Proxy server checkbox is unchecked.
Solution 3: Disable Proxy Temporarily
If the proxy setting is the issue, you can disable it temporarily:
- Press Windows + R, type Regedit, and hit Enter.
- Create a backup of the Registry via File > Export.
- Navigate to:
HKEY_CURRENT_USER → Software → Microsoft → Windows → CurrentVersion → Internet Settings
- Delete the following values:
ProxyOverrideMigrateProxyProxyEnableProxyServer
- Restart your computer.
Solution 4: Reset TCP/IP
Resetting TCP/IP restores default settings and clears errors:
- Right-click the Windows key and select Command Prompt (Admin).
- Type these commands, pressing Enter after each:
netsh winsock reset
netsh int ip reset
- Type Exit then press Enter to close the Command Prompt.
- Restart Windows.
Solution 5: Renew IP Address
To renew your IP address, follow these steps:
- Open Command Prompt (Admin) again.
- Enter the following commands, pressing Enter after each:
ipconfig /release
ipconfig /flushdns
ipconfig /renew
- Finally, type Exit to close the Command Prompt.
Solution 6: Repair Your Errors Automatically
For future prevention of errors, consider using reliable software designed to fix system errors automatically.
Similar Posts:
Conclusion
This comprehensive guide elaborates on all the simple yet effective methods to tackle the ERR_PROXY_CONNECTION_FAILED error. Carefully follow the steps, ensure commands are entered correctly, and we're confident one of these solutions will resolve your issue.










Rick from Chicago -
Appreciate the detailed steps! I'm passing this along to my team. Proxy issues can really slow things down!
Timmy 7 -
I truly appreciate this! I always thought it was my Wi-Fi, but it turns out to be a simple fix
Gina C. -
This was so informative! I didn't realize I could access proxy settings easily. You definitely helped me out
Jason R. -
Is there a way to prevent this error from happening again? I would love to know if there are any tips
Tom Techie -
This was a real lifesaver! I faced the Err_Proxy_Connection_Failed error in Chrome for so long. Thank you
Sara1985 -
I had the same issue! The first step really helped me clear the confusion. Sharing this with my friends!
Lilly -
Finally! I've been searching for a solution to Err_Proxy_Connection_Failed for ages. You just made my day
MaxPower -
Thanks for this! The steps were so easy to follow. Why isn’t there more content like this online
FunCat123 -
LOL! I had no idea I could fix this on my own. You made it look easy! Thanks a bunch
Charlie -
Could someone explain how proxy settings affect Chrome? This was super helpful, but I’m still confused about a couple of things
Kate G. -
No more proxy errors! I was almost ready to switch browsers. Your tips were a lifesaver
Dave IT -
Awesome article! This error was driving me crazy, and now I can finally use Chrome without issues. Cheers
MiaB -
Thanks for the detailed solution. Is this a common issue with all versions of Chrome, or just certain updates?
Aiden Smith -
Reading this was a relief! Proxy errors can be so frustrating; I'm glad there's a solution out there
Lucas -
How did I not find this sooner? You just saved me from a ton of frustration. Thank you for sharing this
Billie -
So glad I found this solution! Spent way too long trying to troubleshoot. Chrome is finally functional again!
Pet Lover Sam -
Hooray! This worked perfectly! Chrome is running again, and it's all thanks to you
LindaP -
Quick question, what should I do if this error comes back? Is there a maintenance routine for Chrome
Nina W. -
I never thought a proxy error would stop me from browsing. This guide made it super easy to fix. Forever grateful
Lucy K -
This really helped me! After following your guide, my Chrome works like new again. Keep up the good work
Tommy Tech -
Wow, I can finally get back online! I thought my internet was broken. Thanks a ton for the solution!
Cats4Life -
This guide is amazing! I read somewhere that proxy errors can often be fixed in Chrome settings but never knew how!
Sweetie Paws -
Just wanted to say, I love how straightforward your instructions are. I got rid of that annoying error so fast
John Doe -
Thanks for solving the Err_Proxy_Connection_Failed error! I was stuck on it for days. This guide saved me
Andy -
Do you think this solution applies to other browsers too, or is it specific to Chrome? Would be great to know!
Hannah Rose -
Such a detailed explanation! I had hit a dead end with this error, but now everything's running smoothly. Thank you!
Rover -
My cat was even annoyed with my constant restarts. Finally, I can browse without interruption. You’re a hero!
Jenna L. -
Great post! Are there any alternatives to using proxies? I’m curious what the best practices are
Chloé -
Fantastic! I never knew fixing proxy settings could be so simple. It’s a game-changer for my work
Emily Jane -
I had no idea this error was so common. Your steps made it simple to fix. Appreciate the help
SammyB -
Thanks for sharing! I think these tips might help my cousin too. He’s always complaining about connection issues
Mark IT Pro -
Pleased to see a clear solution! We've been dealing with proxy issues at work. Will definitely share this guide.