How to backup and restore drivers with DriverEasy

An important and integral part of every computer is the driver. Usually, every time you buy a new computer or reinstall Windows, the next mandatory task is that we have to install the driver for it. If each time reinstalling Windows also has to find, download each Driver and then install it will take a lot of time and really not really effective.

Currently, on the market there are many powerful tools to help users find, upgrade and install drivers for computers such as Driver Identifier , DriverEasy, 3DP Chip , IObit Driver Booster ... And to save time as well as manipulate during use, Download.com.vn will guide you how to backup and restore drivers on the computer with DriverEasy.

Download DriverEasy free for computers

Back up the driver on the computer with DriverEasy

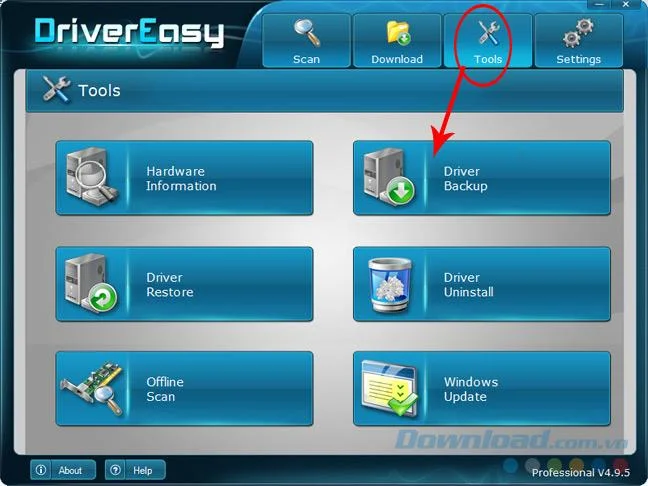
Step 1: You start the software DriverEasy up. From the main interface, select the Tools / Driver (Backup) tab .
How to backup and restore drivers with DriverEasy

Wait a moment for this software to scan the entire system and filter out the drivers that are installed on the computer.

How to backup and restore drivers with DriverEasy

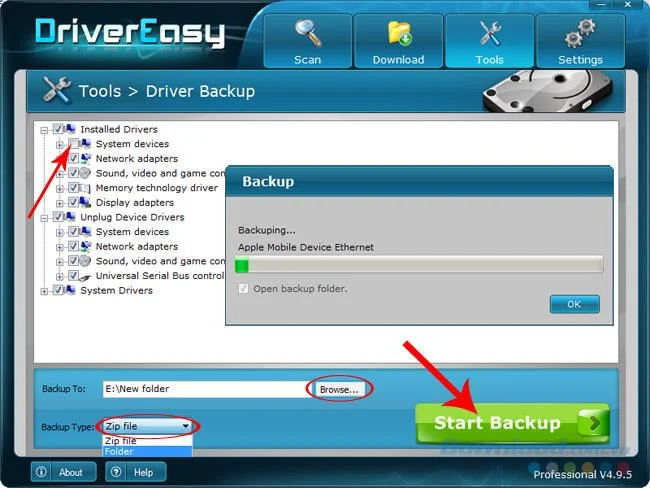
Step 2: After the scan is complete, a list of available drivers is on your computer. Can tick each item to back up separately or can tick all to DriverEasy to save this entire driver. You can choose to Browse to change the location of the driver backup file on the computer.

DriverEasy offers users two options for file formats, namely:

  • Zip file: Compressed file format
  • Folder: The type of folder.

Selected, click Start Backup to start conducting driver backup for the computer.

How to backup and restore drivers with DriverEasy

This process will take quite some time if the number of drivers you use is much. When completed, there will be a notice as below.

How to backup and restore drivers with DriverEasy

Click OK to close the message

Restore drivers on the computer with DriverEasy

During the use process, if an error occurs, or when reinstalling Windows has to install additional drivers, we can save a lot of time for this installation, by using the existing DriverEasy tool. .

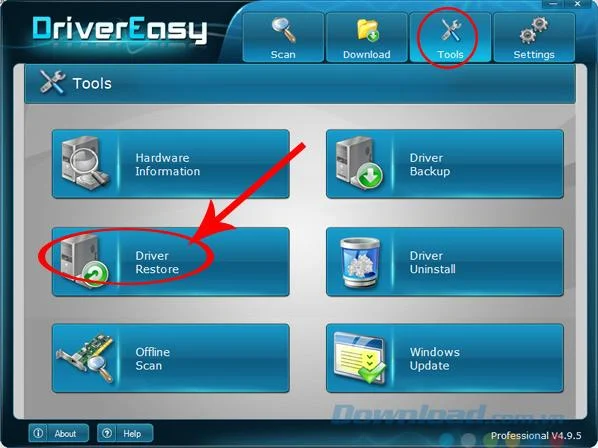
Step 1: At the main interface of DriverEasy, also select the Tools tab, Driver (Restore).

How to backup and restore drivers with DriverEasy

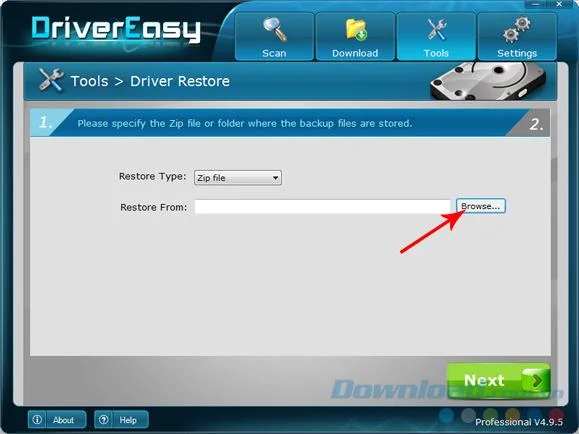
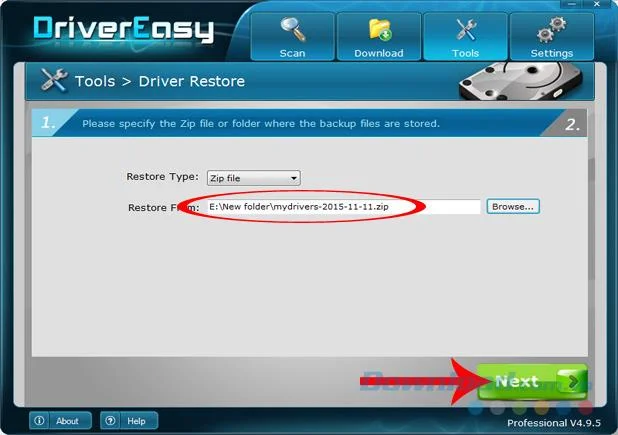
Step 2: Click Browse to navigate to the location where the backup file was made, and select the format of the file (zip file or folder).

How to backup and restore drivers with DriverEasy

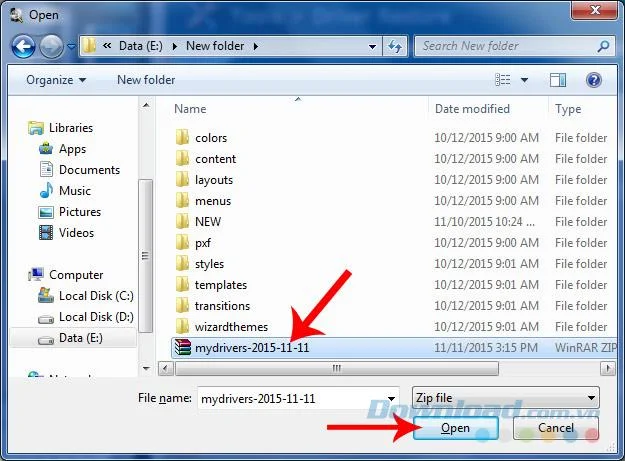
Choose the right backup file, then click Open .

How to backup and restore drivers with DriverEasy

Click Next to proceed to restore the driver on your computer.

How to backup and restore drivers with DriverEasy

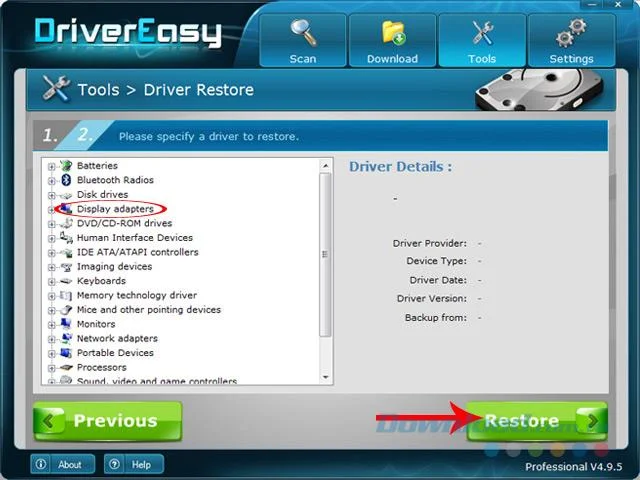
Step 3: In the display of DriverEasy we turn on each driver, then select Restore to restore that driver. Or maybe choose what you need / Restore.

How to backup and restore drivers with DriverEasy

Many people are quite subjective, believe that their computer is safe and never need to be reinstalled, so often skip this operation. However, this is a pretty misleading thought, because although it is not always necessary to install a driver, creating a backup file is completely redundant.

ATTENTION:

  • Driver backup file should not be in C drive, because when reinstalling Windows, it will also be lost along with other data.
  • Should choose the zip file format to save space for the machine, and convenient for sending (if necessary).

I wish you successful implementation!

Leave a Comment

Enable FIPS Mode on SLES 15 and Verify the Boot State

Enable FIPS Mode on SLES 15 and Verify the Boot State

Follow SUSE’s SP7 procedure to enable FIPS mode, reboot safely, verify the active policy, and check whether your compliance requirement calls for validated modules.

Set Up a LUKS-Encrypted Data Volume on SLES

Set Up a LUKS-Encrypted Data Volume on SLES

Compare YaST and cryptsetup for a new encrypted SLES data volume, choose LUKS1 or LUKS2, and verify unlock and mount behavior safely.

Build a Custom AppArmor Profile on SUSE Linux

Build a Custom AppArmor Profile on SUSE Linux

Create, refine, and verify a least-privilege AppArmor profile on SLES 15 SP7, with a clear note on SLES 16’s SELinux default.

Build a Local SUSE Update Server with RMT on SLES 15

Build a Local SUSE Update Server with RMT on SLES 15

Set up RMT on SLES 15, mirror entitled repositories, and verify HTTPS registration and package access from a test client.

Join SLES 15 to Active Directory with SSSD in YaST

Join SLES 15 to Active Directory with SSSD in YaST

Connect SLES 15 to AD with YaST’s SSSD-based logon management, then verify directory lookup, domain login, and Kerberos tickets.

Enable SLES Live Patching and Verify a Kernel Fix

Enable SLES Live Patching and Verify a Kernel Fix

Set up the right Live Patching path for SLES 16.0 or 15 SP7, apply eligible kernel fixes, and confirm what is active without confusing it with a reboot-required kernel update.

Install and Sign Custom Kernel Modules on SLES 15 Secure Boot

Install and Sign Custom Kernel Modules on SLES 15 Secure Boot

Load a custom SLES 15 kernel module without disabling Secure Boot. Match the running kernel, sign the .ko file, enroll a MOK key, and verify loading.

Keep Services Available During a SLES 15 SP5 to SP6 Upgrade

Keep Services Available During a SLES 15 SP5 to SP6 Upgrade

SLES 15 SP5 can migrate online to SP6, but each node must reboot. Use a tested rolling upgrade or blue-green cutover to keep workloads reachable.

Apply the SLES 15 STIG Safely with OpenSCAP

Apply the SLES 15 STIG Safely with OpenSCAP

Use SUSE’s supported STIG profile to scan SLES 15, test remediation, review remaining findings, and retain assessment evidence.

Restore Cockpit Access to SUSE Linux Enterprise Server

Restore Cockpit Access to SUSE Linux Enterprise Server

Trace a failed Cockpit connection through DNS, port 9090, the systemd socket, firewalld, TLS, and login settings using current SUSE guidance.