Home
» PC Tips
»
How to delete individual system restore points in Windows
How to delete individual system restore points in Windows
Windows automatically creates system restore points up to a set limit, which can leave you with dozens of restore points you never use. Deleting all restore points at once is easy, but how do you delete only selected ones? For example, restore points that take up too much space or expose sensitive data. This guide will show you how to delete individual restore points in Windows.
Delete individual restore points using Command Prompt
The most reliable way to delete restore points in Windows is to use the vssadmin command line tool, which is used to create and delete shadow copies. This tool can list all of your current restore points and delete them individually.
To determine the restore point in the command line, we will have to use the date the restore point was created. Here's how to find it:
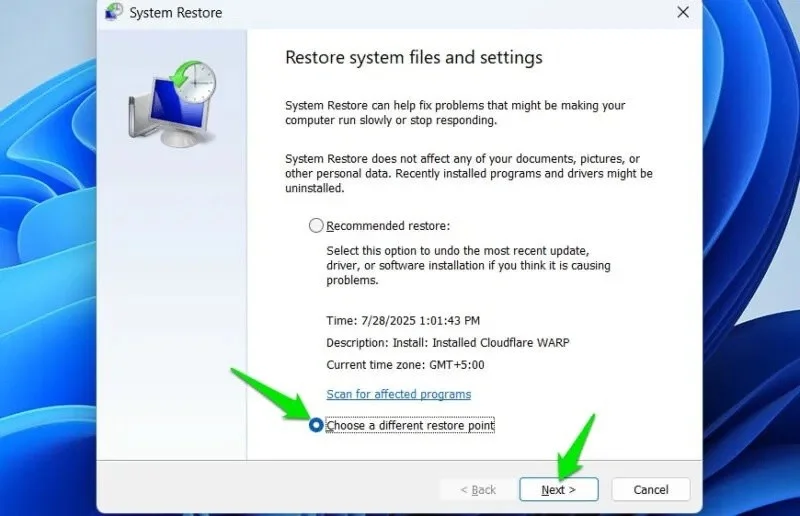
Press Win + R keys and type rstrui.exe in the Run dialog box to open System Restore . Here, select the Choose a different restore point option and click Next .
Open the System Restore wizard
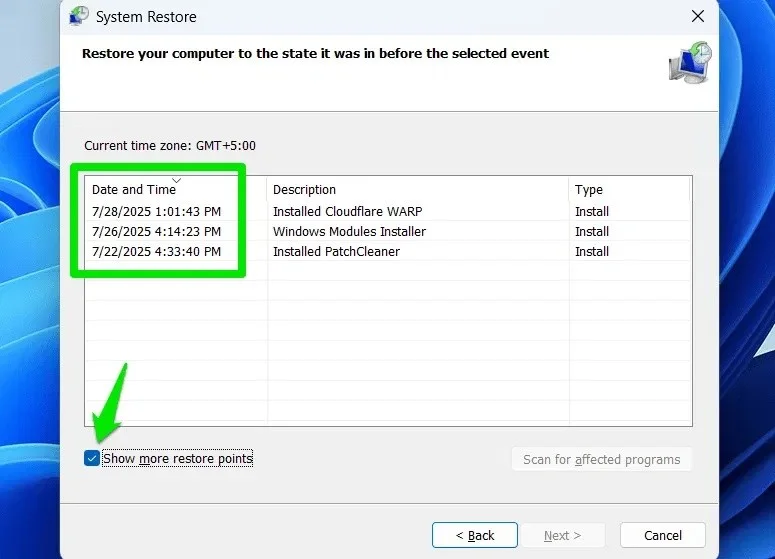
Then, select the Show more restore points option to view all the restore points. Make a note of the date and time of the restore points you want to delete.
List of restore points in System Restore
Now, search for “cmd” in Windows Search, right-click on Command Prompt and select Run as administrator . Type the following command here and press Enter .
vssadmin list shadows
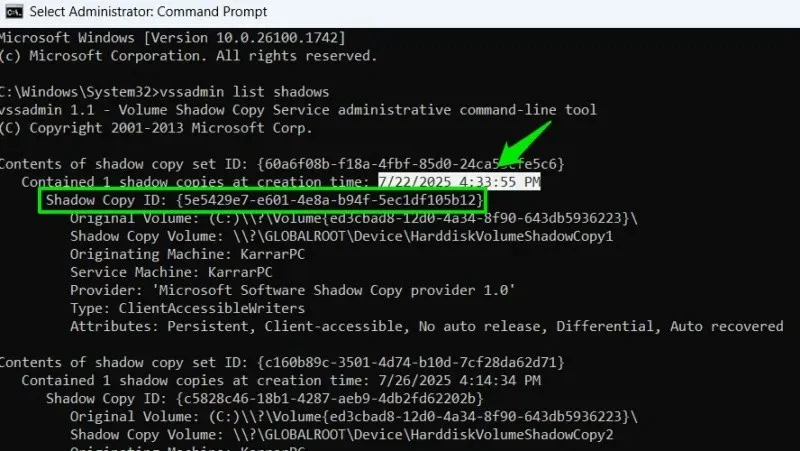
This command will list all restore points along with a bunch of information about them. You'll need to look at the creation time to find the restore point you want to delete. Once you've located it, copy the Shadow Copy ID of that restore point (including the curly brackets), which in our example is {5e5429e7-e601-4e8a-b94f-5ec1df105b12} .
Shadow Copy Creation ID and Date in Command Prompt
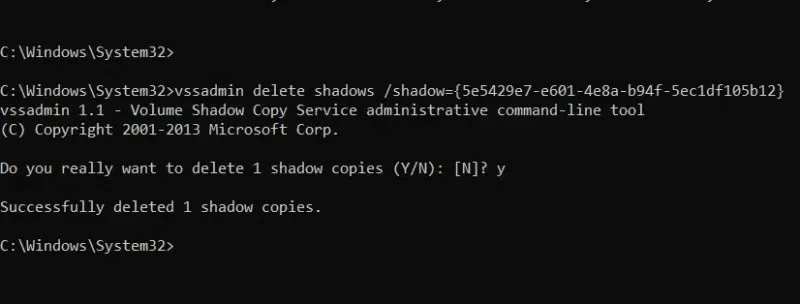
Next, use the following command and replace the ID at the end with the ID of the shadow copy you want to delete:
You will be asked to confirm the action, type Y , then press Enter to confirm deleting the restore point. You can repeat the process to delete all the restore points you want to delete.
Delete Shadow Copy using Vssadmin in Command Prompt
Use a third-party tool to delete each restore point
While vssadmin is fairly straightforward, deleting multiple restore points one by one can become tedious if you have to do it frequently. A third-party tool can make this process easier by automatically identifying all restore points and allowing you to delete them with a single click.
You should use CCleaner for this purpose. While CCleaner's main function is to clean up junk data, it also has a secondary tool for managing restore points.
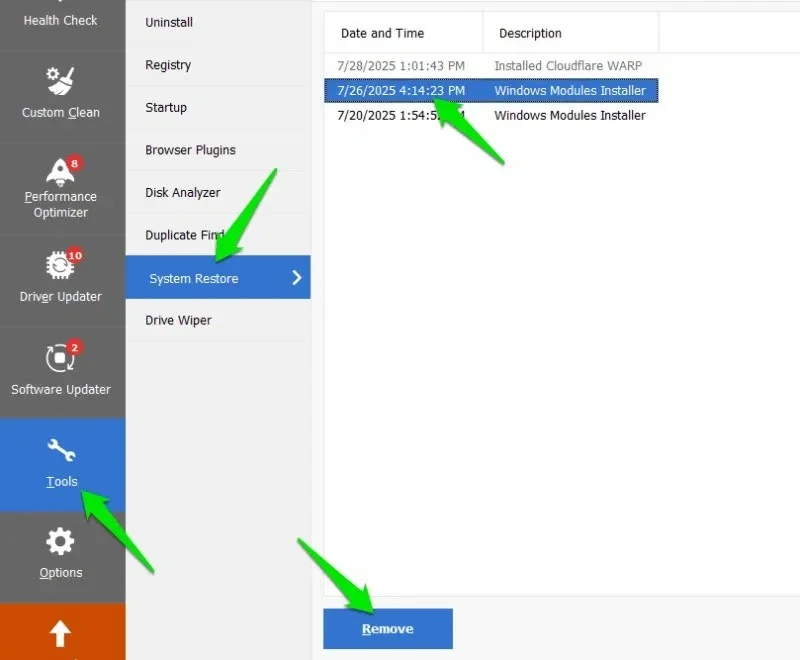
Open CCleaner, go to Tools -> System Restore , you will see all the restore points currently saved. Select the restore point you want to delete and click Remove at the bottom to delete it. You can hold down the Ctrl key and select multiple restore points to delete at once.
Delete restore point in CCleaner
For safety reasons, CCleaner will not allow you to delete the latest restore point to ensure you always have a point to revert to. You are free to delete all other restore points individually.
Bonus Tip: Use Windows Disk Cleanup
If you're deleting restore points to create disk space but don't want to risk deleting all of them, you can also use Disk Cleanup to delete only the old restore points while keeping the latest restore point. Open Disk Cleanup using Windows Search, go to the More Options tab , and click Clean up under System Restore and Shadow Copies .
Managing restore points is important, especially as data can continue to grow in size. You should use vssadmin if you only have one restore point to delete; installing a third-party application may not be suitable for a single task. If you're having trouble with a restore point, here are all the ways to troubleshoot System Restore .