SLES Thin Pool Out of Space: Extend LVM Safely and Restore Writes
Resolve SUSE LVM thin-pool space errors by checking data and metadata usage, expanding the pool safely, and preventing repeat outages.
When a SUSE Linux Enterprise Server thin-provisioned volume reports “no space left on device,” check the thin pool’s Data% and Meta% first. If the data area is full and the volume group has free extents, extend the thin pool with lvextend—not merely the virtual size of its thin logical volume. A completely full metadata area is different: it can require offline repair before normal writes resume.
The procedure below uses LVM2 commands documented for Linux and the storage model described in the SUSE Linux Enterprise Server 15 SP7 Storage Administration Guide. Command availability and service configuration may differ on another SLES service pack or a clustered installation. Take an application-consistent backup and restrict heavy writes before modifying production storage.
Run the following on the host that owns the active thin pool, replacing vgdata with your volume-group name:
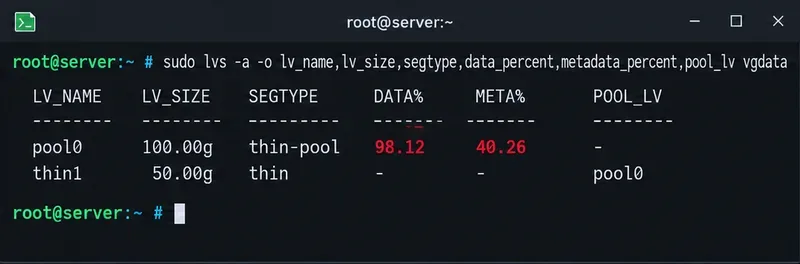
sudo lvs -a -o lv_name,lv_size,segtype,data_percent,metadata_percent,pool_lv vgdataLook for the row with thin-pool under SegType. Data% measures allocated data blocks; Meta% measures the pool's mapping metadata. These are separate capacity limits. If Data% is near 100 but Meta% is comfortably below it, additional data extents are the most direct remedy. If Meta% is at 100, use the recovery precautions in section 4.
For a hypothetical example, suppose vgdata/pool0 is 100 GiB with 98.12% data usage and 40.26% metadata usage. The pool is at immediate risk even if df -h reports plenty of space inside a mounted thin volume. A thin volume's virtual size can exceed the physical capacity backing the pool, as SUSE's Expert Partitioner documentation explains.
Also inspect recent errors:
sudo journalctl -k --since "-30 min" | grep -Ei 'thin|no space|I/O error'Do not interpret an empty grep result as proof that no failed writes occurred. Check the application's logs as well, especially if a database or virtual machine was writing when the pool became full.
Before changing pool size, find out whether the volume group can fund the extension:
sudo vgs -o vg_name,vg_size,vg_free vgdata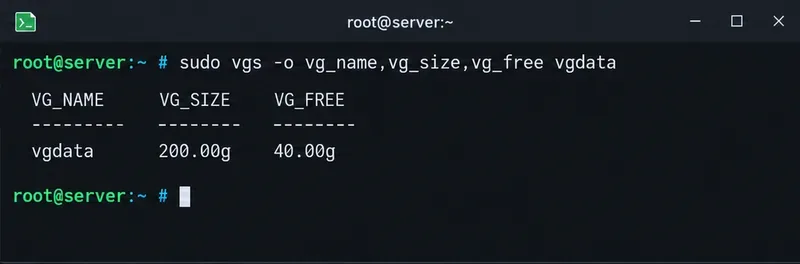
In the hypothetical example, the 200 GiB volume group has 40 GiB free. A 20 GiB pool extension is therefore feasible in principle, subject to allocation constraints and room for any metadata growth. Keep some VG space in reserve rather than assigning every free extent to the pool.
If VG_FREE is zero, lvextend cannot invent physical capacity. Add a correctly identified, prepared physical volume to the VG, enlarge underlying storage and its LVM PV as appropriate, or reclaim blocks before retrying. SUSE documents adding physical volumes when resizing a volume group. Never run pvcreate against an unverified disk: it can destroy existing storage metadata.
When Data% is the limiting factor, metadata is not exhausted, and sufficient VG extents are free, extend the pool itself:
sudo lvextend -L +20G vgdata/pool0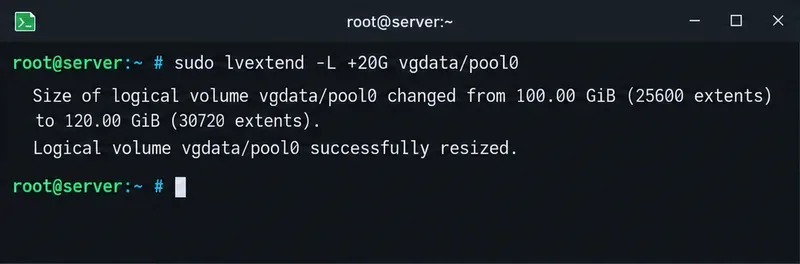
The +20G syntax adds 20 GiB to the current pool size; it does not set the final size to 20 GiB. In this example, the backing pool grows from 100 GiB to 120 GiB. With unchanged allocated data, 98.12 GiB in use would represent about 81.8% of the enlarged pool. The actual percentage may differ if writes continue during the operation.
Do not substitute lvextend -L +20G vgdata/thin1. Enlarging a thin volume's virtual address space does not necessarily add physical data capacity to its pool. Because this command expands the backing pool rather than the filesystem's virtual block device, a filesystem resize is not normally required for this specific operation. The authoritative LVM thin-provisioning manual documents the thin-pool extension mechanism and its limitations.
If files have already been deleted from a thin filesystem and discard is supported by the entire stack, consider reclaiming discarded blocks:
sudo fstrim -v /srv/dataUse the real mount point of a thin volume, not the thin-pool device. A successful trim may lower Data%, but deleting files alone usually does not return blocks to the pool. Thin snapshots can retain shared blocks, and a pool set to ignore discards will not benefit. Do not treat trim as a dependable emergency substitute for physical capacity, particularly if writes have begun failing. Remove old snapshots only after checking their ownership, dependencies, and retention requirements; snapshot deletion is irreversible.
If Meta% has reached 100%, stop application writes and plan a controlled outage. LVM warns that metadata exhaustion can make the thin-pool metadata and filesystems inconsistent. Merely increasing pool data size, retrying writes, or forcing activation does not resolve that risk.
The documented recovery sequence is to deactivate the affected pool offline, repair its thin metadata using lvconvert --repair VG/ThinPool, enlarge metadata capacity using lvextend --poolmetadatasize, and then check each affected filesystem with the appropriate offline tool. For example, a pool whose metadata LV is smaller than 2 GiB might require a reviewed target such as:
sudo lvextend --poolmetadatasize 2G vgdata/pool0This is not a command to run blindly on an active, damaged pool. Its size is an example, not a universal requirement. Confirm current metadata size, available extents, correct deactivation, recovery media, and backups first. lvconvert --repair must be planned with downtime and recovery expertise; the LVM manual notes that it may fail and data can still be unrecoverable. Retain the old metadata LV until the pool and filesystems have been verified. An LVM configuration backup from vgcfgbackup does not back up thin-pool metadata. For business-critical data, involve SUSE support or your storage recovery team before attempting repair.
After the system is stable, configure a proactive growth policy in the activation section of /etc/lvm/lvm.conf. This example begins extension at 70% usage and requests 20% growth; tune these values for write rate and available VG capacity:
activation {
    thin_pool_autoextend_threshold = 70
    thin_pool_autoextend_percent = 20
}
Ensure the settings are applied to the correct configuration scope and the pool is monitored:
sudo lvchange --monitor y vgdata/pool0
Automatic thin-pool growth depends on LVM event monitoring (dmeventd) and sufficient free extents. Check the monitoring service provided by your SLES installation—for example, systemctl status lvm2-monitor where that unit exists—and review its logs. A threshold does not guarantee protection if writes outrun extension or the VG is already full. See the LVM manual's automatic extension guidance and lvchange monitoring options.
Read back both pool utilization and the VG's remaining capacity:
sudo lvs -o lv_name,lv_size,data_percent,metadata_percent vgdata/pool0
sudo vgs -o vg_name,vg_free vgdata
Data% should have dropped after data-pool expansion, Meta% must remain below exhaustion, and the pool should be active without new I/O errors. Check filesystem status and application logs, then perform a small, application-appropriate write and read test before releasing suspended workloads. If errors persist after space is available, keep the affected workload offline until its filesystem and application integrity have been assessed; more capacity cannot reverse already failed or lost writes.
Resolve SUSE LVM thin-pool space errors by checking data and metadata usage, expanding the pool safely, and preventing repeat outages.
Identify whether Btrfs is intentionally read-only, short on space, or protecting data after errors, then choose a recovery path that fits the cause.
Prepare mirrored channels, create an activation key, and bootstrap an SLES 15 client without direct internet access while preserving the connection needed for Manager check-ins.
Fix YaST’s XIO launch error over SSH, verify X11 forwarding and xauth, and switch to the ncurses interface when a remote window is unnecessary.
Find the pre-update Btrfs snapshot, test it read-only, and make recovery permanent with Snapper while understanding which data stays outside the root rollback.
Send SLES system logs to a remote rsyslog collector over authenticated TLS, with certificate checks, outage buffering, and delivery tests.
Use RAM, swap, kernel, and Zypper logs to identify real memory pressure, protect package state, and choose a safer SLES upgrade retry.
Enable Debian’s unattended security updates over SSH, keep the default package sources, and verify scheduled runs through systemd and APT logs.
Compare mail delivery options, configure smartd on Ubuntu, and verify that disk-health warnings reach your inbox.
Restore DNS lookups on Debian 12 by checking systemd-resolved, repairing resolv.conf when needed, and verifying upstream DNS and application resolution.