5 tips to improve image and sound in Zoom calls

While hardware quality helps you look more professional, anyone can achieve it with just a few small changes.
Zoom Meetings has a free version for those who want to experience it first or can't afford to buy packages. However, downloading Zoom for free online learning will be limited to a maximum of 100 participants.
Zoom is a remote online conferencing platform that can connect many people together. To use the Zoom software, you need a computer or tablet or smartphone that can connect to the internet.
You can use Zoom software to record HD videos, record audio. In addition, Zoom also supports up to 1,000 participants (depending on the Zoom package you buy). The Zoom app has a free version you can try, but it will have limited features.

Record meetings: All meetings, online learning are recorded when you press the active button. And you can save the recording on the device or upload and save it to the cloud data.
Screen sharing: All participants can share the screen with others, so Zoom is very useful for meetings, presentations, and online learning.
Chat: Not only chatting online, you can use Zoom to chat with many people at the same time
Virtual speaking: This is a feature that helps you want to speak or ask questions to participants in a meeting or study session.
Poll: This feature is suitable for management because it is possible to create a poll topic, share it with the rest of the members to collect opinions and feedback information in the most objective way.
Mute participants: this feature ensures that meetings or online learning are free from noise interference from many sides.
In addition, to secure information in exchange, Zoom Meetings is also encrypted with the application.
Zoom Meetings has a free version for those who want to experience it first or can't afford to buy packages. However, downloading Zoom for free online learning will be limited to many features such as: up to 100 participants, each online learning session (meeting) lasts up to about 40 minutes (after 40 minutes the accounts will automatically out).
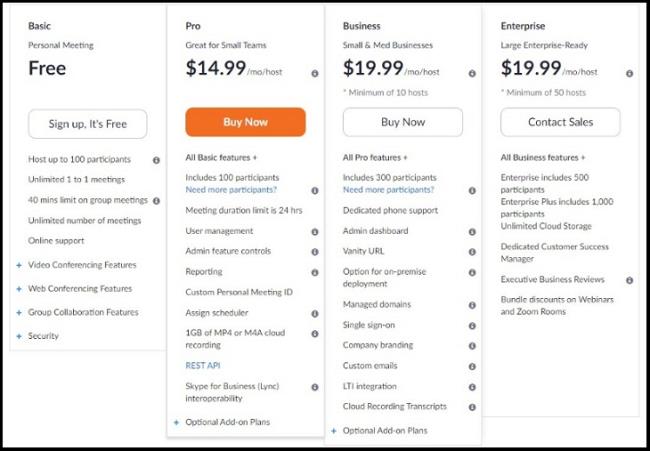
Zoom package price applies only on the server, participation will be free. That is, there is only one paid person (on that person's device) that can connect with many other people (for free) to participate in online learning (meeting) on Zoom.
Participants (free) can store any data, they are limited to some features of the free plan only (like making calls for no more than 40 minutes).
Step 1:
We download the online learning software Zoom according to the link below and then install it.
>> Download Zoom software on your computer here .
Step 2:
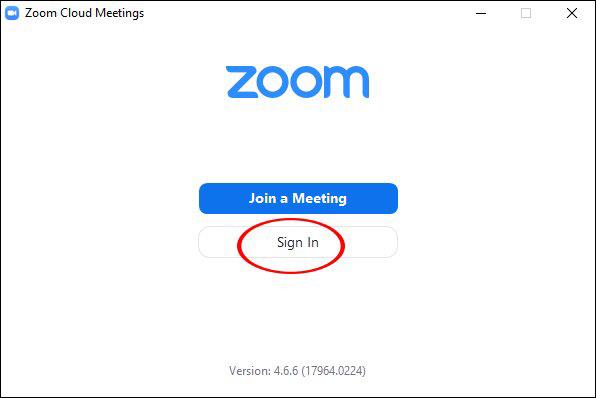
Next we need to register for a Zoom account to use, click Sign in in the display interface.
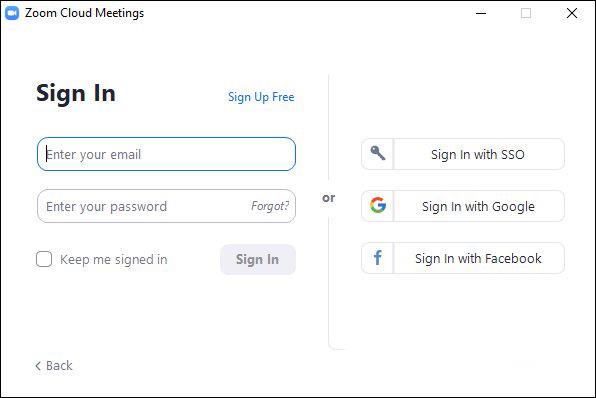
Users then have the choice of creating a Zoom account, via email, via SSO, Google or via Facebook. We should choose to register via Google to link to the Google account we are using and immediately create a Zoom account.
Step 3:
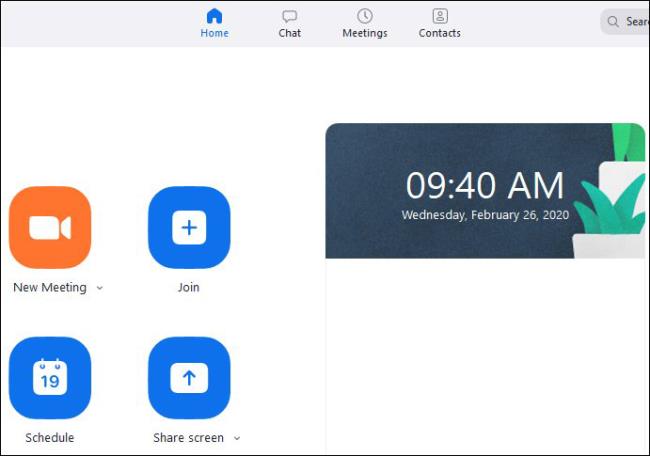
Once you have an account, you will be redirected to the main interface of the software. At the top horizontal bar, there will be 4 main management groups including:
Home: Tap to return to the Home screen.
Chat: Show window, group of Chat functions.
Meetings: Displays the Meeting window and group of functions.
Contacts: Manage contacts.
Below are 4 main functional parts to create classrooms, join other classrooms.
New Meeting: Create new meeting rooms and classrooms.
Join: Access to other classrooms and meeting rooms.
Schedule: Schedule, manage the time of lessons.
Share Screen : Share your computer screen to others.
Step 4:
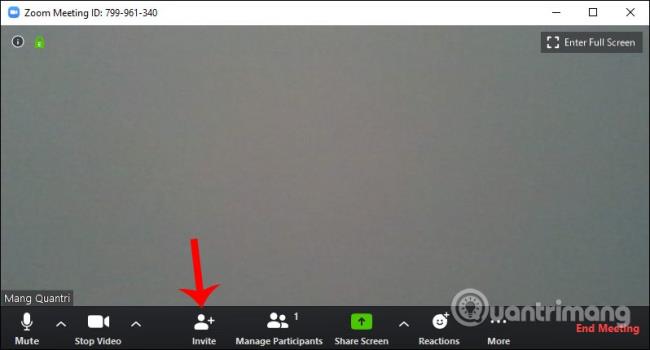
To create an online classroom on Zoom, click New Meeting. Show the webcam screen interface with the classroom options below. To invite teachers or students, students to join the classroom click Invite. Note the Meeting ID to send to others who want to join.
Step 5:
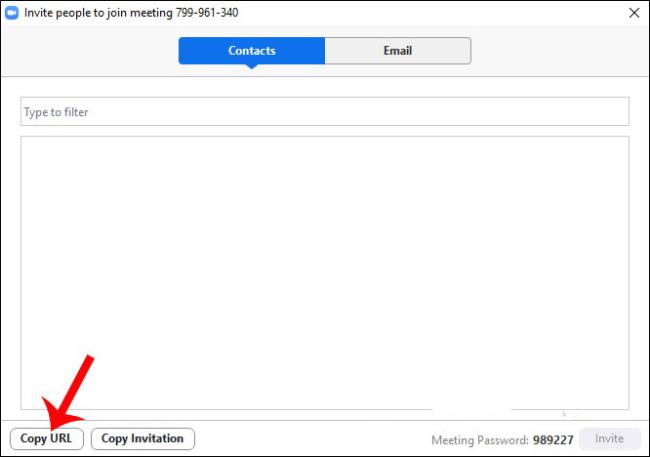
Display the interface, we click Copy URL and then send it to the people you want to invite to join. Participants also need a user account.
Step 6:
When others want to join an online classroom on Zoom, click Join. Then enter the ID of the provided classroom and enter the name of the person who wants to join. Finally click Join to join.
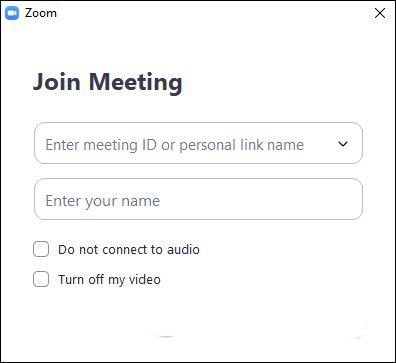
By default, when learning online on Zoom, all audio is recorded and the webcam is available. Note that if you study online on Zoom by phone, you also need to enter your classroom ID and name to join.
The interface of the online classroom on Zoom has the interface as below.

Join Audio: Set the sound on Zoom. If Zoom has an audio error, you can edit it at Settings.
Stop Video: Turn off the webcam and replace it with a logo image or change the background of the learning video on Zoom.
Invite: Invite others to join the classroom. You refer to the article How to register for Zoom.us for free online learning to know how to invite to an online room on Zoom.
Manage Participant: Manage class participants. If you create a classroom on Zoom, you can change the host of the classroom on Zoom, or remove any member from the classroom.
Share Screen: Share the screen. If you want to secure information on Zoom, limit unnecessary screen sharing except for the classroom host, then click Advanced Sharing Options.
Chat: Send a message.
Record: Record the video of the lesson on Zoom.
Reactions: Send emoticons.
End Meeting: End of the lesson.
As mentioned, the Hosts who create Zoom rooms will have many setting rights, including the right to turn on or off the microphones of members participating in the classroom.
This is very useful when teachers can turn off the sound of students in the class when not necessary, avoiding the case of recording noise from outside, affecting other students.
Click Manage Participants to control participants. Then press Mute on the person you want to mute or press Mute All to mute all members. Click More to open the additional settings interface for the audio section.

Step 1:
We click the Share Screen button at the control bar at the bottom of the screen.
Then the Basic section displays all open applications, browsers, and computers. Below are 2 options including:
Share Computer Sound: If you select this option, any audio coming from the computer will be shared in the online meeting.
Optimize screen sharing for video clips: If you select this option, you share a video clip in full screen mode. However, the sharing screen is dim.
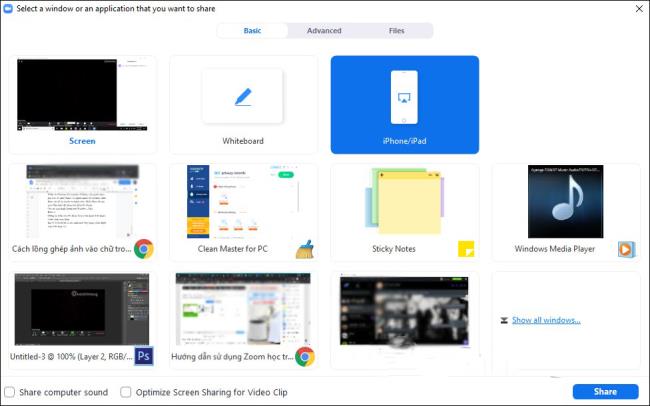
To be able to deliver lectures visually and vividly, teachers can use an electronic drawing board to connect to Zoom software through the Share Screen feature.
Step 2:
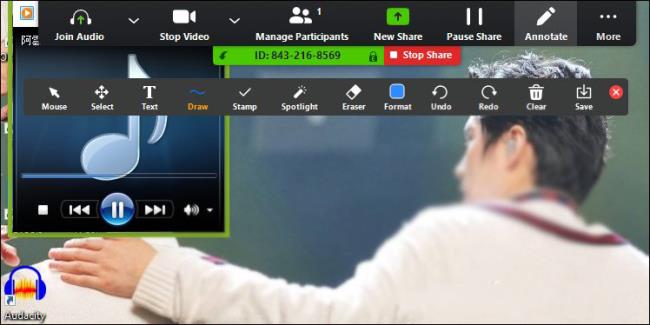
After selecting the sharing screen, the sharing screen view interface will be displayed. A menu bar displays as shown below.
Join Audio: Turn off sharing audio.
Stop Video: Play or stop the video.
Manage Participants: View or manage participants (if you are Host).
New Share: Select a new screen share.
Pause Share: Pause your current screen sharing.
Annotate: Show the drawing toolbar on the shared screen interface.
More: Open the options menu
Click Stop Share to stop the sharing process.
Step 3:
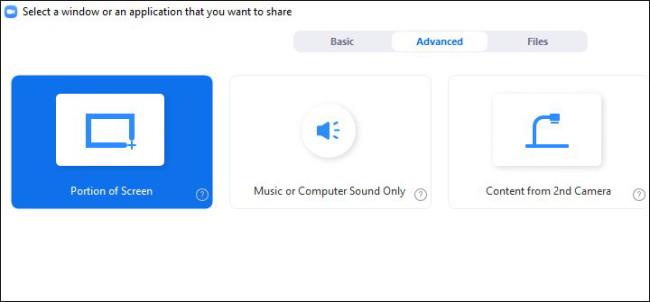
In addition, in the screen sharing interface, when clicking Advanced, there will be advanced sharing options.
Portion of Screen: Select a specific screen to share.
Music or Computer Sound Only: Share only the audio on the computer.
Content from 2nd Camera: Share via the 2nd camera connected on the computer.
Step 4:
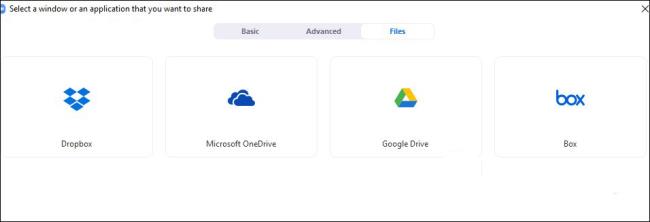
The Files section will choose to share the screen of the files you save at the cloud storage service that Zoom supports. We log into the service to share.
Recently WebTech360 has shared useful information about Zoom software - The most popular online learning and meeting application today. Hopefully, the above information will help you easily use zoom software to serve well at work.
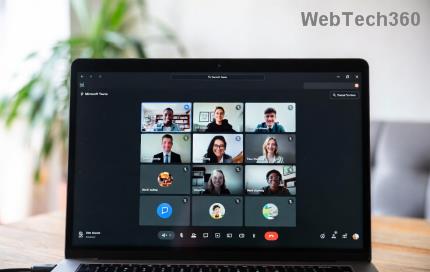
While hardware quality helps you look more professional, anyone can achieve it with just a few small changes.
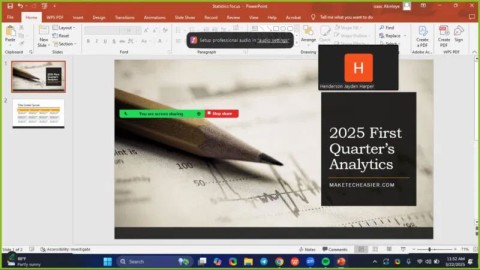
Zoom is the go-to app for virtual meetings and Microsoft PowerPoint is still king for presentations, making it easy to combine the two whether you're teaching a class, pitching a business idea, or hosting a webinar.
Zoom is a top video conferencing service for connecting with friends, family, business associates, and classmates on various devices including Amazon Fire tablets.
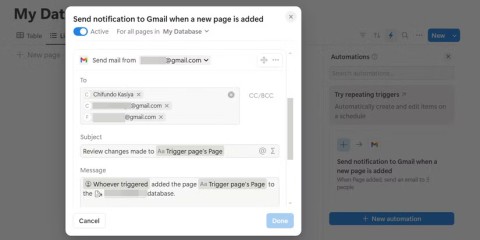
With the right integrations, you can automate workflows, sync data across platforms, and boost productivity without ever leaving Notion.
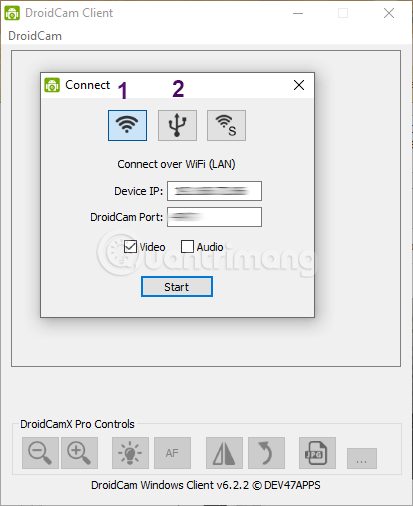
The following article will guide you on how to use Droidcam on your computer and phone as well as some suggestions for having a perfect video call!
How to export the list of meeting participants in Zoom, How to take attendance on Zoom is not difficult, it even allows you to export the list of students participating in the class.
How much Internet capacity does Zoom use?, Zoom is an indispensable remote online learning and working software during the epidemic, but it can be extremely bandwidth-consuming.
Instructions for displaying webcam while sharing screen in Zoom. Zoom is an online teaching and meeting software with many useful features for users. In
Instructions on how to raise your hand to speak in Zoom. During the process of using Zoom to teach, there are many times when students will want to raise their hand to speak to elaborate on the lesson, but
How to turn on subtitles on Zoom, Zoom provides an automatic subtitle creation feature, making it easier for users to understand the call content. Here's how to turn on captions on Zoom when calling
Zoom Meeting is one of the best free online teaching software in 2020. You can create different classrooms and invite unlimited participants.
Tired of Microsoft Teams "Meet" joining error blocking your meetings? Discover proven, step-by-step fixes to resolve Microsoft Teams Meet joining issues quickly and get back to seamless collaboration. Updated with the latest troubleshooting tips.
Struggling with Microsoft Teams "Installation Has Failed" on Windows 11? Follow our step-by-step troubleshooting guide with proven fixes, from clearing cache to advanced repairs, to resolve the error quickly and painlessly. Get Teams running smoothly today!
Tired of Microsoft Teams Breakout Rooms not showing up? Follow our ultimate guide with step-by-step fixes, troubleshooting tips, and prevention strategies to get breakout rooms working seamlessly for productive meetings.
Tired of Microsoft Teams shortcut error blocking your workflow? Learn proven steps to solve Microsoft Teams shortcut error and startup crashes for smooth collaboration. Quick, easy fixes inside!
Struggling with Microsoft Teams "Planner Error" in channels? Discover proven, step-by-step solutions to resolve it quickly and restore seamless collaboration. No tech skills needed!
Discover how to set up Microsoft Teams for school and education effortlessly. Get free access, create classes, assignments, and meetings with our ultimate guide for teachers and students. Boost learning today!
Discover how to use Microsoft Teams Whiteboard in 2026 with this complete guide. Learn access methods, AI-powered features, step-by-step tutorials, and pro tips for seamless collaboration in virtual meetings. Boost productivity today!
Stuck with Microsoft Teams errors? Get step-by-step fixes for crashes, sign-in failures, audio glitches, and more. Proven solutions to resolve general Teams issues fast and frustration-free.
Stuck with Microsoft Teams Wiki not loading error? This ultimate troubleshooting guide delivers quick, step-by-step solutions to fix the issue fast and restore seamless collaboration.
Struggling to locate the Microsoft Teams Installation Folder on your PC? This step-by-step guide reveals exact paths for new and classic Teams, per-user & per-machine installs. Save time troubleshooting!
Struggling with Microsoft Teams Proxy Error? Discover proven Troubleshooting Microsoft Teams "Proxy Error" Settings Fix steps. Clear cache, adjust proxy settings, and get back to seamless calls in minutes with our expert guide.
Tired of Microsoft Teams OneDrive Error blocking file sync? Follow our step-by-step guide to solve Microsoft Teams "OneDrive Error" File Sync issues quickly. Proven fixes for smooth collaboration in Teams channels. Get your files syncing error-free today!
Tired of Microsoft Teams workflows and Power Automate errors halting your productivity? Get step-by-step solutions to common issues like authentication failures, timeouts, and flow errors. Fix them in minutes and automate effortlessly!
Facing Microsoft Teams "Download Error" on MacBook? Discover proven troubleshooting steps to resolve download failures quickly, from cache clears to reinstalls, and get back to smooth teamwork.
Tired of the frustrating Microsoft Teams "Where is Teams" Folder Error? Discover proven, step-by-step troubleshooting fixes to resolve it quickly and restore smooth teamwork. Latest methods included!
