Is your C drive full, causing the computer to run slowly, heat up and sometimes power down? Want to expand the operating drive (drive C: \) without losing data? Please follow the instructions below.
When you install any program or software, it takes up space in the C drive. After a while, this drive is full and you realize the computer is running slowly. Basically, the operating system needs to have a free space in drive C to run smoothly, but when there is not enough space, it will behave abnormally.
Here are two ways for users to expand drive C on Windows 7,8,10 . The first way is to use the built-in disk management feature of Windows and the second way is to use 3rd party software.
Method 1: Use the drive management feature of Windows
Important note: If you do not use this feature properly, you may lose your data. And the disk management feature of Windows has limited functionality.
- Open the File Explorer by pressing Windows + E .
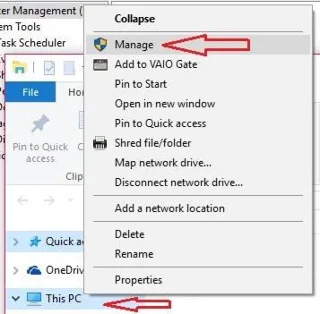
- Right-click on This PC or My Computer (depending on the version of your operating system).
- Select Manage .
4. Select Disk Management in the Computer Management window .

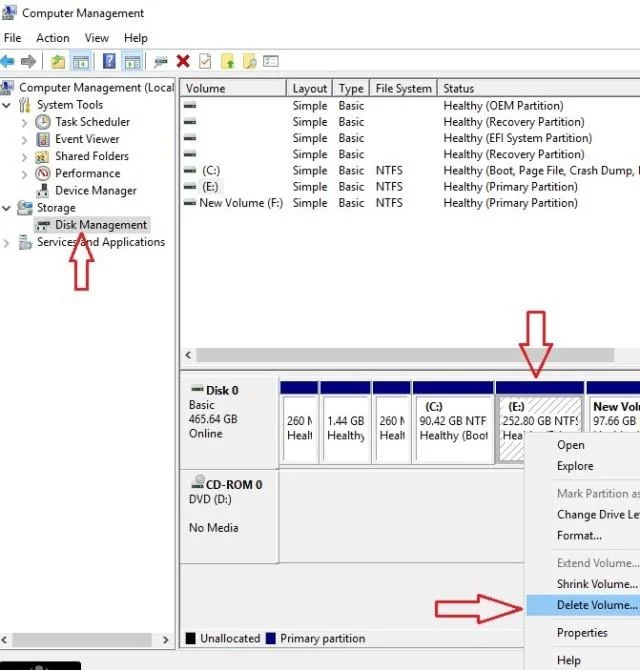
Looking at the screenshot above, we see the C , E , F drives in order. If you want to increase disk space C, you must have free space to allocate to drive C. Therefore, you must delete a drive and the space will be transferred to drive C. Before deleting the drive then make sure you transfer all the data there to another drive or an external hard drive.
5. Click on drive E or any other drive you want to delete (except drive C ).
6. Select Delete Volume . If the drive is large, use the Shrink Volume option to minimize the drive. For example, your E drive 150 GB and you are just another 50 GB on drive C . If you select Delete Volume , all 150 GB will be transferred to drive C. If you choose Shrink Volume, drive E will be reduced to 50 GB, 100 GB has not been allocated in drive E, you just need to change the name to one Other letters to form the new drive. Now remove the drive E 50 GB for storage that is transferred to drive C .
7. Right-click the drive C .
8. Select the Extend Volume section . Select Next and Finish .
When using the Disk Management option , the user must delete the space of other drives (except drive C), because you cannot create the remaining unallocated space for any drive by using Shrink Volume. . You can only create unallocated space right there. To expand drive C without deleting any, you need to use a 3rd party hard drive partition tool.
Method 2: Use Macrorit Partition Expert software
The software is very easy to use, free (or if you buy the pro version, it is also much cheaper than other similar software) and works fast. Besides, Macrorit Partition Expert provides many other features besides partitioning the hard drive.
Macrorit Partition Expert
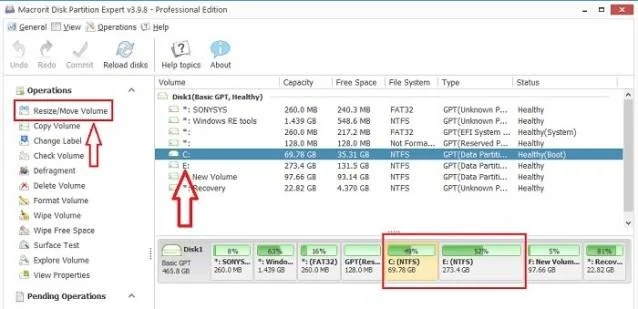
Step 1. Select the drive E .
Step 2. Click Resize / Move Volume in the left menu.

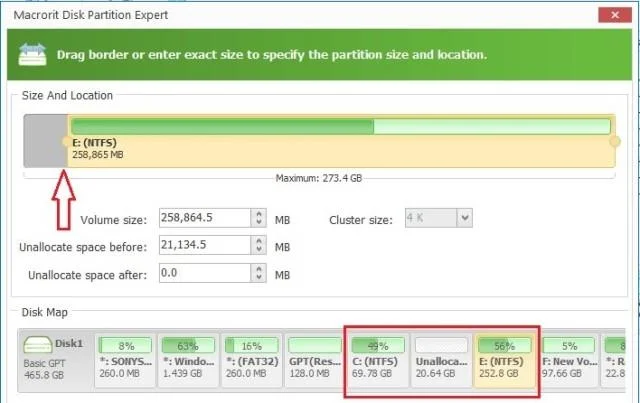
Step 3. Just drag from the left to create the remaining unallocated space into drive E and press OK .

Step 4. Once again you return to the main screen. Select drive C . You will see another window and drag to the right. Click OK .
Step 5. Click Commit at the top. It will restart the computer and within 10 minutes, your C drive space has been expanded.