Configure Reliable Ethernet Failover with SLES 15 Bonding

Create a redundant Ethernet connection on SLES 15 with YaST and Wicked, configure active-backup bonding, and verify both ports and failover.
If a SUSE Linux Enterprise Server 15 host has two Ethernet adapters but loses network access when one cable fails, configure a bond0 interface in YaST, add both adapters, and select active-backup with miimon=100. Put the server's IP configuration on the bond rather than on either physical port. This provides link redundancy without requiring an LACP-enabled switch.
The steps below use the Wicked networking service normally used for SLES server workloads. Changing the interface that carries an SSH session can disconnect you, so perform the change from a local console, remote management console, or an approved maintenance window with a recovery path.
Two available network cards do not automatically form a failover pair. Without bonding, each interface is managed separately, and an application using one route may lose connectivity when its link goes down. A Linux bond presents several physical ports as one logical interface.
Before making changes, identify the real interface names, record the host's current IPv4/IPv6 addresses, gateway, VLAN, and DNS settings, and confirm that both switch ports reach the intended network:
ip -br link
ip -br addr
ip route
systemctl status network
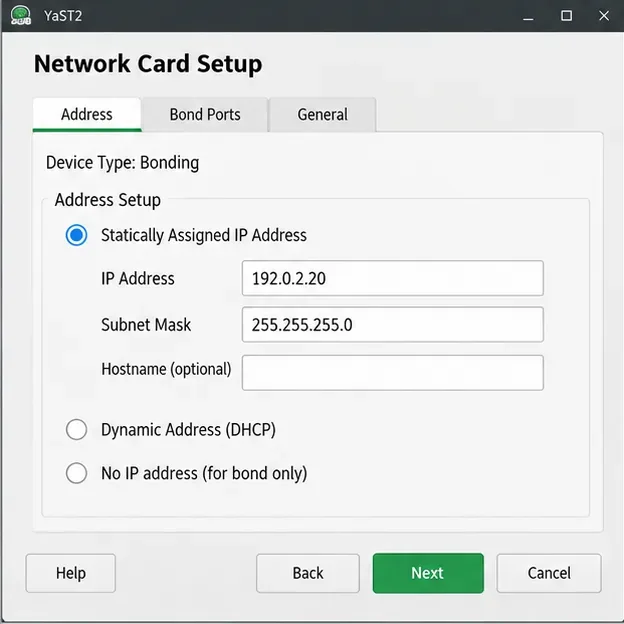
In the example screens, the two physical interfaces are enp1s0 and enp2s0. These names are illustrative; your server may have different names. The sample address 192.0.2.20/24 is a documentation-only address, not a value to deploy on your network.
Use active-backup (mode 1) when the goal is to preserve service during a port or cable failure. One port transmits while the other remains available for failover. Choose 802.3ad (LACP, mode 4) only when the network switch is explicitly configured for a matching LACP aggregation group, with compatible speed and duplex settings. LACP can distribute different traffic flows across links, but does not promise double the speed of one connection. SUSE cautions against spanning ordinary bonds across multiple switches unless the switch vendor supports the arrangement. See the SUSE network bonding procedures and restrictions.
Run sudo yast2 or open YaST locally, then go to System > Network Settings. In the Overview tab, identify both Ethernet interfaces you intend to combine. If one interface currently holds the server's management address, arrange console access before changing its configuration. Do not choose a wireless interface or an interface already dedicated to an unrelated bridge without planning that topology first.
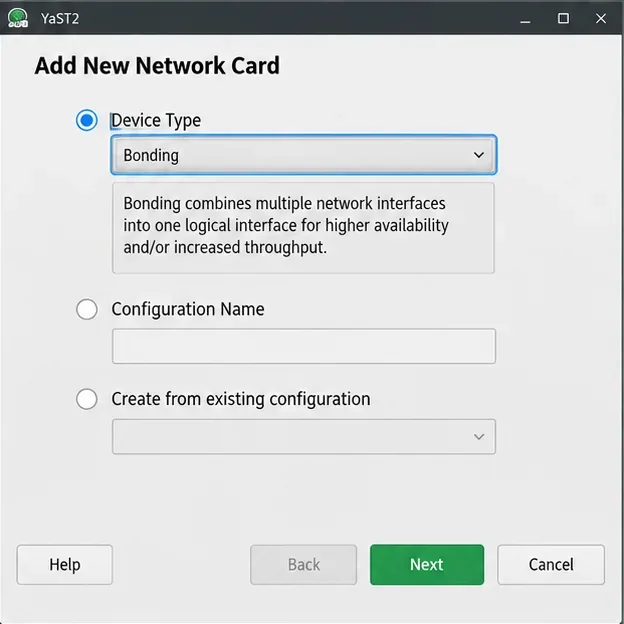
Click Add, change Device Type to Bonding, and click Next. YaST opens the network card setup for the new logical bond. Do not try to make both physical adapters independently own the same static address.
On the Address tab, choose Dynamic Address if your infrastructure supplies an appropriate DHCP lease, or Statically Assigned IP Address for a server with a fixed address. In a static deployment, move the previous management address and subnet to the bond and ensure the old physical interface does not retain a duplicate IP. Confirm the default gateway on the Routing tab and DNS under Hostname/DNS as appropriate; do not assume static addressing populates them automatically.
Open Bond Ports and check the two intended adapters. In Bond Driver Options, select active-backup for simple redundancy and keep miimon=100. This checks member-link state at a 100-millisecond interval; it is not a guarantee that all upstream failures will be detected. Select Next, accept any prompt to adapt the old individual-interface configuration by choosing Continue, and click OK to commit the new bond. You may briefly lose access while the IP moves to bond0.
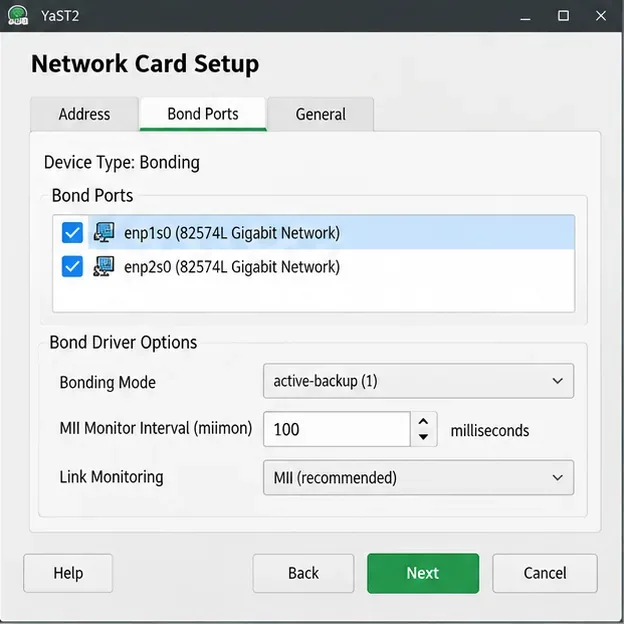
These screen views focus on the controls described in SUSE's SLES 15 SP7 YaST bonding instructions; the exact layout or wording can vary with the installed YaST version and graphical or text interface.
Manual configuration is a fallback for administrators who cannot use YaST. SUSE documents the /etc/sysconfig/network/ifcfg-* format for Wicked-managed hosts. Back up the original network files outside the live /etc/sysconfig/network directory and retain console access before proceeding:
sudo mkdir -p /root/network-bond-backup
sudo cp -a /etc/sysconfig/network/ifcfg-enp1s0 /root/network-bond-backup/
sudo cp -a /etc/sysconfig/network/ifcfg-enp2s0 /root/network-bond-backup/
If a named source file is absent, inspect the directory and back up the actual file instead of assuming the name. For this illustrative static-IP configuration, create /etc/sysconfig/network/ifcfg-bond0 with the following contents, replacing the interface names and address with your real values:
STARTMODE='auto'
BOOTPROTO='static'
IPADDR='192.0.2.20/24'
BONDING_MASTER='yes'
BONDING_SLAVE0='enp1s0'
BONDING_SLAVE1='enp2s0'
BONDING_MODULE_OPTS='mode=active-backup miimon=100'
Each member's ifcfg file must no longer have its own IP configuration. For example, place only these lines in both ifcfg-enp1s0 and ifcfg-enp2s0:
BOOTPROTO='none'
STARTMODE='hotplug'
Keep any necessary system-wide route and resolver configuration consistent with the new bond. Inspect the configuration and bring up the logical interface with Wicked:
sudo wicked show-config
sudo wicked ifup all bond0
Use sudo wicked ifreload bond0 after later edits to the running bond. Do not use systemctl to start or stop an individual bonded device; SUSE specifies wicked for that task. For supported file parameters, consult the SUSE manual bond configuration reference and the locally installed man 5 ifcfg-bonding page.
The bond exists but has no IP address: Check that the address was assigned to bond0, not to a member, and confirm the DHCP server or static address settings. A missing gateway or incorrect VLAN can make the server unreachable even when both ports report carrier. Inspect ip route and your actual switch-port configuration before repeatedly restarting the network.
The bond reports a down member: Check cable, switch-port status, interface selection, and driver messages. Ensure the member names in BONDING_SLAVE0 and BONDING_SLAVE1 match ip -br link. Link monitoring detects relevant interface/carrier changes, but not every possible failure beyond the directly connected switch.
Traffic fails after switching to 802.3ad: Confirm the switch's LACP group and port settings first. A bond set to LACP while its switch ports remain ordinary independent ports is a configuration mismatch. If the purpose is simply failover, return to active-backup rather than introducing switch aggregation unnecessarily.
Check the live bond, its member interfaces, and routing:
sudo wicked ifstatus --verbose bond0
ip -br addr show bond0
ip route
cat /proc/net/bonding/bond0
The bond should have the intended IP address, its link should be up, and the kernel status file should list both member interfaces. In active-backup mode, check the Currently Active Slave field and each member's MII Status. The exact output depends on your driver and configuration; the Linux kernel bonding documentation describes this status interface.
Finally, confirm connectivity to the real default gateway and the service clients that must reach the host. During an approved maintenance window, briefly disconnect or disable only the currently active link while watching the bond status and a continuous connectivity test; the standby member should take over and connectivity should recover. Restore the link afterward and confirm both members show a healthy state. If the network remains unreachable, use your console access to restore the backed-up member configurations rather than making additional blind changes over SSH.
Create a redundant Ethernet connection on SLES 15 with YaST and Wicked, configure active-backup bonding, and verify both ports and failover.
Turn an existing SLES 15 system into a reviewed AutoYaST profile, validate it, and use it to deploy a test server with fewer manual steps.
Install the SLES 15 KVM and libvirt tools, enable the right host service, and configure selected virtual machines to start after a reboot.
Use systemd jobs and the previous boot journal to locate a slow service, mount, or storage dependency, then correct it without masking the cause.
Use firewall-cmd to inspect the active zone, allow HTTP safely, preserve SSH access, and verify that the rule survives a reload on SLES 15.
Trace a PAM failure to its service, account policy, or identity provider, then repair the right SLES configuration while preserving a working admin session.
Trace a failed kernel module at SLES startup, correct an obsolete boot entry or repair the required driver, and verify the next boot.
Prepare SCSI SAN paths, enable multipathd, inspect SUSE’s hardware defaults, and verify stable device maps without guessing array settings.
Find the process holding Zypper’s package lock, distinguish process conflicts from package locks, and retry updates without deleting lock files blindly.
Register SLE HA, bootstrap SLES 15 nodes, then add fencing, quorum, and tested service resources before relying on failover.