
How to change color image to black and white in Microsoft Word

Microsoft Word is a text editor that is widely used today. Here, there are many tools to support your typing and composing easier, especially with Word, users can easily convert color images to black and white like Photoshop.

In order to help everyone do this easily and quickly, today WebTech360 will introduce the article on changing color to black and white image on Microsoft Word, invite you to join us.

Instructions for converting color images to black and white in Microsoft Word

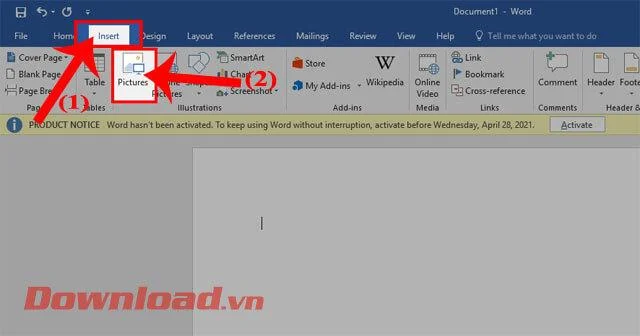
Step 1: First, open a new document compose file, then click Insert.

To be able to insert pictures into your text, click on Pictures.

Click Insert> Pictures

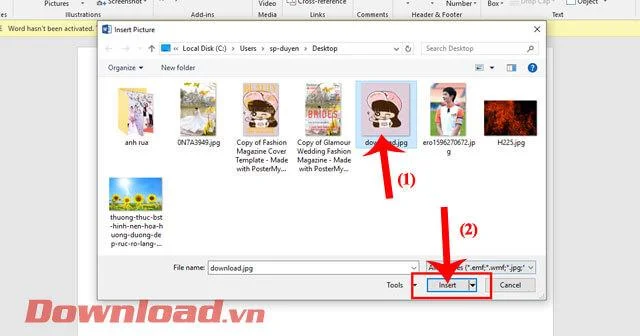
Step 2: Select a picture on your computer that you want to add to the text, then click the Insert button.

Select images in computer


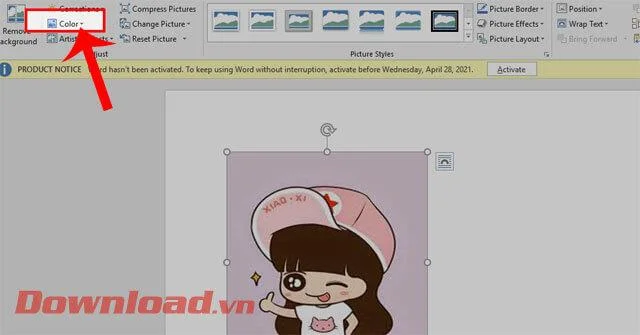
Step 3: To change the color of the image, click on Color.

Click on Color

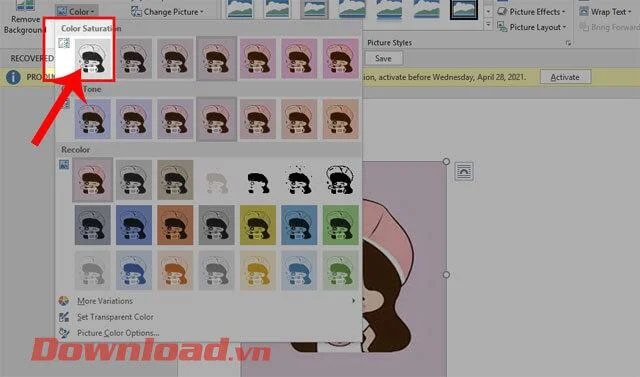
Step 4: In the Color Saturation section  , then select the available black and white color style.

Choose the available black and white color style

In addition, you can learn more about some other features of the Color item in Word:

  • Color Saturation: Select a primary color for the image.
  • Color Tone: The dominant color for the image.
  • Recolor: Reselect a color effect for the image.

Below you will see the converted image from color to black and white.

The image after it has been changed to black and white

The image after it has been changed to black and white

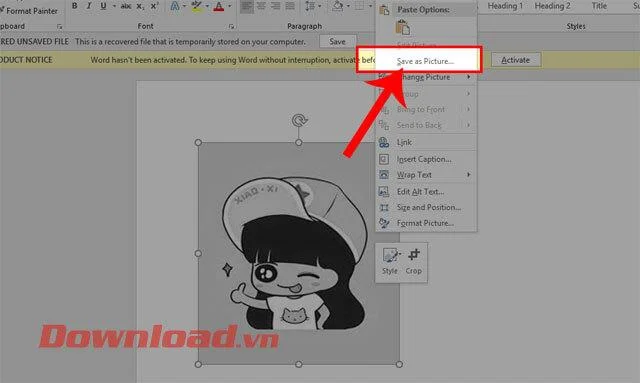
Step 6: After the picture has been turned black and white, right-click on the image, then click Save as Pictures.

Right-click and click Save as Pictures


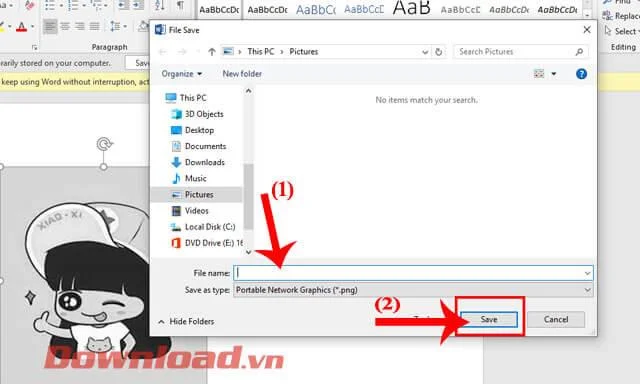
Step 7: Select a save location and name the image file, then click on the Save button.

Choose a location and name the image file and click the Save button

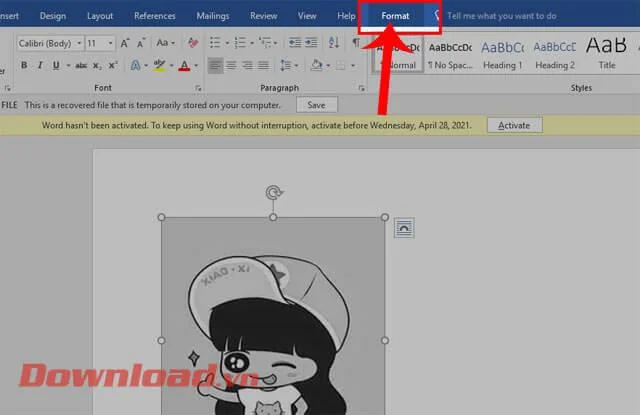
Step 8: To restore the colors of the image to the original, we will first click on the Format item.

Click the Format button

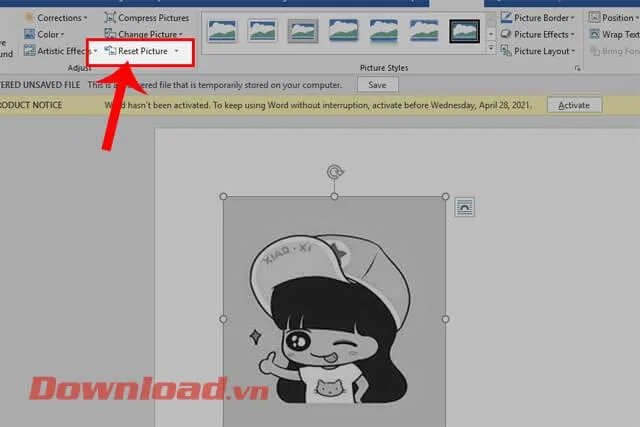
Step 9: Next, click Reset Pictures, to restore the photo.

Click on Reset Pictures

Wish you all success!

Reduce a color picture to shades of a single color

Publisher for Microsoft 365, Publisher 2019, Publisher 2016, Publisher 2013, Publisher 2010, Publisher 2007, Less

You can simplify a color picture in Publisher by reducing the number of colors in the picture. Doing so can reduce the picture's file size and reduce the cost of printing. Applying a uniform color to all pictures in your publication can also unify your publication.

Newer versions

Change a picture to shades of a single color

  1. Click the picture that you want to change.

  2. On the Format tab, click Recolor, and then click the color that you want, or to see more color choices, click More Variations.

Restore the picture's original colors

The picture's original color information remains stored with the image, so you can restore the picture's original colors at any time.

  • Click the picture, click the Format tab, and then click Reset Picture.

Change a picture to grayscale or to black-and-white

  1. Click the picture that you want to change.

  2. On the Format tab, click Recolor, and then choose Grayscale.

Restore the picture's original colors

The picture's original color information remains stored with the image, so you can restore the picture's original colors at any time.

  • Click the picture, click the Format tab, and then click Reset Picture.

Office 2007 - 2010

You can reduce the number of colors in a picture in one of three ways:

  • Change the picture to shades of a single color.

  • Change the picture to grayscale.

  • Change the picture to black-and-white.

Note: You can change pictures that are in Encapsulated PostScript (EPS) format only to grayscale or to black-and-white.

Change a picture to shades of a single color

  1. Right-click the picture that you want to change, and then click Format Picture on the shortcut menu.

  2. Click the Picture tab.

  3. Under Image control, click Recolor.

  4. In the Recolor Picture dialog box, click the arrow next to Color, and then click the color that you want or to see more color choices, click More Colors, select the options that you want, and then click OK.

    Note: If your publication uses spot colors, More Colors is not available.

  5. Do one of the following:

    • Click Recolor whole picture to apply tints of the selected color to the entire picture.

    • Click Leave black parts black to apply tints of the selected color to only those parts of the picture that are not black or white.

Restore the picture's original colors

The picture's original color information remains stored with the image, so you can restore the picture's original colors at any time.

  1. Right-click the picture, and then click Format Picture on the shortcut menu.

  2. Click the Picture tab.

  3. Click Recolor.

  4. In the Recolor Picture dialog box, click Restore Original Colors.

Change a picture to grayscale or to black-and-white

  1. Right-click the picture that you want to change, and then click Format Picture on the shortcut menu.

  2. Click the Picture tab.

  3. Under Image control, in the Color list, click Grayscale or Black and White.

Restore the picture's original colors

The picture's original color information remains stored with the image, so you can restore the picture's original colors at any time.

  1. Right-click the picture, and then click Format Picture on the shortcut menu.

  2. Click the Picture tab.

  3. Under Image control, in the Color list, click Automatic.

    Note: You can restore all of the picture's original settings by clicking Reset.

Leave a Comment

How to Add Font to Canva

How to Add Font to Canva

Learn exactly how to add font to Canva with this step-by-step guide. Upload custom fonts through Brand Kit to use them across all your designs in minutes.

How to Use Skype

How to Use Skype

How to Use Skype for free video calls, messaging, and screen sharing. Follow this complete guide to install the app, set up your account, and start communicating in minutes.

How to Clear Google History

How to Clear Google History

Learn how to clear Google history quickly to protect your privacy. This step-by-step guide shows you how to delete search activity from your Google account on any device.

How to Delete History on Chromebook

How to Delete History on Chromebook

Learn exactly how to delete history on Chromebook to protect your privacy. Follow these precise steps to clear browsing data, cookies, and cached files on your device.

How to Find a Server on Discord

How to Find a Server on Discord

Learn how to find a server on Discord with this clear walkthrough of the built-in Discovery tool and other reliable methods. Join active communities fast.

How to Change Search Engine in Chrome

How to Change Search Engine in Chrome

How to Change Search Engine in Chrome takes just a few clicks in Settings. Switch your default provider to Google, Bing, DuckDuckGo or another option and improve search results instantly.

How to Cast Netflix to Chromecast

How to Cast Netflix to Chromecast

Learn exactly how to cast Netflix to Chromecast from your phone or computer. Follow these steps to stream movies and shows to your TV in minutes.

How to Set Google as Your Homepage on Chrome

How to Set Google as Your Homepage on Chrome

Learn exactly how to set Google as your homepage on Chrome in under a minute. Follow the precise steps in Chrome Settings to make google.com load when you click the home button.

How to Add Pictures to Canva

How to Add Pictures to Canva

Learn how to add pictures to Canva in just a few clicks. This guide shows the fastest ways to upload your own photos or use Canva's library for any design project.

How to Create a QR Code in Canva

How to Create a QR Code in Canva

How to create a QR code in Canva is simple with the built-in generator. Follow these exact steps to add a working, customizable QR code to any design in under two minutes.