Home
» How to
»
How to Clean a Coffee Grinder Safely: A Beginner’s Guide for Burr and Blade Grinders
How to Clean a Coffee Grinder Safely: A Beginner’s Guide for Burr and Blade Grinders
A clean coffee grinder should grind at a normal speed, produce fewer stale-smelling grounds, and return to the grind consistency you expect from the machine. For a beginner, the most important thing to know is that burr grinders and blade grinders are cleaned differently, and removable plastic parts do not always have the same water-safety rules as the burrs, blades, or motor base.
The safest general approach is simple: unplug the grinder, remove loose coffee, brush the grinding parts dry, wash only the removable pieces your manual says can be washed, let everything dry completely, then reassemble and test. If your grinder’s manual conflicts with a generic instruction in this guide, follow the manual for your exact model.
First, Know Which Type of Grinder You Have
A burr grinder crushes coffee between two shaped grinding surfaces called burrs. The burrs may be conical or flat. Burr grinders usually have a bean hopper on top, a grind-size adjustment, a burr chamber, and an exit chute where ground coffee leaves the machine.
A blade grinder uses one or more fast-spinning blades inside a bowl or grinding chamber. It chops beans rather than feeding them between matched burrs. The chamber may be fixed to the motor base or removable, depending on the model.
This distinction changes what you should clean with water. For example, Breville’s Smart Grinder Pro instruction manual tells users to wash the hopper, hopper lid, grind container, and lid in warm soapy water, while cleaning the conical burrs and grind outlet with a brush. Fellow’s Ode cleaning guidance is even more explicit that the burrs should not be submerged in water.
What You Need Before You Start
A clean, dry grinder brush or another soft brush approved by the manufacturer
A soft microfiber cloth
Warm water and mild dish soap only for parts the manual identifies as washable
A dry towel or drying rack
A small container for holding beans you remove from the hopper
Your grinder’s user manual or official support page
You do not need harsh detergent, steel wool, abrasive scrubbers, or a sink full of water. KRUPS advises users to keep the grinder, cord, and plug dry and to avoid harsh detergents and abrasive scouring pads in its official burr-grinder support guidance.
Step 1: Unplug the Grinder, Empty It, and Remove Only Approved Parts
Turn the grinder off and unplug it from the wall before you put a brush, cloth, or fingers anywhere near the grinding mechanism. This is the first step in official cleaning guidance from Breville, Fellow, Hamilton Beach, and other manufacturers.
If you have a burr grinder, empty the hopper. Some grinders let you close a hopper gate and lift the hopper off with the beans still inside; others require you to pour the beans into a separate container. If the manual tells you to run the grinder briefly to clear remaining beans from the burr chamber, do that before unplugging it for the rest of the cleaning process.
Remove the hopper, grounds bin, and upper burr only if they are designed for user removal. Do not start unscrewing internal hardware simply because you can see it. Advanced lower-burr removal can affect calibration and is model-specific.
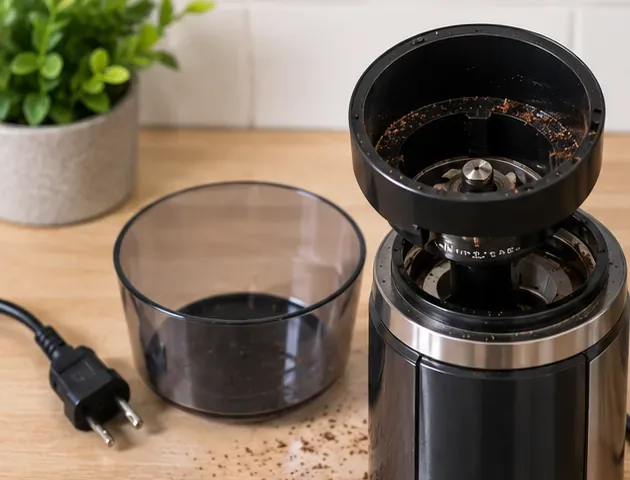
An unplugged burr grinder with removable parts taken off. Disconnect power before brushing or reaching into the burr chamber.
For a blade grinder, unplug the machine before removing the lid or grinding chamber. Hamilton Beach’s coffee-grinder use and care guide warns not to immerse the base, plug, or cord and reminds users to be careful around the sharp blade.
Step 2: Brush Out the Burrs, Chamber, and Exit Chute
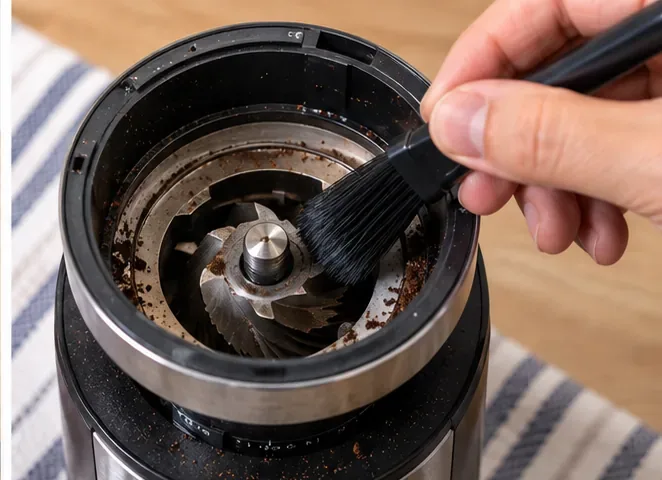
On a burr grinder, coffee fragments and oils collect around the burr teeth, inside the grinding chamber, and in the exit chute. Use a dry brush to loosen and sweep away this material. Hold the brush so your fingers stay away from sharp burr edges.
Brush loose grounds from the burrs and chamber while the grinder is unplugged. Burr edges can be sharp, so use the brush rather than your fingertips.
Breville’s conical-burr instructions tell users to brush the upper burr, lower burr, and grind outlet. Fellow’s current Opus maintenance instructions, updated in August 2026, likewise direct users to remove the outer burr and brush the burrs, and to brush the exit chute and anti-static area.
Do not pour water into the burr chamber. Even when a manufacturer permits washing the hopper or catch cup, that does not automatically mean the metal burrs, bearings, electronics, or motor cavity are washable.
If you have a blade grinder with a fixed grinding bowl, the procedure is different: use a soft, slightly damp cloth to wipe the bowl and blade only after the unit is unplugged, keeping water away from the motor base. Breville and Hamilton Beach both publish blade-grinder instructions built around careful wiping rather than soaking the electrical appliance.
Step 3: Wash Only the Removable Parts Your Manual Allows
Now separate the parts into two groups: parts the manufacturer says are washable, and parts that must stay dry.
On many grinders, the hopper, hopper lid, grounds container, and lid can be washed with warm soapy water. But dishwasher rules vary. Breville’s Smart Grinder Pro manual recommends hand-washing those parts and says it does not recommend cleaning grinder parts or accessories in a dishwasher. Some Hamilton Beach models with removable grinding chambers explicitly allow certain removable pieces in the dishwasher. This is why the model manual matters.
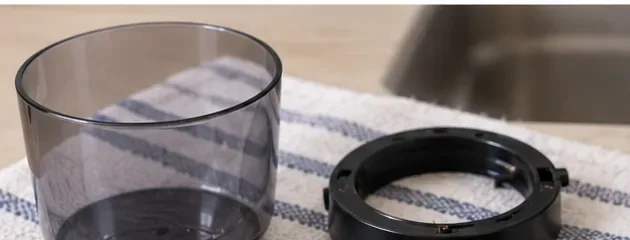
Removable plastic parts staged for cleaning. Wash only components that your grinder’s manual identifies as water-safe, then dry them completely.
Rinse soap away thoroughly and leave the approved washable pieces to air-dry or towel-dry until there is no moisture in seams, locking tabs, or openings. Do not reinstall a damp hopper above dry burrs where droplets could fall into the grinding chamber.
Wipe the exterior of the grinder with a soft damp cloth, then dry it. Never immerse the motor base, power cord, or plug.
Step 4: Reassemble Correctly and Test With a Small Amount of Coffee
Once every washed part is completely dry, reinstall the upper burr in the correct orientation and lock it exactly as the manufacturer describes. Replace the hopper and grounds container. If your grinder has alignment arrows or lock marks, verify them before adding beans.
A fully reassembled burr grinder ready for a small test grind. Confirm that the hopper and burr are locked before switching the machine on.
Add a small dose of coffee and run the grinder. Listen for the normal motor sound and confirm that grounds exit freely. If you removed and reinstalled a burr assembly that affects calibration, follow the manufacturer’s recalibration instructions before judging grind size.
A clean grinder should not sound strained or show obvious clogging. If the motor runs but little or no coffee exits, unplug it again and check the chute and burr seating. If you hear scraping, grinding metal, or a new mechanical noise, stop rather than continuing to run the machine.
Can You Use Grinder-Cleaning Tablets?
Yes, for some burr grinders, provided the grinder manufacturer permits them and the product is specifically designed for coffee grinders. Tablets or cleaning granules can absorb oils without requiring a full burr-chamber disassembly.
Baratza’s grinder cleaning guide lists grinder-cleaning tablets as an optional method. Fellow’s Ode instructions also describe using grinder-cleaning tablets, then grinding coffee afterward to clear remaining tablet residue.
Tablets are convenient, but they do not replace removing a foreign object, clearing a severe chute blockage, or correcting a burr that was installed incorrectly.
Should You Clean a Burr Grinder With Rice?
Do not use ordinary rice in a burr grinder unless the manufacturer of your exact machine explicitly instructs you to do so. Baratza’s official grinder-myth guidance warns that rice can strain the motor, wear the burrs, create a gummy mess, and leave residue. Breville’s current coffee-grinder guidance also says rice should not be used in burr grinders.
There is an important exception to the broad “never rice” slogan: some blade-grinder manuals do recommend raw white rice for specific models, particularly after grinding spices. That does not make rice safe for a burr grinder. Treat it as a model-specific blade-grinder technique, not a universal cleaning method.
How Often Should a Coffee Grinder Be Cleaned?
There is no single interval that fits every grinder. Usage volume, bean roast, oil buildup, and grinder design all matter.
Baratza currently recommends routine cleaning roughly every four to six weeks for its grinders. Fellow says a daily-use Ode burr grinder should have its burrs cleaned at least every three months, while clearing old grounds from the chute more frequently. Breville’s general consumer guidance suggests more frequent cleaning for grinders used heavily or with oilier coffee.
For a beginner, a useful schedule is to inspect rather than wait for a failure. Brush away loose grounds whenever buildup becomes visible, empty the grounds bin after use, and deep-clean according to your manufacturer’s interval. Clean sooner if you notice stale odors, slower grinding, more retained coffee, a clogged chute, or a sudden increase in mess around the exit.
Common Mistakes to Avoid
Cleaning while plugged in: disconnect power before removing burrs or reaching into any grinding chamber.
Washing the burrs by default: many manufacturers specify dry brushing instead. Water can create corrosion or reach parts that are difficult to dry.
Putting every removable part in the dishwasher: dishwasher safety varies by model.
Using ordinary rice in a burr grinder: manufacturers such as Baratza warn that it can damage or clog burr-grinder mechanisms.
Using abrasive pads or harsh cleaners: these can damage surfaces and leave residues.
Reassembling damp parts: wait until water is completely gone before putting the grinder back together.
Taking apart more than the manual describes: lower-burr removal, calibration hardware, shims, and washers can be model-specific.
When Cleaning Is Not Enough
Cleaning can fix retained grounds, oil buildup, and many minor clogs, but it cannot repair a worn motor, broken burr carrier, damaged gearbox, bent blade, or failed switch. If the grinder still will not start after correct reassembly, check the manual for safety interlocks such as a hopper or lid that must be fully locked.
If the grinder makes an abnormal mechanical sound, repeatedly jams with normal coffee beans, or has visible damage, stop using it and contact the manufacturer or an authorized service provider. Baratza, for example, publishes model-specific troubleshooting, parts diagrams, and repair resources through its official product support hub.
Bottom Line
For most electric coffee grinders, good cleaning is more about controlling where water does not go than about scrubbing everything. Unplug first, remove only user-serviceable parts, brush burrs and chutes dry, wash only approved containers and hoppers, dry everything completely, then reassemble and test with a small amount of coffee.
If you remember one beginner rule, make it this: the removable hopper and the grinding mechanism are not automatically cleaned the same way. Check the manual before soaking, dishwashing, removing a lower burr, or running any cleaning material through the grinder. That keeps routine maintenance simple and greatly reduces the chance of turning a dirty grinder into a damaged one.