Home
» How to
»
How to Clean a Faucet Aerator: A Beginner’s Guide to Restoring Flow
How to Clean a Faucet Aerator: A Beginner’s Guide to Restoring Flow
A faucet aerator is the small fitting at the end of a faucet spout that shapes the water stream and, on many faucets, helps control flow. When its tiny screens or passages collect mineral scale, sediment, or pipe debris, the faucet may start spraying sideways, flowing unevenly, or producing less water than it used to.
For a first-time cleaning, the most important idea is simple: identify the aerator style before you try to remove it. Some aerators have visible threads and unscrew by hand. Others are recessed into the spout and require a small aerator key. Some designs use a deeper “stream breaker,” and a few faucet models are meant to be cleaned in place rather than routinely pulled out.
The U.S. Environmental Protection Agency’s WaterSense program recommends periodically checking faucet aerators for scale buildup and cleaning or replacing them when buildup restricts flow. See the EPA WaterSense home maintenance guidance. Manufacturer directions still take priority because removal tools, soaking instructions, and finishes vary by faucet.
What should you know before you start?
The word aerator is often used for the entire removable tip at the outlet of the faucet, but that tip may contain several pieces: a metal or plastic housing, one or more screens, a plastic flow insert, and a rubber gasket or O-ring that seals the connection. A cache aerator or keyed aerator sits recessed inside the end of the spout and usually has no outer flats for a wrench. A stream breaker is another internal outlet device that straightens or breaks up the stream.
KOHLER’s current aerator-removal guidance illustrates three common categories: a visible threaded aerator, a keyed aerator with a smooth exterior, and a recessed stream breaker. See the KOHLER aerator removal guide.
What you see
Likely type
Typical removal approach
Main beginner risk
A round tip with visible threads or wrench flats
Threaded aerator
Unscrew counterclockwise by hand or with protected grip
Scratching the finish or crushing the housing
A smooth tip recessed into the spout
Keyed/cache aerator
Use the correct aerator key
Using pliers and damaging the slots or spout
A grid or insert set deeper inside an unusual spout
Stream breaker or model-specific outlet
Follow the manufacturer’s removal steps
Pulling the wrong part or losing internal screens
Do you need to shut off the water under the sink?
For a normal removable aerator at the end of a manual faucet, closing the faucet handle is usually enough because you are not opening the pressurized plumbing below the sink. If you are working on a touchless faucet, a special commercial fixture, or any model whose instructions call for shutting the supply, follow that model’s procedure.
What you need
A towel or soft cloth to protect the faucet finish
A small bowl or cup
White vinegar and water, if the manufacturer allows vinegar for the aerator parts
A soft toothbrush or other soft-bristle brush
The correct aerator key for a recessed/keyed design
An adjustable wrench, strap wrench, or pliers only when the faucet instructions allow it
A sink stopper, drain cover, or towel to keep tiny parts from disappearing down the drain
Your faucet model number or official parts diagram if the aerator type is unclear
Vinegar is useful for mineral scale, but do not assume the entire decorative aerator housing should be submerged. KOHLER has maintenance instructions for some faucets that say to soak only the plastic insert in a 50/50 mixture of vinegar and water. See the KOHLER maintenance guide. That is why model-specific directions matter before soaking plated or finished parts.
How to clean a faucet aerator step by step
1. Turn the faucet off and protect the drain
Close the faucet handle completely. Put the sink stopper in place or cover the drain with a towel. Aerators can contain small screens, gaskets, and plastic inserts that are easy to drop.
Wipe the outside of the spout so you can see where the aerator begins. If it is recessed and smooth, stop before reaching for pliers; it may require a key.
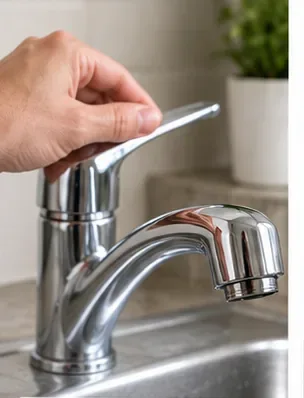
Turn the faucet off before removing the aerator, and protect the drain so small parts cannot fall into it.
2. Remove the aerator using the correct method
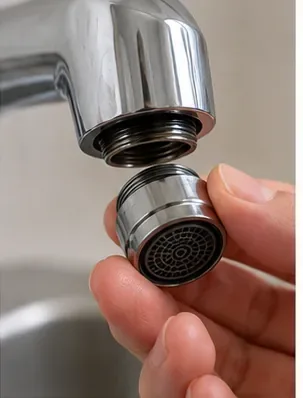
For a standard threaded aerator, try turning it counterclockwise by hand first. If it is stuck, wrap the housing in a soft cloth before using a suitable wrench or gripping tool so the finish is not contacted directly by metal jaws.
For a recessed aerator, use the matching aerator key. KOHLER sells model-specific aerator keys, and its installation guides show keyed aerators being removed with the supplied tool. Do not force a key that does not fit.
Some faucets are exceptions. Delta’s support information for certain outlet assemblies directs owners to clean the exposed end with a cloth saturated in a 50/50 white-vinegar-and-water solution rather than routinely removing the part. See the Delta RP90059 support page. If your aerator does not loosen with reasonable effort, identify the exact faucet before applying more force.
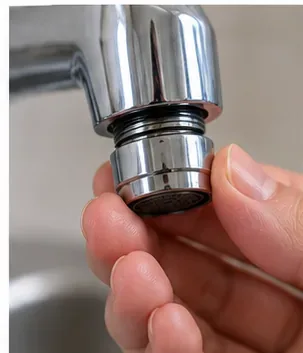
Remove a threaded aerator gently and counterclockwise; recessed versions may require a model-specific key instead.
3. Lay out the pieces in the order they came out
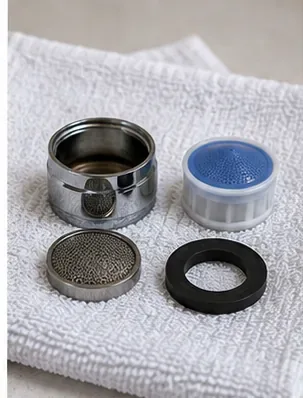
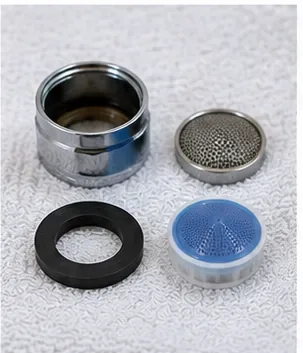
Set the aerator parts on a clean towel. Keep the gasket, screens, housing, and flow insert in the same orientation so reassembly is straightforward. If several layers come apart, take a phone photo before moving them.
Inspect the rubber gasket for cracks or permanent flattening and check plastic parts for damage. A torn seal or broken insert is a replacement problem, not something soaking will repair.
Lay out the aerator pieces in order so the screen, flow insert, housing, and gasket can be reassembled correctly.
4. Soak only the parts the manufacturer says can be soaked
For mineral or calcium buildup, a 50/50 mixture of white vinegar and water is a common manufacturer-approved method. KOHLER instructs owners of its Katun stream breaker to clean the part with a 50/50 solution of white vinegar and warm water. Delta also recommends a 50/50 vinegar-and-water soak for several removable aerators. See the KOHLER Katun stream-breaker instructions and the Delta RP84385-1.2 aerator guidance.
There is no single soak time that applies to every faucet. Some Delta support instructions use a few hours or even an overnight soak for specific parts, while other manufacturer pages simply tell you to soak or clean with the solution. Follow the time given for your model. If the instructions limit vinegar to an internal insert, keep the decorative housing out of the solution.
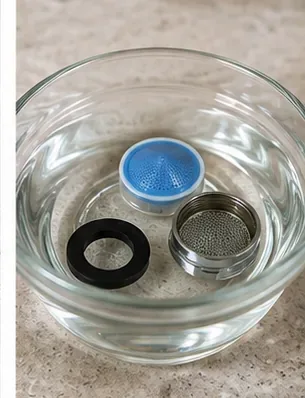
Soak only manufacturer-approved aerator components; some faucets allow the whole removable aerator, while others specify only an internal insert.
5. Loosen remaining scale with a soft brush
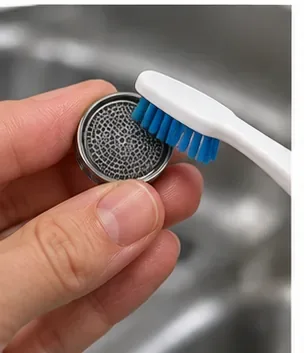
After soaking, use a soft toothbrush to work gently across the screen and around small passages. Do not use a metal pick, wire brush, knife, or abrasive pad. Those tools can enlarge openings, tear screens, or scratch finished surfaces.
Delta specifically recommends a clean soft toothbrush after a vinegar-and-water soak on some aerators. The goal is to remove softened deposits, not to reshape or pry apart the screen stack.
Use soft bristles to lift softened scale from the screen without bending the mesh or scratching the aerator.
6. Rinse, inspect, and flush loose debris from the spout
Rinse the cleaned pieces thoroughly with clean water. Hold the screen up to the light and confirm that the openings are clear. Check that the gasket is clean and still flexible.
If your faucet instructions recommend flushing the spout with the aerator removed, do that before reassembly. KOHLER installation guidance for some faucets calls for running water through the open spout for about one minute to remove debris before reinstalling the aerator. See the KOHLER keyed-aerator installation guide. Expect more splash than usual while the aerator is off, and do not use this step if the manufacturer gives different directions.
Rinse away vinegar and loosened debris, then inspect the screen, insert, housing, and gasket before reassembly.
7. Reassemble and reinstall without overtightening
Put the parts back in their original order. Make sure the gasket sits flat and is not twisted. Start the aerator threads by hand so you can feel whether they are engaging correctly.
Threaded aerators should generally be snug rather than aggressively tightened. If a tool is needed for the final fit, protect the finish and use minimal force. For keyed aerators, use the key in the direction and position shown by the manufacturer.
Reinstall the aerator in the original orientation and tighten only enough to seat the gasket and stop leakage.
8. Test the stream and check for leaks
Turn on the faucet slowly. A clean aerator should produce an even stream appropriate for that faucet design, without new sideways jets. Look around the joint between the aerator and spout for drips.
If the aerator leaks at the threads, turn the faucet off and check the gasket position before tightening harder. If flow is still weak, the aerator may be damaged, another screen may remain clogged, or the restriction may be elsewhere in the faucet or supply line.
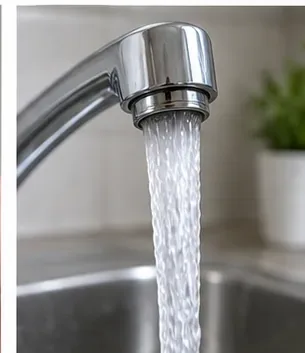
Test the faucet after reassembly; the stream should be even, and the aerator-to-spout connection should stay dry.
What if the aerator will not come off?
Stop before escalating to more force. First confirm whether the aerator is threaded, keyed, or a model-specific stream breaker. A smooth recessed outlet often needs a key, and some stream breakers use a set screw or a special removal procedure. KOHLER’s Katun instructions, for example, use a hex key plus small pliers or tweezers to remove the stream breaker from specific models.
Heavy mineral buildup can also lock a removable part in place. KOHLER recommends a towel soaked in a 50/50 white-vinegar-and-warm-water solution for several minutes to soften hard-water deposits around faucet parts before removal. See the KOHLER hard-water buildup guidance.
If the finish starts twisting, the spout itself moves, or the tool slips, stop and identify the faucet model. A replacement aerator costs far less than repairing a damaged spout.
Common mistakes to avoid
Using pliers directly on chrome or another finished surface. Metal jaws can leave permanent scratches or flats.
Forcing a recessed aerator without its key. Smooth or hidden aerators are often designed for a dedicated removal tool.
Mixing up the order of screens and gaskets. Take a photo before disassembly if the stack is unfamiliar.
Soaking every component in vinegar automatically. Some manufacturer instructions limit vinegar to a plastic insert or another specific component.
Using abrasive brushes or sharp picks. Damaged mesh can change the stream and flow characteristics.
Overtightening during reinstallation. This can distort a gasket, make future removal difficult, or damage threads.
Assuming low flow always means a dirty aerator. If cleaning does not help, the restriction may be in a cartridge, supply line, filter, or another internal part.
Trying to modify a flow restrictor to get more water. Aerators may be designed to meet efficiency and code requirements; replace damaged parts with the correct specification instead.
When should you replace the aerator instead of cleaning it?
Replacement makes more sense when the screen is torn, the plastic insert is cracked, threads are stripped, the housing is badly corroded, or cleaning no longer restores a stable stream. EPA WaterSense also advises replacing an aerator or other spout-end device when necessary if scale or malfunction is restricting performance.
If you are replacing a bathroom faucet aerator and water efficiency matters, the EPA WaterSense bathroom faucet page explains the WaterSense label for qualifying bathroom faucet accessories. Match the replacement to the faucet’s thread size, intended flow rate, and manufacturer requirements rather than choosing by appearance alone.
Beginner’s quick checklist
Identify the faucet model and aerator type before using tools.
Close the faucet and cover the drain.
Use the proper key or protect the finish before gripping a threaded aerator.
Keep the parts in order as you disassemble them.
Use vinegar only on components the manufacturer permits.
Brush with soft bristles and rinse thoroughly.
Flush the open spout only if the faucet instructions recommend it.
Reassemble with the gasket flat and avoid overtightening.
Test for even flow and leaks.
A faucet aerator is a small part, but it can have a noticeable effect on how the faucet feels and performs. For a beginner, the job is easiest when you resist the urge to force the part: identify the aerator, use the right removal method, dissolve mineral scale gently, preserve the order of the pieces, and follow the faucet maker’s instructions whenever the design differs from a standard threaded tip.