Home
» How to
»
How to Clean a Keurig Needle Safely: 4 Steps to Clear Coffee Grounds
How to Clean a Keurig Needle Safely: 4 Steps to Clear Coffee Grounds
The quickest safe answer: power off and unplug the brewer, remove any K-Cup pod, and let the machine cool. Then use a straightened paper clip to loosen coffee grounds from the entrance needle under the lid and, where your model allows access, the exit needle in the K-Cup pod holder. Reassemble the brewer, plug it back in, and run two cleansing brews with plain water and no pod. Keurig's own care guides use this paper-clip method and warn that the needles are sharp.
That is the right first move when you see coffee grounds in the cup, the brewer stops or sputters during a cycle, or it produces a partial cup. It is not a substitute for descaling when mineral buildup is the underlying problem. Because Keurig designs differ, especially on newer brewers with multiple entrance needles, use the instructions below as a model-aware process rather than assuming every pod holder comes apart in exactly the same way.
Source check: this guide was reviewed against Keurig support and official Keurig Use & Care guides in September 2026. For model-specific instructions, start with Keurig Support. The recent K-Crema Use & Care Guide documents cleaning the entrance-needle holes with a straightened paper clip and running two cleansing brews, while this official Keurig brewer care guide also documents removal of the pod holder and cleaning of the exit-needle area.
Is a clogged needle really the problem?
Clean the needle first when the problem looks like a coffee-ground blockage rather than a water-supply or scale problem. Keurig troubleshooting guidance specifically associates grounds in the cup with debris in the entrance or exit needle, and it lists a clogged exit needle as one possible cause of a partial cup.
What you notice
Best first move
Grounds in the cup, weak or interrupted flow, partial cup
Inspect and clean the needle openings, then run pod-free cleansing brews.
Descale light or notification is on
Follow the descaling procedure for your exact model; needle cleaning alone will not remove mineral scale.
No water flow after needle cleaning
Check the reservoir seating and model-specific troubleshooting, then descale if due.
Needle is bent, damaged, or inaccessible without force
Stop. Do not pry or reshape it; use Keurig support for model-specific service guidance.
What do you need before you start?
You only need a few things: a straightened metal paper clip, a mug large enough for cleansing brews, fresh water, and access to a sink. A damp, lint-free cloth is useful for wiping removable plastic parts, but do not put soap, vinegar, or another cleaner directly into a needle opening. If your model guide calls for descaling, treat that as a separate maintenance procedure.
Before touching the needle area, remove the pod, switch the brewer off, unplug it, and allow hot surfaces to cool. Keurig repeatedly warns that the puncture needles are sharp, so keep your fingers out of the pod-holder cavity and use the paper clip as the cleaning tool.
Step 1: Where are the Keurig needles?
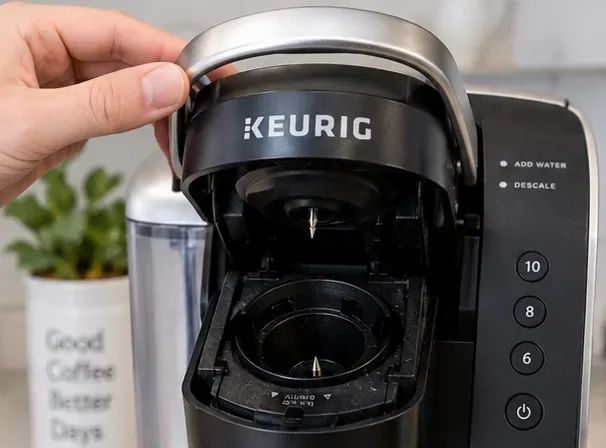
Lift the handle and look at the underside of the brewer lid. The upper puncture point is the entrance needle, which pierces the top of the K-Cup pod. Depending on the brewer, there may be one entrance needle or multiple entrance points/holes. The lower exit needle is associated with the K-Cup pod holder and punctures the bottom of the pod.
The open brewer shows the two areas you need to identify before cleaning: the entrance-needle area under the lid and the lower pod-holder area. Exact geometry varies by model.
If your pod holder does not release the way an older Keurig guide shows, do not force it. Search your model number on Keurig Support and follow that model's removal instructions. This is especially important on newer or specialty brewers whose puncture mechanism may differ from classic K-Cup machines.
Step 2: How do you clean the entrance needle?
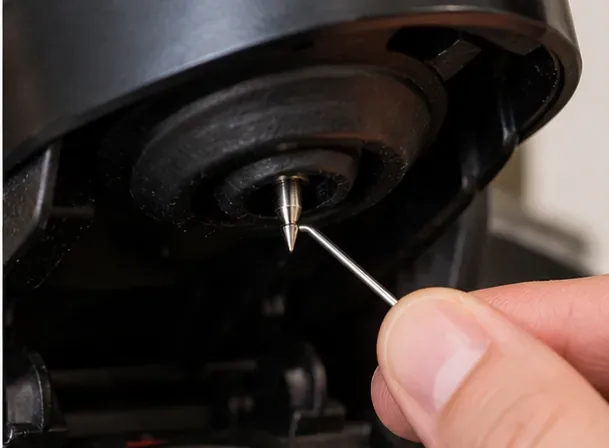
With the brewer unplugged and the handle raised, locate the small opening or openings in the entrance needle under the lid. Carefully insert the end of a straightened paper clip into each documented opening and gently move it around to loosen packed coffee grounds. You are clearing debris, not drilling or enlarging the hole, so stop if you meet hard resistance.
A straightened paper clip is used at the upper entrance-needle opening. Keep your fingers away from the sharp puncture point and use gentle movement rather than force.
Some Keurig models use multiple entrance needles or multiple holes. The K-Crema guide, for example, tells the user to clean all entrance-needle holes. That is why checking the exact brewer guide matters: cleaning only one visible opening may not address the entire flow path on a MultiStream-style design.
Step 3: How do you clean the exit needle and pod holder?
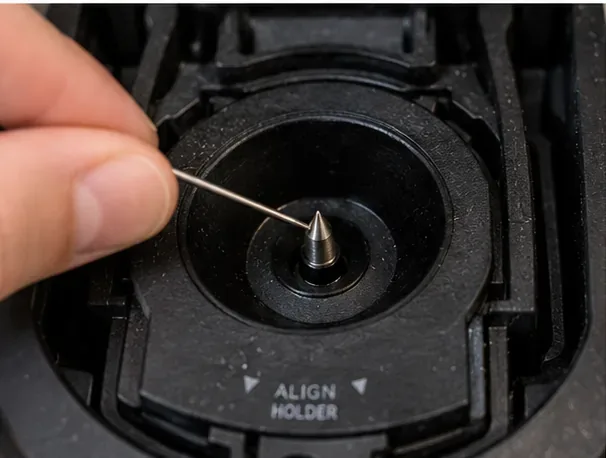
On Keurig designs with a removable K-Cup pod holder, remove the holder according to the model guide. Some guides then direct you to detach the funnel so you can reach the exit needle from the inside bottom of the holder. Insert the straightened paper clip into the exit-needle opening and move it gently to loosen coffee grounds. Rinse removable parts with water if the model guide permits it, then reinstall them in the correct orientation.
The lower exit-needle area can also trap grounds. On models with a removable pod holder, remove and clean that assembly exactly as the brewer's Use & Care guide directs before reinstalling it.
Do not put a fingertip into the pod holder to feel whether the opening is clear. The lower puncture needle is sharp even when the brewer is unplugged. Also avoid bending the needle sideways; a clog should release with gentle probing, not leverage.
Step 4: How do you rinse and verify the result?
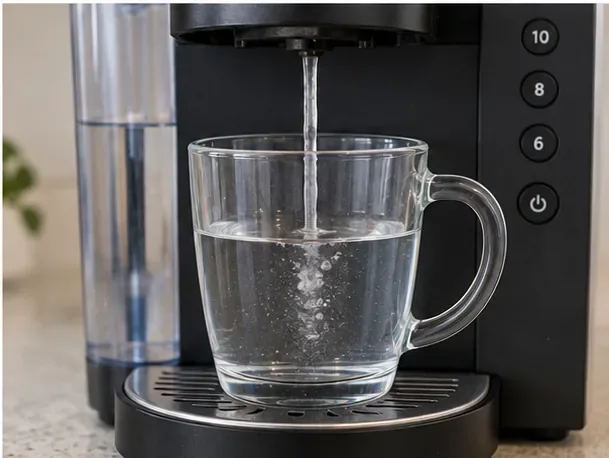
Reinstall the pod holder and any funnel or filter component you removed. Fill the reservoir with fresh water, plug the brewer back in, place a large mug on the drip tray, and make sure there is no K-Cup pod in the chamber. Keurig's current care guidance for the entrance needle calls for two cleansing brews after the debris is loosened.
Finish with pod-free cleansing brews using fresh water. Two cleansing brews are specified in Keurig's needle-cleaning guidance for the models reviewed here.
After the second rinse, brew a normal cup and judge the result by what actually changed: the machine should dispense the expected volume, flow should be reasonably steady, and loose grounds should no longer appear in the cup. If the brewer still produces a short cup or weak flow, repeating the paper-clip step once is reasonable if you can still see debris. Repeated aggressive probing is not.
Should you descale instead of cleaning the needle?
Use needle cleaning for coffee-ground obstruction. Use descaling for mineral buildup inside the water path and heating system. They solve different problems. A brewer can need both, but one does not replace the other.
Descaling intervals vary by model and water conditions. For example, recent Keurig guidance on some models says to descale every three months or when the descale notification appears, while older models may specify a different interval. Follow the schedule in the guide for your exact machine rather than relying on a universal calendar rule.
If a descale notification is on, or if flow remains poor after the needle is clear, move to the official descale procedure. The current Keurig guides reviewed for this article specify Keurig Descaling Solution for their formal descale process. Do not pour descaling solution, vinegar, dish soap, or another cleaner directly into the puncture needles.
How do you know the cleaning actually worked?
A successful result is practical, not cosmetic. Look for these signs during the next few brews:
The cup reaches the selected volume instead of stopping noticeably short.
Water or coffee leaves the brewer in a continuous, predictable stream rather than sputtering because of a visible grounds blockage.
No fresh coffee grounds appear in the finished cup.
The brewer completes a normal cycle without interruption that was previously associated with the clog.
If only one symptom improves, do not assume the machine is fully fixed. For example, a needle cleaning may remove grounds from the cup while a separate scale problem still limits flow. That is the point at which switching from needle cleaning to model-specific descaling or troubleshooting makes more sense than repeatedly inserting the paper clip.
When should you stop and use a different approach?
Stop the manual cleaning process if the paper clip will not enter the documented opening without force, a needle looks bent or damaged, the pod holder does not release as your model guide says it should, or the brewer continues to deliver partial cups after the needle path is clear and appropriate descaling has been completed. Those signs suggest the problem may be elsewhere in the water path or may require service rather than more scraping.
Keurig's support site lets you select the brewer family and view model-specific FAQs, Use & Care guides, and troubleshooting. That is the best next step when your machine's layout does not match a generic cleaning tutorial. It also avoids treating a newer multi-needle puncture mechanism as though it were an older single-needle design.
Can you prevent the needle from clogging again?
You cannot eliminate every stray coffee ground, but a few habits reduce the chance of another blockage. Remove used pods after brewing instead of leaving them in the holder, keep the pod-holder area free of loose grounds, and clean removable parts on the schedule in your model guide. If your brewer starts producing grounds in the cup or a noticeably partial brew, address it early rather than waiting for flow to stop completely.
The main rule is simple: clear coffee grounds gently, verify the result with water-only brews, and switch to descaling or model-specific support when the symptoms point beyond the needle. That keeps the fix proportional to the problem and reduces the temptation to force delicate parts that were not designed to be pried apart.