Home
» How to
»
How to Clean a Sink Faucet Head: Choose the Right Method for Buildup, Sediment, and Low Flow
How to Clean a Sink Faucet Head: Choose the Right Method for Buildup, Sediment, and Low Flow
If your sink faucet sprays unevenly, feels weaker than it used to, or has a crusty white ring around the outlet, the problem is often at the faucet head rather than inside the plumbing. The best cleaning method depends on what is blocking the water and what type of outlet you have.
For light surface buildup, wiping flexible spray nozzles may be all you need. For sand or debris trapped behind an aerator screen, removal and rinsing usually makes more sense. For mineral scale, a manufacturer-approved vinegar solution can be effective. The tradeoff is that stronger or longer chemical exposure is not automatically better, especially on decorative finishes or pull-down spray heads with more parts.
First, Identify What You Are Cleaning
The term faucet head can mean several things. On a standard bathroom or kitchen faucet, the outlet often contains an aerator: a small assembly that mixes air with water and helps shape the stream. On a pull-down or pull-out kitchen faucet, the larger spray head may include an aerator, multiple spray outlets, rubber nozzles, a selector button, and internal seals.
That difference matters because a removable metal aerator can often be cleaned separately, while soaking an entire pull-down spray head may expose finishes, buttons, seals, or internal components that the manufacturer did not intend to sit in a cleaning solution.
As of September 2026, official manufacturer guidance supports several different approaches rather than one universal recipe. Delta’s aerator guidance recommends removing a mineral-clogged aerator, soaking it in vinegar, flushing it with water, and using a toothbrush for stubborn deposits. Pfister’s faucet-care instructions describe removing an aerator and soaking it in a warm 50/50 water-and-white-vinegar solution for roughly 60 minutes. Meanwhile, easy-clean spray faces such as Kohler MasterClean are designed so mineral buildup can often be wiped away with a wet cloth instead of requiring a soak.
Which Cleaning Method Should You Choose?
Method
Best for
Main advantage
Main tradeoff
Wet cloth or finger-rub on soft nozzles
Light scale on flexible spray holes
Fast and least invasive
Does not remove debris trapped inside an aerator
Remove and rinse the aerator
Sand, grit, or loose debris causing uneven flow
No chemical exposure
Requires correct removal method and careful reassembly
50/50 white vinegar and water soak
Mineral or hard-water deposits on a removable part when approved
Dissolves mineral scale more effectively than plain water
Long exposure may be inappropriate for some finishes or components
Replace the aerator or spray insert
Cracked screens, damaged seals, deformed parts, or buildup that will not clear
Restores the original part condition without aggressive cleaning
You need the correct replacement for your exact faucet model
What You Will Need
A soft cloth or microfiber towel
A bowl or cup for removable parts
Clean water
White vinegar only if your faucet manufacturer permits it
A soft toothbrush for stubborn deposits on removable parts
The aerator key or removal tool if your faucet uses a recessed “cache” aerator
A small towel to protect the sink and keep tiny washers from disappearing down the drain
Your model number or owner’s manual if the outlet design is unfamiliar
Avoid starting with pliers, abrasive pads, bleach, acidic bathroom cleaners, or metal picks. Delta’s official finish-care guidance warns against abrasive cleaners, harsh polishes, bleach-based cleaners, and strong acids or caustic products. The same page says a 50/50 white-vinegar-and-water solution may be used for hard-water stains on Delta finishes when followed by a thorough water rinse. Other brands may set different limits, so model-specific guidance still takes priority.
How to Clean a Sink Faucet Head in Four Steps
Step 1: Start With the Least Aggressive Cleaning Method
Run the faucet and look closely at the spray pattern. If the water still flows strongly but a few jets shoot sideways, the problem may be mineral buildup directly on the outlet. If your faucet uses soft rubber spray holes or an easy-clean spray face, try rubbing the deposits with a fingertip or wiping with a damp cloth first.
This is the lowest-risk option because you are not removing parts or exposing the faucet to a cleaning solution. Delta’s Touch-Clean spray holes are specifically designed so calcium and lime buildup can be wiped away, and Kohler’s MasterClean sprayface literature says the surface resists mineral buildup and wipes clean with a wet cloth.
If the stream remains weak or irregular after surface cleaning, the blockage is more likely inside the aerator or spray insert.
Step 2: Remove the Aerator Only if the Faucet Is Designed for It
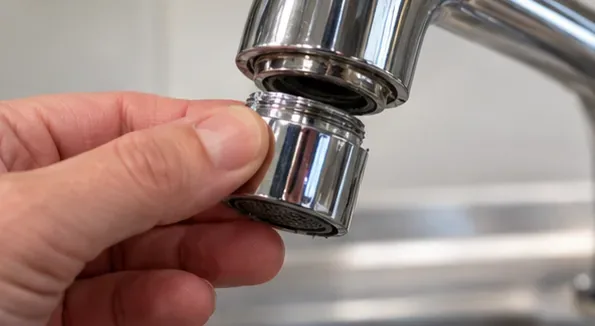
Close the faucet and place a towel over the drain. Many exposed aerators unscrew counterclockwise by hand. Recessed aerators often need a small model-specific key. Pull-down spray heads may use a removable aerator insert rather than requiring removal of the entire spray head.
A removable faucet aerator being unscrewed by hand. Recessed aerators may need the correct aerator key instead.
Do not grip a decorative faucet finish directly with bare pliers unless the manufacturer instructs you to do so. Pliers can scratch chrome, brushed finishes, matte coatings, and plated surfaces. If an aerator will not move, mineral deposits may be binding the threads. Delta recommends a towel soaked in a 50/50 white-vinegar-and-water solution around the spout on some models to loosen mineral buildup before removal.
As you take parts out, keep them in order. A typical aerator may contain a housing, screen, flow restrictor, mixer insert, and rubber washer. Not every aerator is meant to be fully disassembled, so stop at the point described in the owner’s manual.
Step 3: Match the Cleaning Method to the Type of Blockage
For loose sediment: rinse the removable aerator under clean running water. Turn it around and flush from both directions when the design allows. This is usually the best first choice for sand, grit, or construction debris because there is no need to expose the part to acid.
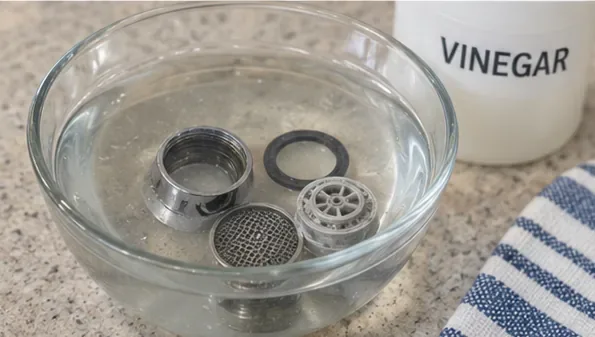
For mineral scale: use vinegar only when the manufacturer allows it. Delta recommends vinegar for aerator mineral deposits, and Pfister specifies a 50/50 mix of warm water and white vinegar for its aerator-cleaning guidance. A diluted solution provides mineral-removal power without assuming that full-strength vinegar or a harsher descaler is necessary.
Removable aerator parts soaking in a diluted vinegar solution. Use this method only when the manufacturer allows vinegar on the part and finish.
The safest practice is to soak the removable aerator or approved insert rather than the entire faucet head. That limits chemical contact with decorative finishes and internal components. If your manufacturer specifies a soak duration, follow that value instead of leaving the part overnight by default. Pfister, for example, gives an approximately 60-minute soak for the procedure on its support page, while Delta has model-specific support answers that call for longer soaking in some cases.
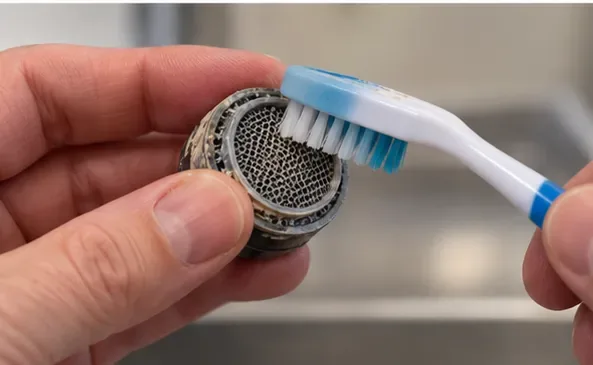
For remaining scale after soaking, use a soft toothbrush rather than a pin or metal pick. Metal tools can enlarge precision openings or damage a screen.
A soft toothbrush can loosen residue from an aerator screen after soaking without scraping the mesh with a metal tool.
If your faucet has flexible rubber nozzles rather than a removable screen, soaking may be unnecessary. A wipe-first approach preserves the finish, takes less time, and avoids disassembly. The tradeoff is that it will not solve sediment trapped behind the spray face.
Step 4: Rinse, Reassemble, and Test the Flow
Rinse every cleaned part thoroughly with fresh water, especially after vinegar. Reinstall screens, inserts, and washers in their original order. Thread the aerator on by hand first so you do not cross-thread it. Tighten only as much as needed to seat the gasket and prevent leakage; overtightening can damage plastic parts or make the next cleaning harder.
Turn the water on gradually and watch the stream. A successful cleaning should produce a more even pattern without water leaking around the aerator housing.
After reassembly, check for an even stream and make sure no water leaks around the aerator threads or housing.
If flow is still poor, remove the aerator again and briefly test the faucet only if the manufacturer’s troubleshooting procedure allows it. Strong flow without the aerator points to a remaining blockage or damaged aerator. Weak flow even with the outlet removed suggests the restriction may be elsewhere, such as the supply lines, cartridge, pull-down hose, or internal filter.
Vinegar Soak vs. Plain-Water Cleaning: Which Is Better?
Neither is automatically better. They solve different problems.
Choose plain water first when the obstruction looks like loose grit, when the faucet is new after plumbing work, or when you are unsure how a decorative finish reacts to acids. Rinsing is fast, leaves no chemical residue, and is unlikely to affect a finish because the removable part receives minimal exposure.
Choose a manufacturer-approved vinegar solution when you can see chalky white mineral scale or when the aerator remains clogged after rinsing. Vinegar is useful because it dissolves common mineral deposits, but longer soaking is not always an advantage. It exposes gaskets, plating, coatings, and plastics for more time.
Choose wipe-only cleaning when the spray face is designed with flexible easy-clean nozzles. In that case, removal and soaking add work without necessarily improving the result.
Should You Put a Bag of Vinegar Around the Faucet Head?
The plastic-bag method is popular because it cleans without removing the aerator, but it has a larger exposure area than soaking a removable insert. The bag can hold vinegar against the faucet finish, seams, spray selector, or pull-down head for an extended time.
For that reason, it is not the best default method. Use it only when your faucet manufacturer says the finish and assembly can tolerate that treatment. If the aerator is removable, cleaning the removable part usually gives you more control and keeps the solution away from the rest of the faucet.
What if the Aerator Is Stuck?
Do not immediately reach for locking pliers. First confirm whether the aerator actually unscrews and whether it uses an aerator key. Recessed “cache” aerators can look as if they are part of the spout even though they are removable with a small plastic key.
If mineral buildup is binding an exposed threaded aerator, use the manufacturer’s approved descaling approach. Delta’s support guidance for one Foundations kitchen faucet, for example, recommends wrapping the spout with a towel soaked in a 50/50 white-vinegar-and-water solution to loosen mineral deposits before turning the aerator counterclockwise.
If you must use a tool, protect the finish and use only the amount of force specified by the manufacturer. A replacement aerator is cheaper than a damaged faucet spout.
When Should You Replace Instead of Clean?
Cleaning removes deposits and debris; it cannot repair damaged components. Replace the aerator or insert if the screen is torn, the plastic flow element is cracked, the washer is permanently deformed, the housing threads are stripped, or the stream remains distorted after the part is clean and correctly assembled.
Replacement also makes sense when the aerator has been damaged by previous attempts to pry out a screen. On some Delta aerators, the company specifically advises against removing the inner screen because it can be damaged and may not reinstall correctly.
How to Protect the Faucet Finish While Cleaning
The outside finish and the internal aerator should be treated as separate cleaning surfaces. For the outside, use the gentlest method that works. Delta recommends a damp non-abrasive sponge or soft cloth for routine care and says to rinse thoroughly after using diluted vinegar on hard-water stains. Pfister similarly recommends starting with warm water on a soft cloth, moving to a 50/50 vinegar-and-water solution if needed, and avoiding acids or solvents that can damage the finish.
Do not scrub with steel wool or abrasive pads.
Do not leave strong bathroom cleaners sitting on the faucet.
Do not mix vinegar with bleach or other cleaning chemicals.
Dry the faucet with a soft cloth to reduce new water spots.
How Often Should You Clean a Faucet Head?
There is no fixed interval that applies to every home. Hard water creates mineral buildup faster than soft water, while plumbing work can introduce sediment unexpectedly. A practical approach is to clean when the spray pattern becomes uneven, flow drops noticeably, or visible scale appears.
For households with hard water, a quick wipe of easy-clean nozzles and drying the faucet after use can reduce the need for deeper descaling. If the same aerator clogs repeatedly with grit rather than mineral scale, frequent cleaning may be a symptom of sediment upstream rather than a faucet-maintenance issue.
Bottom Line
The best way to clean a sink faucet head is to match the method to the problem. Wipe flexible nozzles for light surface scale, remove and rinse an aerator for loose sediment, use a manufacturer-approved diluted vinegar soak for mineral deposits, and replace damaged components rather than cleaning them more aggressively.
When you are deciding between methods, favor the option with the least disassembly and chemical exposure that can solve the specific blockage. That approach is easier on faucet finishes, reduces the chance of losing tiny parts, and makes it simpler to tell whether the aerator was actually the cause of poor flow.