Home
» How to
»
How to clone a hard drive to an SSD with AOMEI Backupper
How to clone a hard drive to an SSD with AOMEI Backupper
Video How to clone a hard drive to an SSD with AOMEI Backupper
More and more people are using SSDs (solid-state drives) - Solid state drives replace conventional hard drives (HDDs), but cloning the hard drive to SSDs can be difficult because SSDs are always smaller than HDD. However, don't worry too much because AOMEI Backupper Standard is available. The software will help you do exactly that without reinstalling the operating system and applications.
Compared to HDD, SSD has many advantages. Specifically, it is durable, fast, low energy, lightweight, cool, quieter. Therefore, it is a great choice to clone the hard drive to an SSD when you want to achieve better performance.
If you use the right tools, this process will be easy and you don't need to worry about copy boot errors. In addition, at present, SSD prices are relatively cheap, and types are still abundant. In addition to the regular SATA SSD, you can choose CI-Express, mSATA, M.2 SSD.
Why use AOMEI Backupper?
A free backup and restore software, AOMEI Backupper Standard contains everything you need. It can clone the hard drive to an SSD, even reducing its capacity. Moreover, it also has the ability to edit partitions on the target drive. You do not need to worry about the problem of SSD unsuitable HDD.
With the Align option - Align partition to optimize SSD, afraid of SSD speed of duplication is too slow to completely occur. Besides, the software also integrates VSS (Volume Shadow Copy Service) technology to ensure its operation does not interrupt your work.
AOMEI Backupper will check whether the space on the destination disk is sufficient before starting the task. If not, you can tidy up the HDD by moving data to another storage device or using a cloned system to just move the operating system (OS) to SSD.
How to backup HDD to SSD
You can install the SSD in the second drive bay or connect it to a USB-to-SATA adapter, as long as the space on the SSD contains enough data on the source disk, you can follow the kernel steps. hard drive copy to SSD below:
1. After downloading and installing the program on your computer, connect the new SSD.
2. Run AOMEI Backupper and go to " Clone " -> " Disk Clone " option.
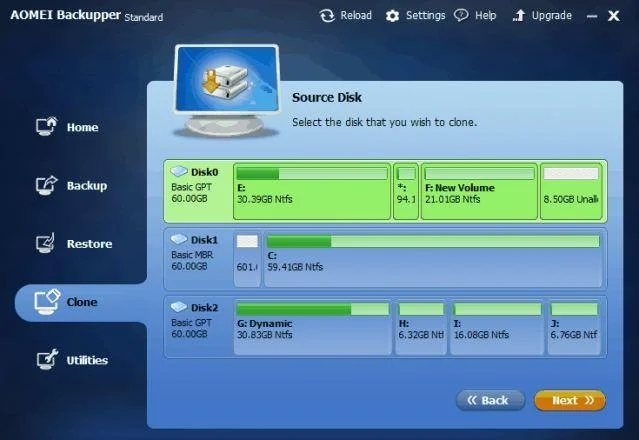
3. The entire hard drive identifier computer will show up in this program, except for dynamic disks because it does not support cloning the entire disk. Select the original hard drive as the source you want to clone, then click " Next ".
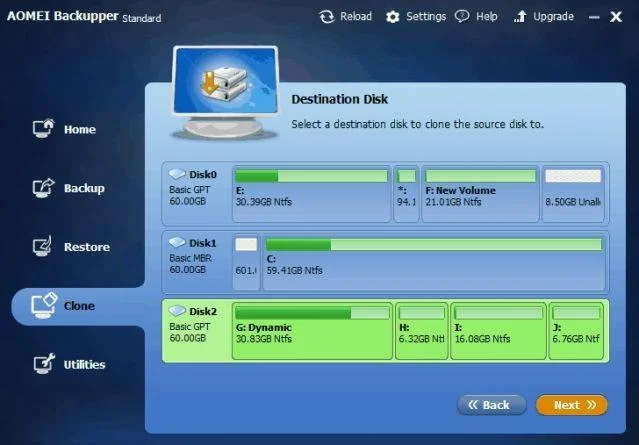
4. Select the destination SSD drive, click " Next ". Note, all data on the target disk will be deleted before copying.
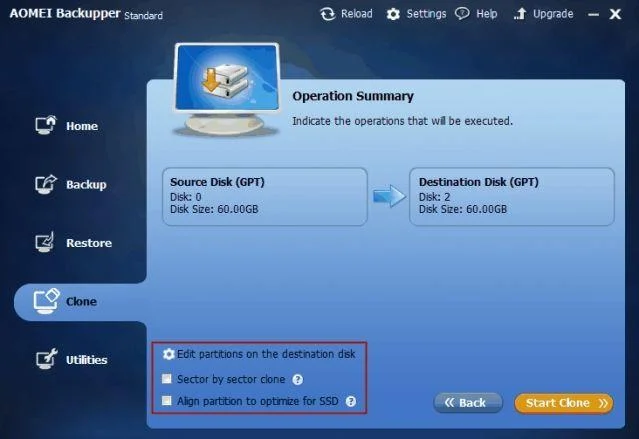
5. There are 3 options on the final screen you need to pay attention to:
Edit the partition on the target disk: You can choose not to copy the partition size, partition the whole disk (recommended), or edit the size itself.
Region mirroring: Copy the entire disk partition to the target disk whether or not it is in use. Do not select this option unless the SSD size is equal to or larger than the source disk.
Align partition to optimize SSD: Use this option to optimize SSD performance.
6. Click " Start Clone " to start backing up the hard drive to SSD. You can check this process while it is running.
Another benefit of using the free hard drive backup software AOMEI Backupper
In addition to cloning disks to SSD, AOMEI Backupper Standard also has the following features:
Backup and restore systems, disks, partitions, files.
Restore system or disk copy to different hardware.
A variety of backup forms can be scheduled, including: Full, incremental, differential, automatic.
Back up by command or batch script.
Create bootable media to prevent system errors.
Synchronize files, folders automatically according to schedule.
Overall, AOMEI Backupper is an ideal backup, restore system data , drive. It's free and easy to use. Hope the article is helpful to you. If there is a better solution, do not hesitate to share with us!