How to enable WebGL on a computer browser

Video How to enable WebGL on a computer browser

WebGL is a hardware acceleration feature of 3D graphics for Internet browsers on computers. Thanks to this feature, the graphic images in the website the user is looking at will become much more beautiful, smoother and sharper. However, many people often overlook this feature or accidentally turn it off without knowing it, which makes the display of images worse, and sometimes even some error conditions.

Download the latest free Chrome

Download the free Coc Coc browser here

Download Firefox for free here

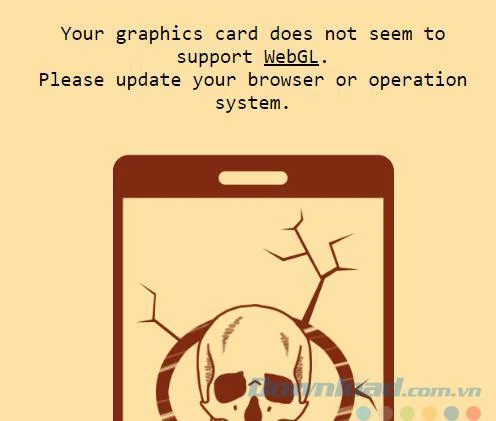
And the error "Your graphics card does not seem to support WebGL" is one of the common cases that images cannot be displayed.

How to enable WebGL on a computer browser

The following article of Download.com.vn will help you perform two processes:

  • Check WebGL on the computer (see if it is enabled or not?).
  • If the browser is not enabled or supports WebGL, what should I do?

Check WebGL on web browser

This method is very simple and does not require users to install software or access complex systems. Just:

  • Copy down this address .
  • Paste into the address bar of the browser to check the status of WebGL and then Enter.

If the results appear as "Your browser supports WebGL" (or see a spinning prism), it means that your browser has WebGL enabled.

How to enable WebGL on a computer browser

And if shown as below:

How to enable WebGL on a computer browser

This means that WebGL is disabled, turned off, and needs to be restarted.

Turn on WebGL in Chrome browser

Step 1: From the main interface, you click the three dashes icon , select down Settings - Settings .


How to enable WebGL on a computer browser

Step 2: Click on Show advanced settings - Show advanced settings ...

How to enable WebGL on a computer browser

Step 3: Scroll down to the bottom, find the System - System section and click Use hardware acceleration mode when available - Use hardware acceleration when available.

How to enable WebGL on a computer browser

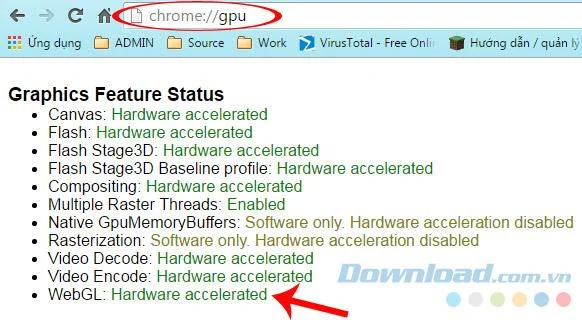
Step 4: Return to the main interface of Chrome, enter the keyword " chrome: // gpu " in the address bar and press Enter . A list like the one below appears. Look for the Graphics Feature Status and look for the WebGL in it.

Usually in this section, there will only be 3 corresponding results:

  • Hardware accelerated.
  • Software only, hardware acceleration unavailable.
  • Unavailable.

How to enable WebGL on a computer browser

If the display is not WebGL: Hardware accelerated , you can do one of the following:

Method 1: Open Chrome, type Chrome: // flags in the address bar and then Enter .

  • Find the section Override software rendering list .
  • Click Enable to enable this feature.
  • Restart the browser.

How to enable WebGL on a computer browser

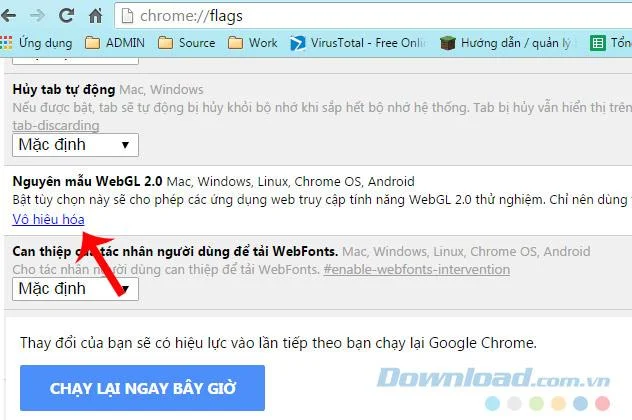
Method 2 : Type " chrome: // flags " in the address bar and then Enter . Then choose to go to WebGL Prototype (you can change the language for the browser to search for this item).

  • Toggle off, disable.
  • Restart the browser.

How to enable WebGL on a computer browser

Disable WebGL Prototype and select "Rerun now" to save changes

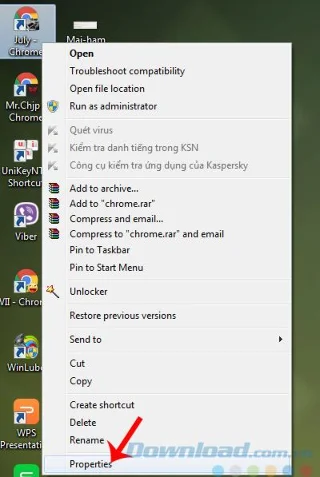
Method 3: Select the right icon Chrome browser from outside the computer screen, in the Properties .

How to enable WebGL on a computer browser

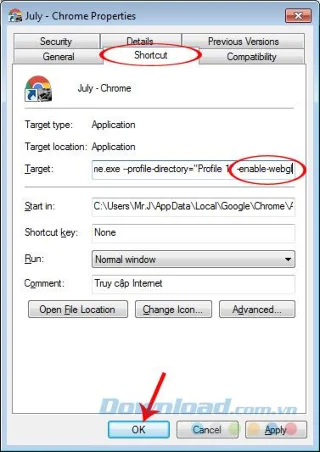
Chrome Properties appears, click Shortcut . In the Target box , add a space at the end of the path and enter -enable-webgl at the end and click OK below.

After this operation also restart the browser to save changes.

How to enable WebGL on a computer browser

Activate WebGL in Firefox

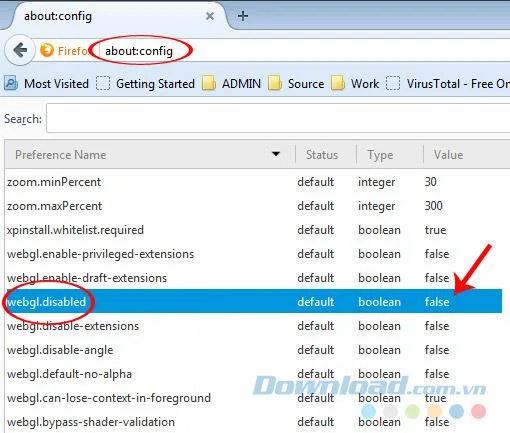
Step 1: Click the left mouse button in the address bar of the browser, type " about: config " into the then Enter . In the list below, you search webgl.disabled (can enter the search box - Search to find faster.

Check and make sure that the value (Value) for this item is False .

How to enable WebGL on a computer browser

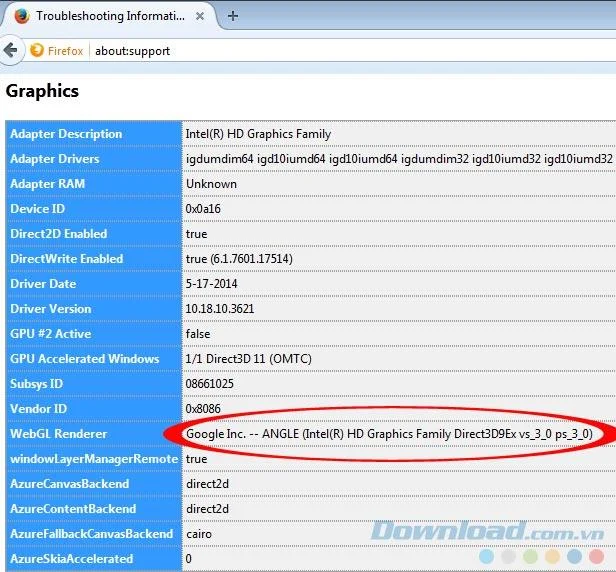
Step 2: Continue typing " about: support ", Enter and check the WebGL Renderer section in Graphics .

If it's an NVIDIA graphics card or HD Graphics ... that's okay. If not (maybe "Blocked for your graphics card because of unresolved driver issues" or "Blocked for your graphics driver version" then we will need to take the next step.

How to enable WebGL on a computer browser

Check out the WebGL Renderer section

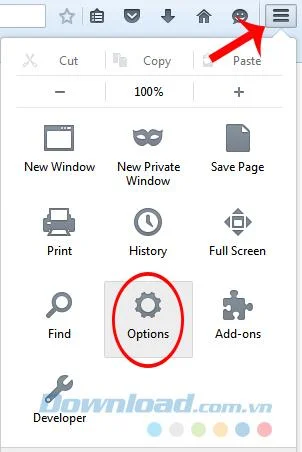
Access the three dash icon from the main Firefox interface, select Options .

How to enable WebGL on a computer browser

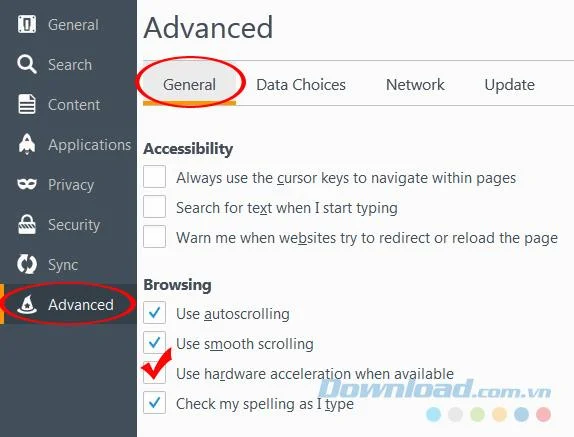
Click on Advanced / General . Here, tick the " Use hardware acceleration when available checkbox".

How to enable WebGL on a computer browser

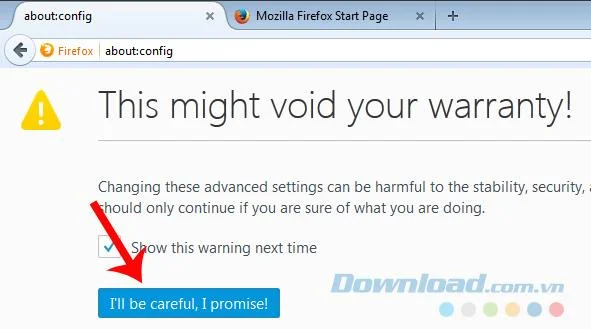
No need to restart the browser, you close the options window and enter about: config in the address bar, Enter .

How to enable WebGL on a computer browser

Choose I'll be careful, I promise! to continue

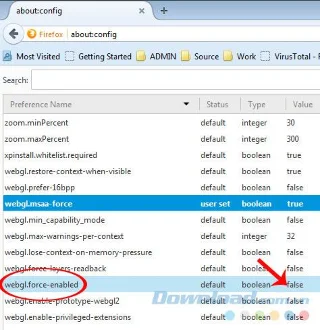
Find the webgl.force-enabled item and change its value to True .

How to enable WebGL on a computer browser

If this doesn't work, you can:

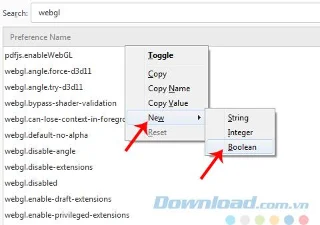
  • Right-click any empty area of ​​the list that appears.
  • Select New / Boolean.

How to enable WebGL on a computer browser

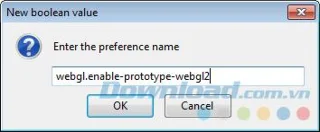
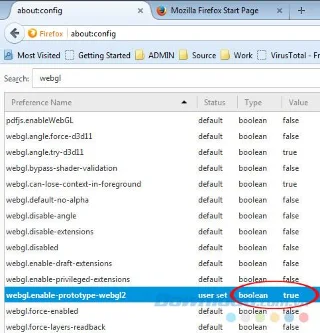
Name this item " webgl.enable-prototype-webgl2" then OK .

How to enable WebGL on a computer browser

Finally, convert the value of this newly created item to True .

How to enable WebGL on a computer browser

The article above has just shown you how to check and enable WebGL on computer browsers. Hopefully the article will be helpful and help you handle the errors related to this feature in the use of the web browser.

I wish you successful implementation!

Leave a Comment

Keep Text Visible When the Collabora Mobile Keyboard Opens

Keep Text Visible When the Collabora Mobile Keyboard Opens

Troubleshoot a mobile browser keyboard covering text in Collabora Online, with quick workarounds and separate checks for browsers, embedded WebViews, and host pages.

Stop Unwanted Printing and Downloads in ONLYOFFICE

Stop Unwanted Printing and Downloads in ONLYOFFICE

Set print and download limits for ONLYOFFICE links, room members, or Docs API sessions, then verify the restrictions from a recipient account.

Schedule Reliable Backups for ONLYOFFICE Workspace

Schedule Reliable Backups for ONLYOFFICE Workspace

Set a backup destination, schedule, Mail coverage, and retention limit in ONLYOFFICE Workspace, then verify the archive is ready to restore.

Deploy ONLYOFFICE Docs Enterprise with Its Official Compose File

Deploy ONLYOFFICE Docs Enterprise with Its Official Compose File

Start the Enterprise Docker Compose stack, persist its license and data, configure JWT safely, and confirm the editors are ready to integrate.

Clean Spreadsheet Text with a Reusable ONLYOFFICE Macro

Clean Spreadsheet Text with a Reusable ONLYOFFICE Macro

Use an ONLYOFFICE JavaScript macro to remove nonprinting characters and trim extra spaces from a defined spreadsheet range, with a safe review workflow.

Sync Active Directory Users with ONLYOFFICE DocSpace via LDAP

Sync Active Directory Users with ONLYOFFICE DocSpace via LDAP

Connect ONLYOFFICE DocSpace to Active Directory or OpenLDAP, import users and groups safely, map account fields, and schedule reliable synchronization.

Change ONLYOFFICE Workspace’s Default Storage Location

Change ONLYOFFICE Workspace’s Default Storage Location

Move portal data from Disk Default to a supported cloud storage provider, or relocate Docker data safely by changing its host volume mapping.

Completely Remove ONLYOFFICE Document Server from Linux

Completely Remove ONLYOFFICE Document Server from Linux

Identify whether Document Server uses a Linux package or Docker, remove only its components, and check remaining data without deleting shared services by mistake.

Stop ONLYOFFICE Co-Editing Lag by Finding the Bottleneck

Stop ONLYOFFICE Co-Editing Lag by Finding the Bottleneck

Trace slow collaborative editing to Docker resource pressure, proxy connections, or document load, then choose the fix that matches your measurements.

Add Fonts to ONLYOFFICE Document Server: Docker vs Linux

Add Fonts to ONLYOFFICE Document Server: Docker vs Linux

Install custom fonts in ONLYOFFICE Document Server, compare persistent Docker mounts with direct copies, rebuild the font list, and verify the result.