Note: Installing a DVB-S2 probe antenna is complicated, requiring certain technical expertise. Therefore, you should not install the home antenna yourself, but ask a technician to install it.
Prepare
1. Satellite pan receiver components
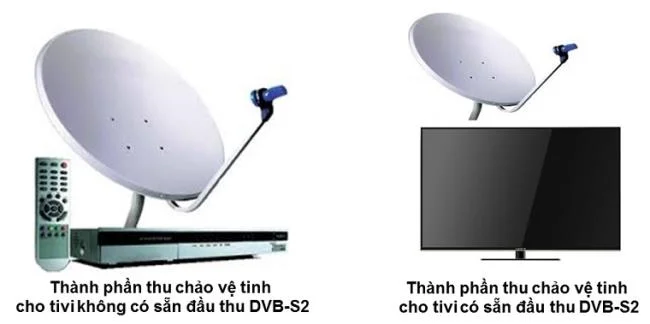
If your TV does not have a DVB-S2 receiver available, you need to prepare:
- KU pan antenna set (60cm)
- The first collection of LNB
- Signal wire 5C
Free signal receiver and decoder
Ingredients satellite pan receiver
Meanwhile, with Skyworth TV pre-equipped DVB-S2 receiver, you do not need to equip the receiver, just prepare as follows:
- KU pan antenna set (60cm)
- The first collection of LNB
- Signal wire 5C
- Skyworth TV
2. Equipment and tools required
Tools required: screwdrivers, wrench, hammer, pliers pliers, compass, screws, cables, concrete drill, RG6 coax cable, connector, receiver pan, TV receiver number of satellites, accessories for installing receiver pan, LNB (Low Noise Block)
Prepare all necessary tools
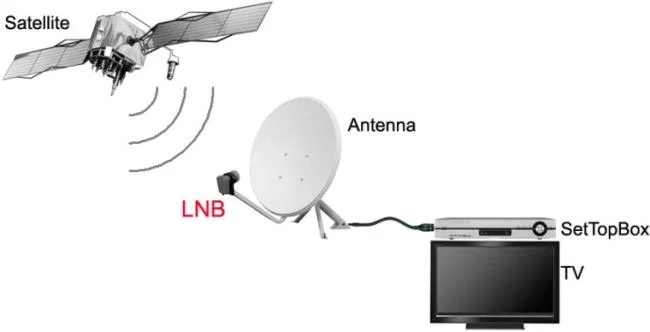
Parabolic antenna (pan antenna): is a device with parabolic shape used to receive television programs from satellites. With DTH the parabolic antenna is the Ku-band type with a small diameter (60cm), usually in elliptical form. + LNB (Low noise block): is a low noise amplifier mounted on parabolic antenna that converts frequency from Ku band frequency (10.7 ¸ 12GHz) to IF frequency range (950 ¸ 2150MHz) that decoder can obtain and amplify the signal power obtained from the antenna up.
Low Noise Block (LNS)
+ Connection auxiliary equipment: including RG6 coax cable and 02 F5 jacks for a set of equipment.
Install the receiver antenna
Step 1: Install the antenna
You can install the antennas on any plane (horizontal, vertical or inclined) that satisfy the following conditions:
Solid location (avoid installing the collection pan on the tile roof)
- The antenna is not shielded, ensuring good reception (the antenna shield angle must not exceed the elevation value - ideal case the view from the installation position of the receiver pan to the Vinasat satellite is not covered by any obstacle)
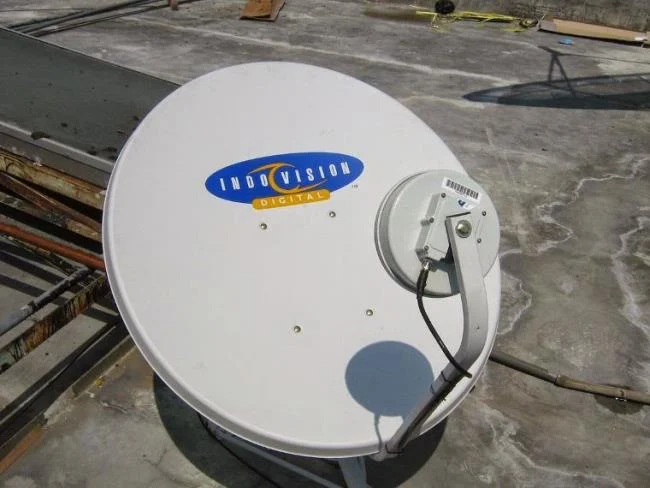
Install the pan antenna on a sturdy surface
- Not affecting the aesthetics, ensuring labor safety when installing (away from high voltage power lines).
Note:
- Do not rotate the antenna in the direction where many people pass.
- Can be installed on the wall.
Step 2: Install the stand and other components
+ The base (which is the antenna supporting shaft) must be mounted vertically, drilled firmly on the plane to define the antenna.
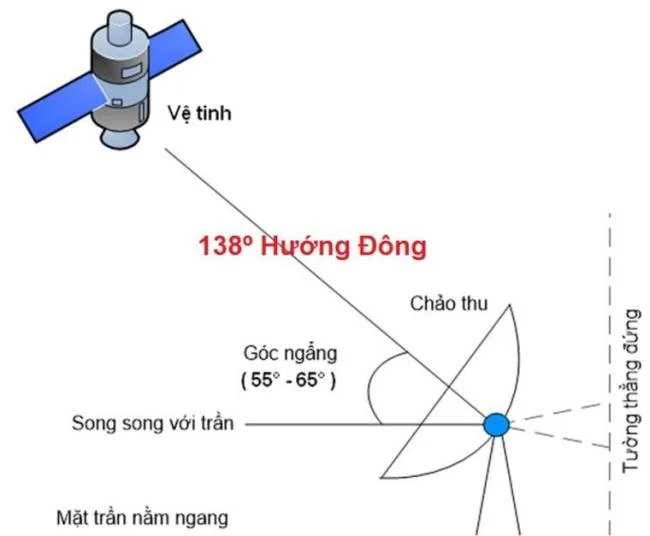
+ The components of the antenna (except the base) must be completely assembled according to the diagram of the attached catalog. Step 3: Insert the antenna into the stand. After completing the antenna installation, you rotate the pan antenna to the direction of 138 degrees East, with an angle of elevation from 55 to 56 degrees. You must rotate the antenna in the correct direction of the satellite to be able to receive quality satellite TV channels.
Rotate the antenna in the correct direction to get a good signal
Note:
+ The screws related to the rotation angle and bearing angle should not be screwed too tight. It is recommended to have the right opening for easy rotation.
+ We have to make sure that the pan has received a good signal, then proceed to install the wire to the LNB terminal on the TV.
Finds the DVB-S2 signal
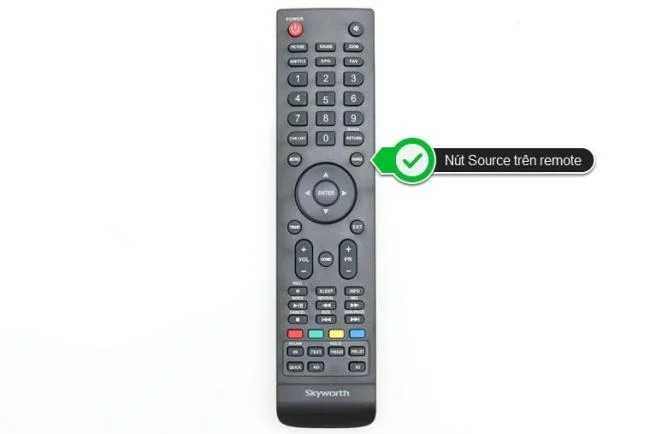
Step 1: Select DVBS signal by pressing the Source button on the remote and select DVBS
Source button on the remote
Step 2: In DVBS section, scroll to Channel. In the Channels view, select Auto Search and press Enter on the remote
Step 3: Select Open in DVBS
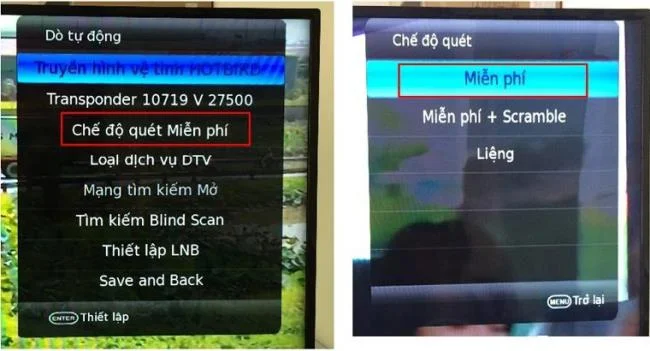
Step 4: In the Auto Detect section, choose Free Mode. Then in the Scan Mode section, choose Free.
Select Free Mode and then select Free
Step 5: Then, go back to Auto Search, choose DTV service type, then, under Service type, choose DTV
Step 6: You continue to return to the Auto Detect. To choose a scan mode, click Search Blind Scan, then select Blind Scan
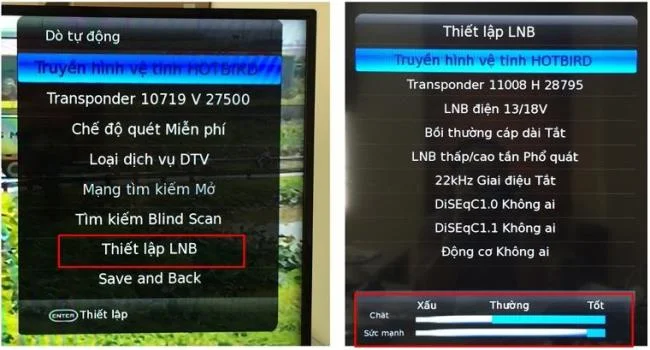
Step 7: You go back to Automatic detection to set up LNB, click on setup LNB then select HOTBIRD Satellite TV. After that, you return to Auto Tuning and click Save and Back to return to Channel
Select Set up LNB, then select HOTBIRD Satellite TV
Step 8: Click Search in the Channels section to let the TV search for channels ..
Note: The search will automatically proceed twice.
Activity 1: Find the bands containing the channels.
2nd time: Update the channels found.
If the signal is good, the TV will receive from 100 channels to 150 free channels.
Above are instructions to install channel tuner antenna and steps to tune DVB-S2 on Skyworth TV. Currently in the products being sold at WebTech360, 32-inch 32-inch Skyworth Led TV is a Skyworth television with built-in DVB-S2.
If you have any questions or share anything, please comment below to get the fastest response.