Home
» How to
»
How to Remove a Kitchen Sink Drain Without Damaging the Sink
How to Remove a Kitchen Sink Drain Without Damaging the Sink
Short answer: To remove a standard kitchen sink drain, place a bucket under the plumbing, disconnect the P-trap or tailpiece, loosen the large locknut on the underside of the sink, remove the washer and gasket, break the old seal, and lift the strainer body out from above. That sequence applies to the common basket-strainer assembly. If the drain is part of a garbage disposal, the job is different: switch off power at the breaker, remove the disposer, then take apart the mounting hardware and sink flange.
The key is to identify which assembly you have before reaching for a wrench. A standard basket strainer is usually held by a threaded locknut under the sink. A disposer flange typically uses a mounting ring, screws, and a snap ring instead. Manufacturer diagrams make this distinction clear: KOHLER shows a conventional strainer body with gasket, paper washer, and nut, while InSinkErator uses a separate mounting assembly for its disposers. See the KOHLER strainer installation guide and InSinkErator replacement-disposal instructions.
First, identify the drain you are actually removing
Drain type
What you usually see underneath
Removal approach
Standard basket strainer
Threaded metal body, gasket or washers, and one large locknut
Disconnect the drain pipe, loosen the locknut, remove the gasket/washer stack, then push the strainer up
Garbage-disposal flange
Disposer body attached to a mounting ring with screws and a snap ring
Turn off power, remove the disposer, loosen the mounting screws, remove the snap ring and hardware, then push the flange up
Specialty or integrated drain
Parts that do not match either arrangement
Find the sink or drain model and follow its manufacturer instructions rather than forcing the assembly
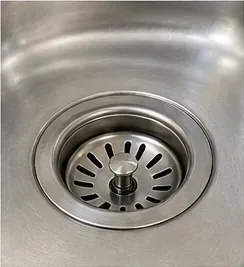
If you see a basket and a large threaded retaining nut beneath the sink, the main procedure below is likely a match. If you see a disposer motor, skip to the garbage-disposal section before doing anything else.
A typical basket-strainer drain viewed from above. Confirm the drain type before loosening any plumbing below the sink.
Tools that make the job easier
Bucket or shallow pan and absorbent towels
Channel-lock pliers, slip-joint pliers, or an adjustable wrench for slip nuts
Pipe wrench or large pliers sized for the strainer locknut
Flat putty knife or plastic scraper for old sealant
Work gloves and eye protection
Flashlight or work light
You do not normally need to shut off the home's water supply just to remove a drain assembly because the drain is not a pressurized supply line. However, do not use the faucet while the trap is disconnected. If you must move or disconnect faucet supply lines to gain access, shut off the appropriate supply valves first.
How to remove a standard kitchen sink drain
1. Clear the cabinet and put a bucket under the trap
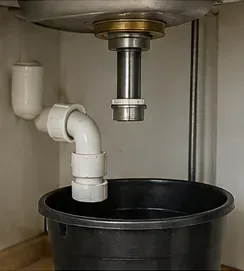
Remove cleaners, bins, and anything else that limits access. Put a bucket directly below the P-trap and spread a towel underneath. Water normally remains in the trap even when the sink looks empty. KOHLER's kitchen-sink installation guidance specifically recommends placing a bucket under the P-trap before disconnecting plumbing; see its kitchen sink installation guide.
Place a bucket below the trap and tailpiece before opening any slip-joint connection so residual water is contained.
2. Disconnect the P-trap or tailpiece
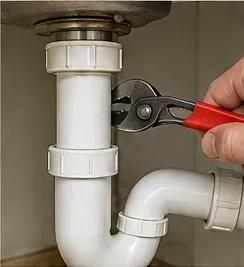
Loosen the slip nuts that connect the trap to the vertical tailpiece and wall-side drain. Many plastic slip nuts can be loosened by hand; use pliers only when necessary and avoid crushing or distorting plastic fittings. Lower the trap into the bucket and let it drain.
If the tailpiece is attached directly to the strainer with a separate nut, remove that connection too. Take a quick photo before disassembly if several washers or fittings are stacked together; it makes reassembly much easier.
Loosen the trap and tailpiece connections without squeezing plastic nuts harder than necessary.
3. Hold the strainer steady and loosen the large locknut
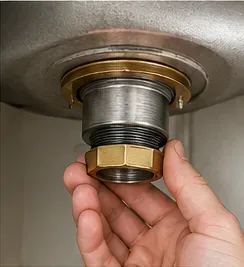
From below the sink, locate the large locknut immediately under the drain opening. On a conventional strainer, the stack usually includes a rubber gasket and a paper or friction washer between the sink and the locknut. The KOHLER installation drawing shows this arrangement and specifies a pipe wrench for tightening the nut during installation; removal is the reverse sequence.
If the entire strainer spins instead of the nut loosening, have a helper stabilize the upper strainer body. Do not pry aggressively against the sink surface, especially on porcelain, composite, or enameled sinks.
The large retaining nut is the main fastener on many standard basket strainers. Remove it from below the sink.
4. Remove the washer and gasket
After the locknut comes off, slide the friction or paper washer and rubber gasket down the threaded body. Old gaskets can stick to the underside of the sink. Peel them away carefully rather than driving a screwdriver between the gasket and sink.
If the hardware is heavily corroded, distorted, or impossible to grip safely, stop before damaging the sink. Replacement strainers are inexpensive compared with repairing a chipped sink or cracked countertop.
5. Break the old plumber's putty or sealant bond
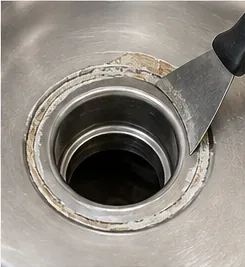
The upper flange may still be firmly attached even after all hardware is removed. Work a putty knife or plastic scraper around the edge to separate old putty or sealant. Keep the tool nearly flat so it does not gouge the sink finish.
Do not assume every drain was installed with plumber's putty. Manufacturers may specify silicone or another sealant depending on the drain and sink material. Oatey notes that putty compatibility depends on the component and sink material, and that some porous surfaces can stain; see the manufacturer's basket-strainer sealant guidance.
Separate old putty or sealant gently. Keep the scraper shallow to reduce the chance of scratching the sink.
6. Push the strainer body upward and lift it out
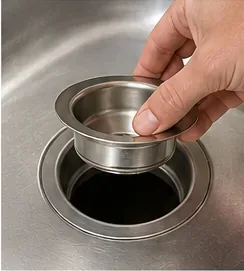
Once the lower hardware and seal are free, push the threaded body upward from beneath the sink. From above, lift the flange and strainer body out of the drain opening. A stubborn flange may need gentle rocking, but it should not require violent force once the retaining hardware is gone.
Lift the released strainer body from above after the locknut, washer, gasket, and old seal have been freed.
7. Inspect the removed parts before deciding what to reuse
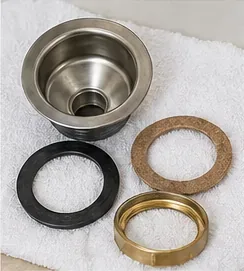
Lay out the strainer body, locknut, gasket, and friction washer. Reusing a sound metal body may be reasonable if you removed it only to reseal a leak, but flattened, cracked, brittle, or swollen gaskets should not be trusted. If corrosion has damaged the threads or locknut, replace the assembly rather than forcing it back together.
Inspect every part after removal. Damaged gaskets, distorted washers, or corroded threads are good reasons to install a new assembly.
8. Clean the sink opening completely
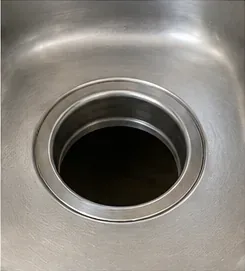
Scrape away the remaining putty or sealant, then wipe the sink surface clean and dry. The drain opening should be smooth and free of old material before a new seal is made. Oatey's putty instructions likewise call for cleaning debris and drying the surface before installation; see Oatey's plumber's putty instructions.
The finished opening should be clean, smooth, and free of old sealing material before a replacement drain is installed.
What changes if the sink has a garbage disposal?
Do not follow the basket-strainer locknut procedure on a disposal flange. First turn off electrical power at the breaker or fuse box. InSinkErator's official replacement procedure then has the user disconnect the plumbing and electrical connection, remove the disposer from the sink mounting assembly, loosen the three mounting screws, pry off the snap ring, remove the mounting hardware, and finally push the old sink flange upward through the drain opening.
The exact mounting system can vary by brand and model, so use the disposer manufacturer's manual if the hardware differs. The key distinction is that a disposal flange is held by a mounting assembly rather than the single basket-strainer locknut described above. InSinkErator's current procedure is available in its replacement installation instructions.
What if the locknut will not move?
First make sure you are turning the actual retaining nut, not a tailpiece nut. Clean enough grime from the threads to see the joint, use a tool that fully grips the nut, and stabilize the strainer from above. Avoid escalating immediately to cutting tools or heat inside a crowded sink cabinet; those methods can damage the sink, countertop, wiring, cabinets, or nearby plastic plumbing.
If the nut is severely corroded, the threaded body turns with every attempt, or the sink material flexes or chips, a plumber is the safer next step. This is especially true for stone, fireclay, porcelain, and older enameled sinks where a small tool slip can become an expensive repair.
Common mistakes to avoid
Skipping drain identification: a disposal mount and a basket-strainer locknut are not the same system.
Forgetting the bucket: the P-trap retains water after the sink has drained.
Using too much force on plastic slip nuts: they can deform or crack.
Prying against the sink finish: use a shallow scraping angle and patient pressure to release old sealant.
Reusing a failed gasket automatically: if the original reason for removal was a leak, the gasket or seal may already be compromised.
Using the wrong sealant during reinstallation: check both the drain and sink manufacturer's instructions, particularly for porous or plastic materials.
When this DIY method is a good fit
This job is usually suitable for a homeowner when the sink has a conventional basket strainer, the trap connections are accessible, the locknut is not badly corroded, and there is no electrical disposer attached. For example, replacing a leaking stainless-steel strainer in a stainless-steel sink with exposed PVC trap plumbing is normally straightforward.
It becomes less attractive as a DIY project when access is extremely tight, the drain is integrated into a proprietary sink system, the cabinet contains hardwired disposal equipment, or the sink itself is fragile or expensive. In those cases, identifying the exact model and consulting its instructions is more important than following a generic sequence.
Before installing the replacement
Check the replacement strainer's instructions rather than simply duplicating the old seal. KOHLER's strainer guide calls for plumber's putty or another approved sealant under the rim and shows the gasket, paper washer, and nut installed from underneath. Oatey also cautions that ordinary plumber's putty is not appropriate for every sink or drain material. Follow the component manufacturer's sealant recommendation, tighten the new hardware evenly, reconnect the trap, and test the completed drain with water while watching every joint from below.
The removal itself is simple once the assembly is identified: disconnect the drain plumbing, release the correct retaining hardware, break the seal, lift the drain out, and clean the opening. The biggest errors usually come from treating every sink drain as if it uses the same mounting system.