Release Ubuntu’s APT Lock Safely and Finish the Update
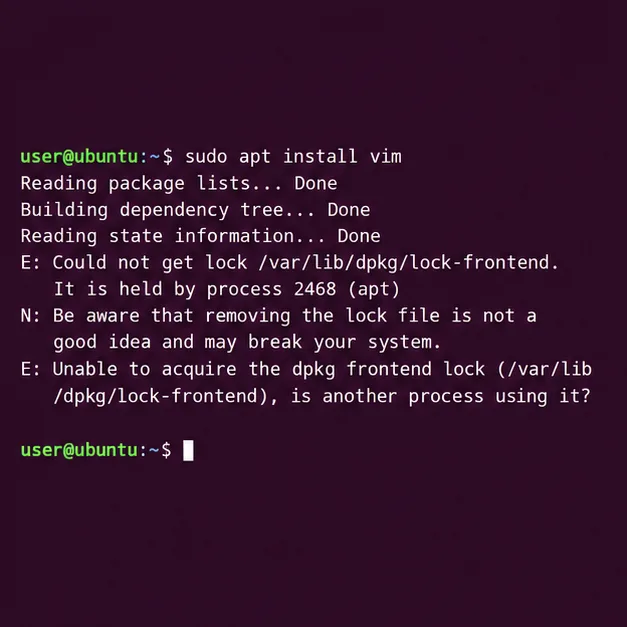
Find which process owns Ubuntu’s dpkg frontend lock, let package work finish, and repair interrupted installations without deleting lock files.
Illustrative example: Maya uses an Ubuntu desktop with a Btrfs root filesystem and wants a restore point before routine updates. This example is hypothetical; it explains a setup path, not a real test or user result. The instructions use Timeshift because its upstream documentation describes Btrfs support and scheduled snapshot levels. Its Btrfs mode has a specific layout requirement, so confirm compatibility before enabling it.
A Btrfs snapshot is a point-in-time view of a subvolume. Copy-on-write means the snapshot initially shares unchanged data blocks with its source, while later changes are stored separately. This can make snapshots quick and space-efficient, but the shared blocks remain on the same filesystem. A disk failure, filesystem damage, theft, or accidental repartitioning can take out both the current system and its snapshots. Keep a separate backup of documents and important files.
Timeshift focuses on system files and settings. Its documentation says user files in home directories are excluded by default. That is useful when rolling back system changes, but it means an automated Timeshift system snapshot should not be treated as a personal-file backup. Btrfs snapshots are also not recursive: a nested subvolume forms a boundary and its contents are not included in a snapshot of the parent.
Do not infer the filesystem from an installer choice or from the presence of Btrfs tools. Open Terminal and inspect the mounted root:
findmnt -no FSTYPE /
sudo btrfs subvolume list /
The first command should report btrfs. Review the second command for your system’s subvolume paths. Timeshift’s Btrfs mode requires an Ubuntu-style layout with @ for root and @home for home, though its documentation permits /home on a non-Btrfs partition. Other subvolume layouts are not supported by Timeshift Btrfs mode. If the root filesystem is ext4, or the required layout is missing, stop here: do not try to repair the layout by renaming or moving live subvolumes as part of this setup.
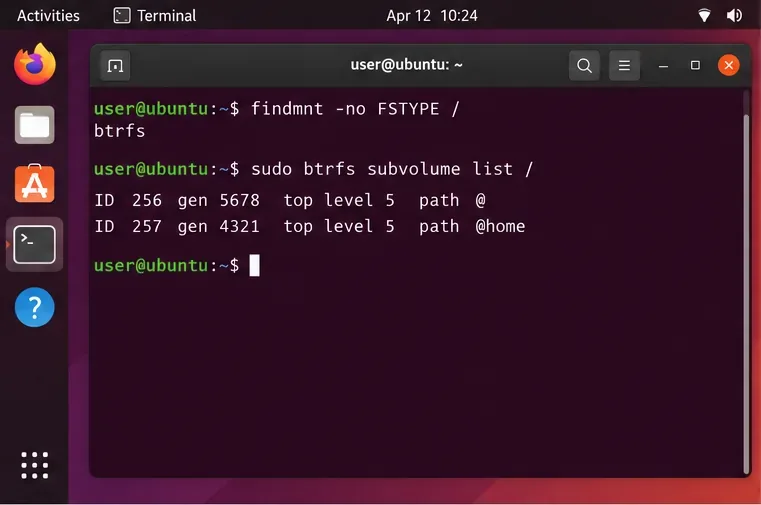
In Maya’s example, the commands show Btrfs and the expected subvolume names, so she can continue to check Timeshift compatibility. Your actual output may differ, and a matching name alone does not prove every detail of a custom disk layout is supported.
On Ubuntu, install the package from your configured Ubuntu repositories:
sudo apt update
sudo apt install timeshift
Launch Timeshift from the application overview and authenticate when prompted. In its first-run setup, choose BTRFS as the snapshot type only if the layout check passed. Review the detected snapshot locations carefully. If Timeshift reports an unsupported layout, cancel and investigate rather than selecting a different device at random. Keep snapshots on the same Btrfs filesystem as the source subvolume; a Btrfs snapshot cannot be placed on an unrelated filesystem as if it were an ordinary copy.
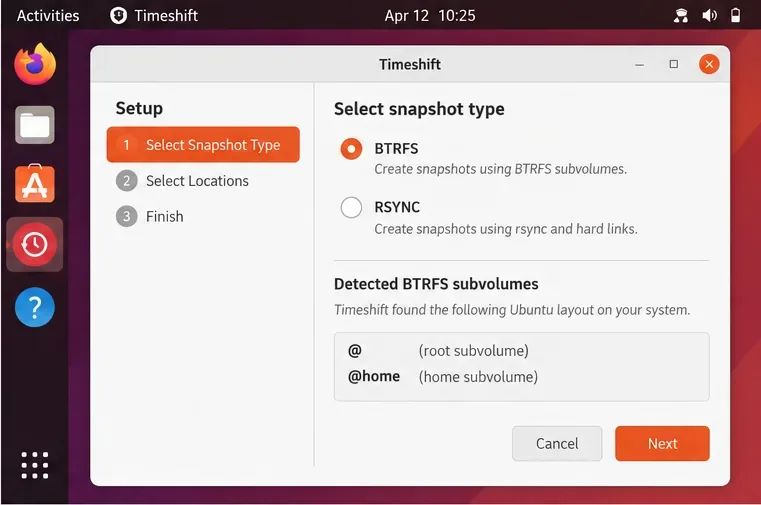
After setup, create one manual snapshot before scheduling. In the main window, select Create and wait for the snapshot to appear. This gives Maya an initial restore point and confirms the tool can create one with her layout. If creation fails, read the displayed error and check disk space and the layout before turning on automation.
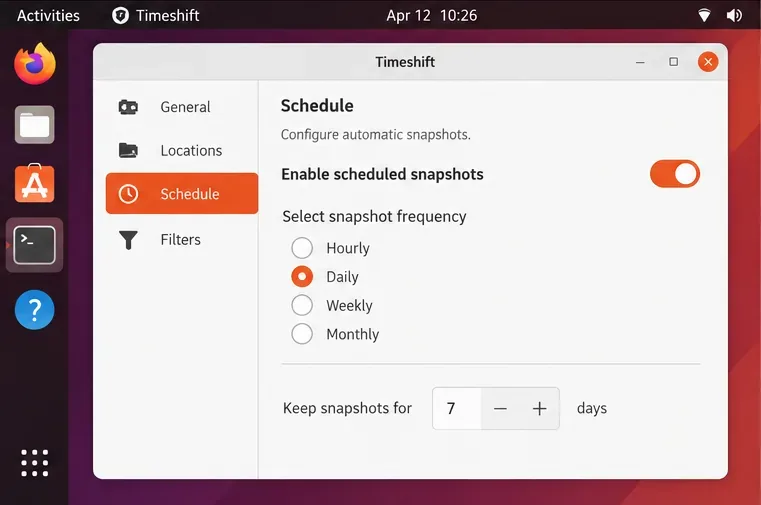
Open Settings, then the Schedule tab. Enable scheduled snapshots and select one or more levels, such as daily or weekly. Timeshift is designed to check periodically and create snapshots when a level is due; the computer does not have to be running at one exact clock time. A laptop that is shut down for days can still miss the protection window until it runs again.
Choose conservative retention counts at first. For example, Maya enables daily snapshots and keeps a small number while she checks how much space changes on her system. This is an example, not a universal setting. Snapshots share unchanged blocks, but later changes can consume space, and retention needs depend on workload and capacity. Avoid enabling every frequency with a large count on a nearly full root filesystem. Revisit the settings after observing normal disk use.
In Settings → Locations, verify that the selected snapshot device is the intended Btrfs filesystem. If you have multiple disks or partitions, identify them by filesystem and mount details rather than guessing from labels. Timeshift’s project recommends a non-system partition for best results in its general guidance, but Btrfs snapshots must remain on the same Btrfs filesystem as the source; an independent backup device should instead receive a separate backup copy.
Return to Timeshift’s main window and confirm that the manual snapshot is listed with a date and type. Keep Timeshift installed and check back after the next scheduled interval while the computer is running. The appearance of one manual snapshot proves creation worked; it does not by itself prove the automated schedule will keep running. Verify that scheduled snapshots appear over time and watch free space with Ubuntu’s disk usage tools.
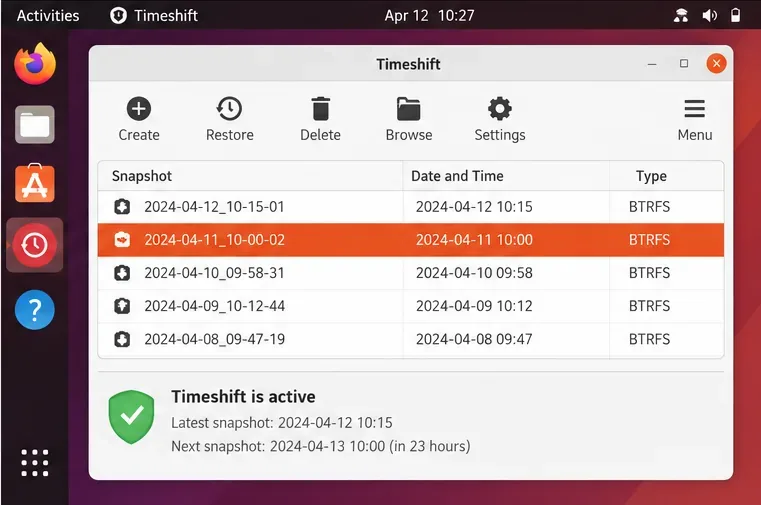
Before relying on rollback, learn the restore workflow and make sure you have a bootable Ubuntu USB available. Timeshift documents restoring a selected snapshot from its main window and using a live system if the installed system will not boot. A restore changes system state and may require rebooting; do not treat it as a harmless browse operation. Back up files that matter before any restore, and avoid testing a destructive rollback on the only copy of important data.
findmnt and the subvolume list. Timeshift Btrfs mode expects @ and @home; custom layouts need a tool and plan that explicitly support them.@ or @home can prevent Btrfs snapshot creation; do not move a swap file without understanding the system’s swap configuration.Ubuntu’s package version and Timeshift interface can change. The steps above describe the documented workflow and common interface labels; if your installed version uses different labels, consult its built-in help and the upstream project documentation before changing subvolumes or restore settings.
Find which process owns Ubuntu’s dpkg frontend lock, let package work finish, and repair interrupted installations without deleting lock files.
Set up scheduled Btrfs system snapshots on Ubuntu Desktop with Timeshift, verify the Ubuntu subvolume layout, choose retention, and understand what snapshots cannot protect.
Plan a safer Debian 12 to Testing migration: upgrade through Stable, back up, clean APT sources, simulate dependency changes, and verify what changed.
Diagnose Ubuntu Server emergency mode safely. Read boot logs, check root and fstab mounts, repair a failed unit, handle filesystem errors, and verify a clean reboot.
Set up a Debian 12 WireGuard VPN server for one remote client. Configure keys, IPv4 forwarding, nftables NAT, firewall access, and connection checks.
Harden a Debian 12 workstation with a careful CIS Benchmark workflow: select the right profile, patch safely, review services and access, configure nftables, and document evidence.
Diagnose MySQL OOM kills on Debian 12, check VPS memory limits, configure swap, and tune database memory and concurrency without promising a universal fix.
Learn how to create and test a Debian-derived OSTree desktop in a VM, including system-tree preparation, boot integration, deployment checks, and rollback.
Configure an SSHFS boot mount in Debian with SSH keys, fstab, and systemd automount. Includes reboot checks, permissions, timeouts, and troubleshooting.
A practical October 2026 Chicago and Illinois home-maintenance checklist covering first frost, heating safety, gutters, leaves, pipes, renters, and winter-storm preparation.